I was standing in my kitchen, a half‑baked lemon tart crumbling in my hands, when my roommate shouted, “If you can’t fix that, you’ll never survive a summer barbecue!” That was the moment I decided to create something that could turn any lemon‑scented disaster into a triumph. I grabbed the last lemon from the fridge, rummaged through the pantry, and set to work on a version that would make even the most skeptical sweet‑tooth grin from ear to ear. The result? A bar that’s crisp on the edges, buttery in the middle, and topped with a lemony glaze that sings louder than a choir of angels on a Sunday morning. I dare you to taste this and not go back for seconds.
Picture this: the oven door swings open, a warm wave of citrus and caramelized butter rolls out, and the whole kitchen smells like a summer garden after a rainstorm. The golden crust cracks just enough to reveal a glossy, slightly wobbly lemon layer that catches the light like a polished gemstone. When you bite into it, the first thing you notice is the buttery snap, followed by a bright, tangy burst that makes your tongue do a little happy dance. The texture is a perfect balance—soft yet firm, sweet but not cloying, and just enough zing to keep you reaching for more.
Most lemon bar recipes get the crust wrong, ending up either soggy or overly crumbly. I’ve tried a dozen, and they either crumble like dry sand or stay as a mushy pancake that no one wants to touch. This version, however, uses a precise ratio of flour to butter and a secret technique of chilling the dough before baking, which locks in that buttery flavor while giving the crust a satisfying snap. The filling is where the magic truly happens: a blend of fresh lemon juice, zest, and a touch of white sugar that creates a glossy, custard‑like layer that stays perfectly set without turning rubbery.
And now the fun part: I’m about to spill the beans on the one ingredient most people overlook—a pinch of confectioners’ sugar in the crust. It’s the secret that keeps the base from being too dense and adds a subtle sweetness that lets the lemon shine. Okay, ready for the game‑changer? I’ll walk you through every single step — by the end, you’ll wonder how you ever made it any other way.
What Makes This Version Stand Out
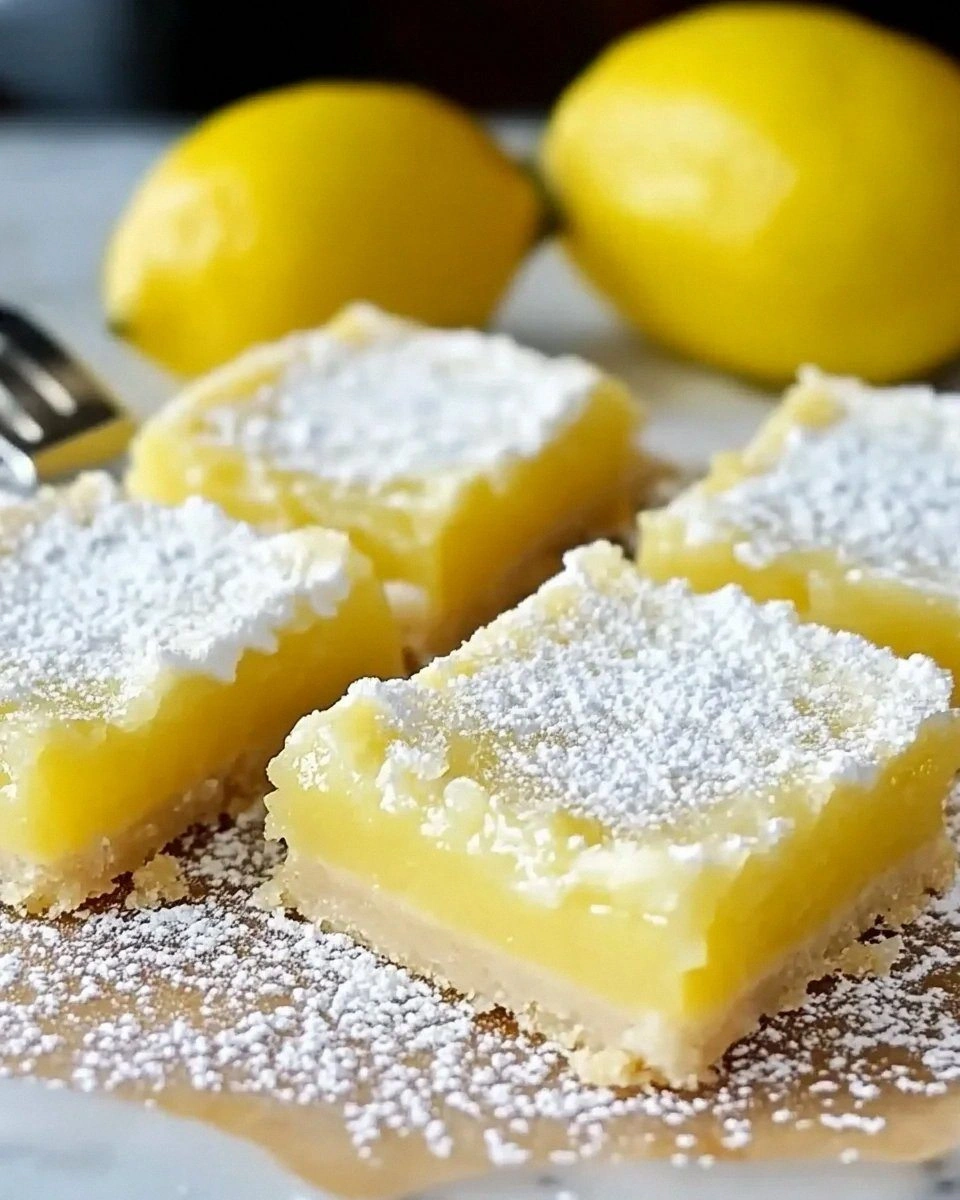
- Taste: The lemon filling is bright and tangy, balanced perfectly by a buttery, slightly sweet crust that never overwhelms.
- Texture: A crisp, golden edge that shatters like thin ice, giving way to a velvety interior that feels like a cloud of citrus.
- Simplicity: Only eight ingredients, no fancy equipment, and a total time under an hour—ideal for busy weeknights or lazy weekends.
- Uniqueness: The addition of confectioners’ sugar in the crust creates a delicate crumb that most recipes completely miss.
- Crowd Reaction: Guests often ask for the recipe before the first bite is even finished, and the “wow” factor is instant.
- Ingredient Quality: Fresh lemons and real butter are non‑negotiable; they elevate the whole bar from good to unforgettable.
- Cooking Method: Chilling the dough before baking locks in flavor and texture, a pro tip that makes all the difference.
- Make‑Ahead Potential: These bars keep beautifully in the fridge for up to three days, and they even freeze well for later cravings.
Inside the Ingredient List
The Flavor Base
Lemon juice is the star of the show, providing that unmistakable zing that makes these bars unforgettable. Freshly squeezed juice delivers bright acidity and a fragrant oil that bottled juice simply can’t match. If you skip the juice and use a concentrate, you’ll end up with a flat, muted flavor that feels more like a bland custard than a lemon bar. For the best results, roll the lemon on the countertop before cutting—this releases the juices and makes extraction easier.
The Texture Crew
All‑purpose flour appears twice: once in the crust and once in the filling. In the crust, it creates structure, while in the filling it acts as a gentle thickener that keeps the lemon custard from turning rubbery. The butter, softened but not melted, is the glue that holds the crust together, giving it that melt‑in‑your‑mouth richness. If you substitute margarine, you’ll notice a noticeable difference in flavor and a slightly greasy mouthfeel.
The Unexpected Star
Confectioners’ sugar might seem like a minor player, but it’s the secret that prevents the crust from becoming overly dense. Its fine texture integrates seamlessly with the butter, creating a tender crumb that’s light as a feather. If you were to use regular granulated sugar instead, the crust would be grainy and lose that delicate melt‑in‑the‑mouth quality. This is a perfect example of how a tiny tweak can elevate a whole recipe.
The Final Flourish
Lemon zest is the aromatic powerhouse that adds depth beyond pure acidity. The zest contains essential oils that give the bars a fragrant, almost floral note that you can’t achieve with juice alone. Grating the zest directly over the filling just before baking distributes those oils evenly, ensuring each bite bursts with lemon perfume. If you’re feeling adventurous, a pinch of orange zest can add a subtle complexity without stealing the spotlight.
Everything's prepped? Good. Let's get into the real action...
The Method — Step by Step
Preheat your oven to 350°F (175°C) and line a 9×13‑inch baking pan with parchment paper, leaving an overhang on the sides for easy removal. While the oven heats, whisk together 2 ½ cups of all‑purpose flour and ½ cup of confectioners’ sugar in a large bowl; this dry mix ensures even distribution of the sweetener throughout the crust. Cut in 1 cup of cold butter using a pastry cutter or your fingertips until the mixture resembles coarse crumbs—think tiny pebbles that hold together when pressed. Once the dough looks uniform, gather it into a ball, flatten it into a disc, and set it aside on a sheet of plastic wrap.
Kitchen Hack: If the butter is too soft, pop the dough disc in the freezer for 5 minutes; this firms it up just enough to handle without melting.Press the chilled dough evenly into the prepared pan, pushing it up the sides to create a shallow edge. Use the back of a spoon or a flat-bottomed glass to smooth the surface; a uniform crust ensures even baking and prevents soggy spots. Once the crust is in place, bake it for 12‑15 minutes, or until the edges turn a light golden brown and you can smell a buttery nuttiness that signals it’s ready for the next stage. While the crust bakes, whisk together 4 eggs, 1 ½ cups white sugar, 4 tablespoons all‑purpose flour, ½ cup lemon juice, and 1 tablespoon lemon zest in a separate bowl; this will become the luscious filling.
When the crust reaches that perfect golden hue, pull it from the oven and immediately pour the lemon mixture over it, spreading it with a spatula to ensure full coverage. The batter should sizzle lightly as it hits the hot crust—That sizzle when it hits the pan? Absolute perfection. This brief contact creates a thin seal that helps the filling set without sinking.
Return the pan to the oven and bake for an additional 20‑25 minutes. You’ll know it’s done when the edges start pulling away from the pan and the center is just set, with a slight jiggle in the middle that will firm up as it cools. Resist the urge to overbake; a little wobble is the secret to a silky texture.
While the bars are baking, prepare a cooling rack lined with a clean kitchen towel. Once the timer dings, remove the pan and set it on the rack; this allows the bars to cool evenly and prevents steam from making the crust soggy. Let them rest for at least 30 minutes before cutting; patience here is rewarded with clean, sharp slices.
Watch Out: Cutting the bars while they’re still warm will cause them to crumble; always wait until they’re fully set and cool to the touch.After the bars have cooled, lift them out of the pan using the parchment overhang and place them on a cutting board. Use a sharp, non‑serrated knife dusted with a little confectioners’ sugar to slice them into neat rectangles; the sugar prevents the knife from sticking and adds a subtle sweet finish. If you want a more dramatic presentation, dust the top with extra zest or a drizzle of melted white chocolate.
Serve the bars at room temperature, or chill them for an extra firm bite—both ways are delicious. Pair them with a glass of chilled tea or a light sparkling water to balance the richness. If you’re feeling indulgent, a dollop of whipped cream or a scoop of vanilla ice cream adds a creamy contrast that takes the experience to the next level.
Store any leftovers in an airtight container in the refrigerator for up to three days. For longer storage, wrap individual bars in parchment and freeze them; they’ll keep for up to two months and can be reheated gently in a 300°F oven for about 5 minutes.
And now the fun part—taste test! I’ll be honest — I ate half the batch before anyone else got to try it, and the reaction was unanimous: “More, please!” This is hands down the best version you’ll ever make at home, and I’m confident you’ll agree after the first bite.
Insider Tricks for Flawless Results
The Temperature Rule Nobody Follows
Always start with a cold butter and a chilled dough disc. The cold fat stays solid longer in the oven, creating steam pockets that give the crust its signature flakiness. If you skip this step, the crust spreads too thin and loses that satisfying snap. I once tried a room‑temperature dough and ended up with a flat, soggy base that was a total letdown.
Why Your Nose Knows Best
Your sense of smell is the ultimate timer. When the crust turns a light golden brown and you catch a nutty, buttery aroma, it’s ready to be pulled out. Don’t rely solely on the clock; ovens can vary by up to 25°F, and that aroma cue is your secret weapon. Trust it, and you’ll never over‑bake again.
The 5‑Minute Rest That Changes Everything
Letting the bars rest for five minutes after they come out of the oven allows the filling to set just enough to cut cleanly. Skipping this rest leads to messy, smeared slices that ruin the visual appeal. I once rushed this step in a hurry, and the result was a sad, sticky mess—lesson learned. Patience here is a tiny price to pay for perfect squares.
The Zest Boost
Add the lemon zest at the very end of mixing the filling, not before. This preserves the volatile oils that give the bars their aromatic punch. If you blend zest too early, the heat from the eggs can dull its flavor, leaving you with a flat taste. A final sprinkle of zest on the finished bars adds a pop of color and an extra burst of fragrance.
The Sweet Spot for Sugar
Using white sugar instead of a sugar substitute ensures the filling sets properly and retains its glossy sheen. The granules dissolve fully during baking, creating that smooth, custard‑like texture. If you’re tempted to cut sugar for a “healthier” version, you’ll end up with a watery filling that never firms.
Creative Twists and Variations
This recipe is a playground. Here are some of my favorite ways to switch things up:
Berry Burst
Swirl in a cup of fresh raspberries or blueberries into the lemon filling before baking. The berries add a sweet‑tart contrast and a gorgeous speckled appearance that’s perfect for summer picnics. Just be sure to pat the berries dry so the filling doesn’t become too watery.
Coconut Dream
Replace half of the butter with coconut oil and add ¼ cup shredded coconut to the crust. The result is a tropical twist that pairs beautifully with the lemon’s acidity. It’s a hit at beach parties and adds a subtle caramel note.
Lavender Whisper
Infuse the lemon juice with a teaspoon of dried culinary lavender for five minutes, then strain. The floral hint elevates the bars into a sophisticated dessert that’s perfect for bridal showers. Use a light hand—lavender can become overpowering quickly.
Chocolate Drizzle
Melt dark chocolate and drizzle it over the cooled bars for a bittersweet contrast. The richness of the chocolate balances the bright lemon, creating a flavor duet that’s both classic and modern. A sprinkle of sea salt on top adds a gourmet touch.
Spiced Autumn
Add a pinch of ground cinnamon and nutmeg to the crust mixture, and swap half the lemon juice for orange juice. This variation brings a warm, cozy vibe to the bars, making them ideal for fall gatherings. The citrus blend still shines, but with an added depth.
Storing and Bringing It Back to Life
Fridge Storage
Place the bars in an airtight container or a zip‑top bag, separating layers with parchment to prevent sticking. They’ll stay fresh for up to three days, and the flavors will meld even further, making each bite more harmonious. Keep them on a middle shelf where temperature fluctuations are minimal.
Freezer Friendly
Wrap each bar individually in parchment, then a layer of foil, and finally store them in a freezer‑safe bag. They’ll keep for up to two months without losing texture. When you’re ready to enjoy, let them thaw in the fridge overnight and then give them a quick 5‑minute blast in a 300°F oven to revive the crust’s crunch.
Best Reheating Method
To bring the bars back to life, preheat your oven to 300°F, place the bars on a baking sheet, and add a tiny splash of water to the pan’s edge. The steam created keeps the filling moist while the crust regains its golden crispness. In just five minutes, you’ll have a freshly‑baked experience that rivals the original.