Picture this: a sunny Saturday morning, a kitchen buzzing with the aroma of vanilla and cocoa, and a stubborn craving for something sweet that feels like a hug in every bite. I was halfway through a batch of plain brownies when a friend dared me to add a splash of strawberry—no, a whole pound of it—to the mix. The idea sounded reckless, but the thought of bright red berries dancing in a dark chocolate sea was irresistible. I grabbed a basket of the freshest strawberries, sliced them thin, and set them on the counter like tiny ruby jewels. The kitchen felt alive, the air thick with anticipation, and I was ready to break the rules of classic brownies.
I set my timer, whisked the butter and sugar until they sang a silky duet, and then folded in the eggs, one by one, as if I were adding layers to a secret. When the batter finally hit the pan, the sound was a low, comforting thump—like a drumbeat before a concert. I could already taste the first bite: a perfect marriage of fudgy chocolate and the bright, tart kiss of strawberries. This was not just a dessert; it was a declaration that flavor can be both bold and gentle, sweet and sharp. The moment the first chocolate-coated berry popped onto the plate, I knew I was about to unleash something extraordinary.
Most people think chocolate and fruit are a risky combination, but that’s exactly why this recipe stands out. The strawberries are not just an afterthought; they are the star that elevates every bite, turning a simple brownie into a carnival of textures. The chocolate coating is so glossy it mirrors the kitchen light, while the interior remains moist and chewy, like a secret held in a velvet pocket. I dare you to taste this and not go back for seconds. The result is a dessert that feels like a midnight rendezvous between sweet and savory, with a hint of citrus that lingers on the palate. If you’ve ever struggled with balancing fruit and chocolate, you’re not alone—and I’ve got the fix.
In the next few sections, we’ll dive deep into why this version is hands down the best you’ll ever make at home. From the precise ratios that keep the batter just right, to the trick of melting butter and sugar together for a silky base, every detail is fine-tuned. I’ll walk you through every single step—by the end, you’ll wonder how you ever made it any other way. Let’s start by uncovering the secrets that make this recipe a standout masterpiece.
What Makes This Version Stand Out
- Texture: The batter is thick enough to hold the strawberries without becoming a mush, yet airy enough to rise slightly, creating a tender crumb that melts in your mouth.
- Flavor Balance: The ⅓ cup of unsweetened cocoa powder gives depth, while the ¼ teaspoon of baking powder ensures a subtle lift, preventing the brownies from feeling dense.
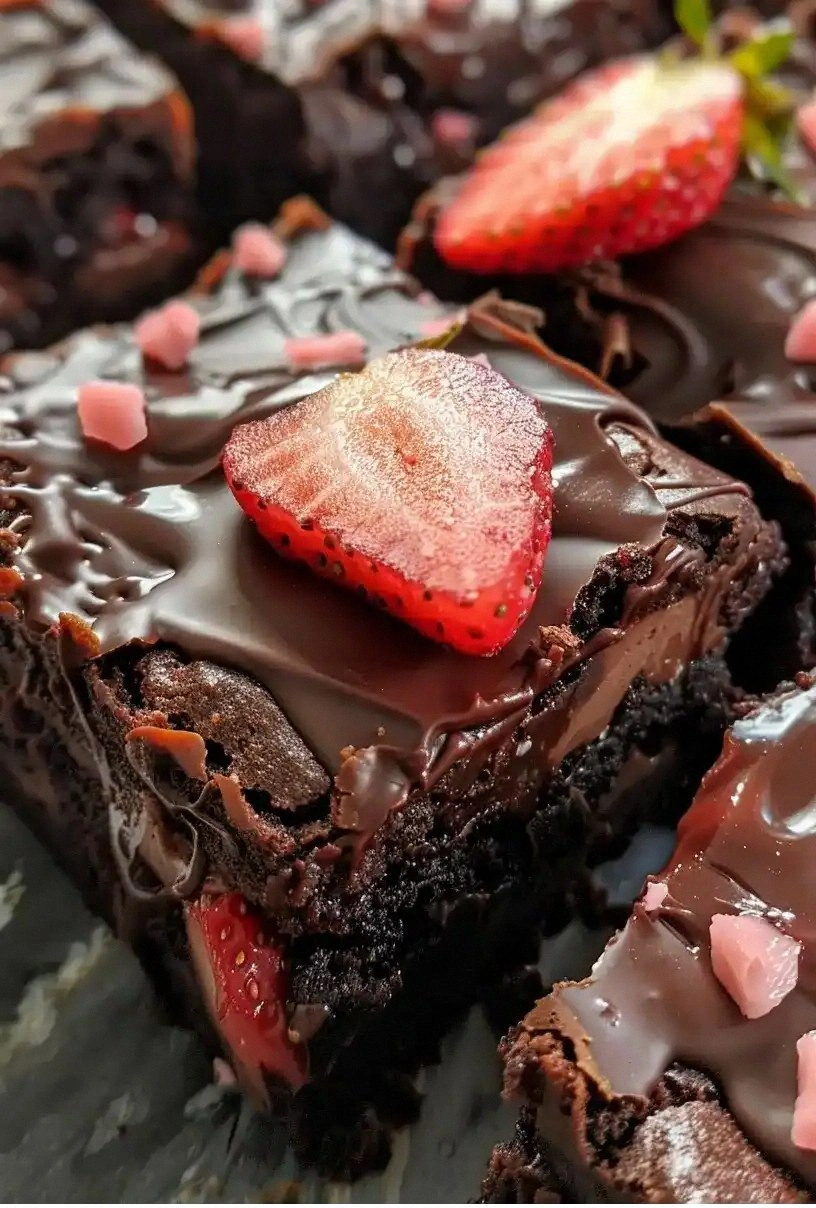
- Fruit Integration: Fresh strawberries are folded in just before baking, preserving their juiciness and preventing them from turning into puree.
- Simplicity: All ingredients are pantry staples—no exotic spices or hard-to-find items, making it a go-to for any kitchen.
- Make‑Ahead Potential: These brownies can be cooled, wrapped, and stored for up to a week, making them ideal for parties or a quick snack.
- Visual Appeal: The glossy chocolate coating and ruby-red berries create a striking contrast that looks as good as it tastes.
Alright, let's break down exactly what goes into this masterpiece…
Inside the Ingredient List
The Flavor Base
The butter, melted and cooled slightly, is the foundation that carries the sweetness and richness throughout the batter. When combined with granulated sugar, it creates a silky texture that melts in your mouth. Skipping the butter would leave the brownies dry and crumbly, a fate many have suffered. If you’re vegan, try using coconut oil in the same quantity; it provides a comparable melt and a subtle tropical note.
Granulated sugar is the sweetener that balances the bitterness of cocoa. It also contributes to the browning of the crust, giving that golden finish. If you prefer a lower-sugar version, half the amount will still work, but the brownies will be less chewy. A touch of brown sugar could add a caramel undertone, though it would alter the flavor profile.
Eggs act as binders, holding the batter together while adding moisture and richness. Two large eggs are the sweet spot; fewer eggs result in a crumbly texture, while more can make the brownies too cake-like. If you’re allergic, you can replace them with a flaxseed egg or an unsweetened applesauce.
Vanilla extract is the subtle hero that rounds out the chocolate’s intensity. One teaspoon is enough to infuse the batter with a warm, floral note. If you’re using a low-quality extract, consider a vanilla bean for a more authentic flavor.
The Texture Crew
Unsweetened cocoa powder provides the deep chocolate flavor without adding extra sweetness. Using ⅓ cup ensures a rich taste while keeping the batter from becoming too dry. If you prefer a sweeter chocolate, switch to a semi-sweet cocoa powder, but reduce the sugar slightly to compensate.
All-purpose flour is the structural component that gives the brownies their body. Half a cup is just enough to bind the batter; too much flour will make the brownies tough. For a slightly lighter crumb, you could replace half the flour with whole wheat flour, but this will alter the taste.
Salt is the flavor enhancer that brings out the chocolate’s depth. A quarter teaspoon is sufficient; too much salt will overpower the sweetness. If you’re on a low-sodium diet, a pinch of sea salt is fine.
Baking powder is the leavening agent that gives the brownies a subtle lift. A quarter teaspoon is enough to prevent them from sinking. If you’re using a different flour, adjust the amount accordingly to maintain the right texture.
The Unexpected Star
Fresh strawberries are the highlight of this recipe, adding a burst of juiciness and a pop of color. One pound of berries, hulled and sliced, provides a balanced sweet-tart flavor that pairs perfectly with chocolate. If strawberries are out of season, frozen berries can work—just thaw them and pat dry to avoid excess moisture.
Semi-sweet chocolate chips are used to coat the strawberries before baking. They melt into a glossy glaze that encases each berry, creating a dramatic visual contrast. You could use dark chocolate chips for a richer, more bitter profile, but this will reduce the overall sweetness.
The Final Flourish
Heavy cream is folded into the batter to add richness and a silky mouthfeel. Half a cup of cream ensures the brownies remain moist and fudgy. If you prefer a lighter version, replace the cream with milk or a dairy-free alternative; the texture will shift slightly but remain delicious.
This combination of ingredients creates a harmony that is both classic and innovative. Each component plays a role in the overall experience, from the first bite to the lingering aftertaste. Skipping any of them will change the character of the brownies, so follow the recipe to the letter for the best results. The next section will walk you through the process, step by step.
Everything's prepped? Good. Let's get into the real action…
The Method — Step by Step
- Preheat your oven to 350°F (175°C) and line a 9x13-inch pan with parchment paper. The parchment ensures easy removal and keeps the brownies from sticking. I always set a timer for 25 minutes to avoid overbaking. The room should be at room temperature; cold ingredients can affect the batter’s consistency. Keep a small bowl of water nearby in case you need to dampen the parchment if it starts to dry.
- In a medium saucepan, melt the butter over low heat. Once melted, remove from heat and let it cool slightly. Stir in the granulated sugar until it dissolves and the mixture feels silky. This step creates a smooth base that prevents clumping. If you’re in a rush, you can microwave the butter in 20-second bursts, but watch carefully to avoid scorching.
- Whisk the eggs into the butter-sugar mixture, one at a time, ensuring each egg is fully incorporated before adding the next. This gradual process keeps the batter from curdling. Once the eggs are blended, add the vanilla extract and stir. The vanilla brings a warm aroma that lingers in the finished product. Let the mixture sit for a minute to allow the flavors to meld.
- Sift the unsweetened cocoa powder, all-purpose flour, salt, and baking powder together. Sifting removes lumps and ensures even distribution. Fold the dry mixture into the wet batter using a spatula until just combined. Be careful not to overmix; a few streaks are acceptable. The batter should be thick but pourable, similar to pancake batter consistency.
- Fold in the sliced strawberries gently, ensuring each piece is coated with batter. The strawberries should be evenly distributed to avoid pockets of excess fruit. This is the moment you can taste the batter’s sweetness; adjust if necessary by adding a touch more sugar or vanilla. The strawberries add a burst of color and a juicy contrast to the fudgy base. They also release a subtle fragrance that makes the kitchen smell heavenly.
- Pour the batter into the prepared pan, spreading it evenly with a spatula. The batter should fill the pan to the top, leaving a little space for expansion. Gently tap the pan on the counter to release any trapped air bubbles. This step prevents uneven rise and ensures a uniform crumb. The batter should have a slight sheen, indicating the butter is fully incorporated.
- Bake for 25 to 30 minutes, or until a toothpick inserted near the center comes out with a few moist crumbs. The edges should be set, but the center should still have a glossy sheen. The aroma at this point will be irresistible, a sweet perfume that lingers in the kitchen. Once done, remove the pan from the oven and let it cool on a wire rack for 15 minutes. This cooling period allows the brownies to set properly.
- While the brownies cool, melt the semi-sweet chocolate chips with the heavy cream in a double boiler or microwave. Stir until smooth and glossy. This chocolate glaze will coat each strawberry, creating a decadent finish. If you want a thicker glaze, add a tablespoon of cocoa powder. The glaze should be pourable but not too runny.
- Drizzle the melted chocolate over the cooled brownies, using a spoon to create a glossy pattern. Allow the chocolate to set for 5 minutes before cutting. The chocolate should harden into a glossy shell that encases the strawberries. This final touch gives the brownies a luxurious look and a satisfying crunch when bitten. Serve immediately or wrap tightly for later.
That’s it — you did it. But hold on, I've got a few more tricks that'll take this to another level…
Insider Tricks for Flawless Results
The Temperature Rule Nobody Follows
Oven temperature consistency is critical; a fluctuating oven can cause uneven baking, leading to a rubbery center. Use an oven thermometer to confirm the actual temperature. If your oven runs hot, lower the setting by 25°F. This subtle adjustment can make the difference between a perfect brownie and a disappointment. Always preheat for at least 15 minutes before placing the pan inside.
Why Your Nose Knows Best
The scent of chocolate baking is a reliable indicator of doneness. A warm, sweet aroma signals that the brownies are ready. If the smell is faint, give them a few more minutes. Avoid opening the door too often; each time you do, the oven temperature drops, affecting the final result. Trust your nose over your timer for the best outcome.
The 5-Minute Rest That Changes Everything
Letting the brownies rest on a rack for 15 minutes before slicing is essential. This rest allows the structure to set, preventing the brownies from falling apart. It also lets the chocolate glaze firm up, giving a clean, glossy finish. Skipping this step will result in a sticky mess that’s hard to handle. Patience pays off in a way that’s hard to explain.
The Secret of Even Strawberry Distribution
If you notice pockets of fruit, the batter may be too thick. Lightly whisk the batter before adding the strawberries to loosen it. Alternatively, you can fold the strawberries in two stages: half first, then the rest after the initial mix. This technique ensures each berry is evenly coated. The result is a balanced bite with no overwhelming sweetness.
The Power of Parchment Paper
Using parchment paper not only prevents sticking but also creates a cleaner edge. Cut a piece that extends beyond the pan by an inch; this allows you to lift the brownies easily. If you prefer a firmer edge, use a silicone mat instead. The choice of lining material can subtly influence the texture of the final product.
The Art of Chocolate Coating
For a glossy, uniform coat, stir the melted chocolate until it reaches a silky consistency. Adding a tablespoon of cocoa powder can thicken the glaze if you prefer a thicker shell. If the glaze is too thin, it will run off the brownies; if too thick, it won’t spread evenly. Experiment with small batches to find your preferred thickness.
The Timing of the Final Drizzle
Drizzle the chocolate while it’s still warm but not liquid; this ensures it sets quickly and doesn’t pool in the center. If you wait too long, the chocolate may harden before you can spread it evenly. Use a spoon to create a decorative pattern for a professional look. This final touch elevates the presentation and the eating experience.
Creative Twists and Variations
This recipe is a playground. Here are some of my favorite ways to switch things up:
Almond Crunch Variation
Add ¼ cup chopped toasted almonds to the batter before baking. The crunch will contrast nicely with the fudgy base, and the almonds add a nutty aroma. This variation is perfect for those who love a bit of texture in every bite. The almonds also provide a subtle earthy note that complements the strawberries.
Minty Fresh Twist
Stir in ½ teaspoon of peppermint extract with the vanilla for a cool, refreshing flavor. The mint pairs well with chocolate and adds a bright finish. This version is ideal for summer parties or a festive dessert. The mint’s aroma will linger pleasantly in the kitchen.
Espresso Infusion
Add 1 tablespoon of instant espresso powder to the dry mix. The coffee deepens the chocolate flavor and introduces a subtle bitterness that balances the sweetness. Espresso lovers will appreciate the depth of flavor. This variation is great for an after-dinner treat.
Citrus Zest Surprise
Grate the zest of one orange into the batter before folding in the strawberries. The citrus adds a bright, tangy note that cuts through the richness. This twist is especially refreshing during hot weather. The zest also brings a fragrant aroma to the kitchen.
Nutella Swirl Edition
Swirl a few spoonfuls of Nutella into the batter before baking for a creamy, hazelnut flavor. The Nutella adds a decadent richness that pairs well with strawberries. This version is a hit among chocolate lovers. The swirl pattern also creates a visually appealing design.
Dark Chocolate and Chili
Replace the semi-sweet chips with dark chocolate chips and add a pinch of cayenne pepper. The heat from the chili will contrast with the sweetness, creating a complex flavor profile. This spicy variation is great for adventurous eaters. The chili also adds a subtle warmth that lingers on the palate.
Raspberry Rapture
Swap strawberries for fresh raspberries for a tangier flavor. The berries will release a bright, tart juice that contrasts beautifully with the chocolate. This variation is ideal for berry lovers who prefer a more acidic taste. The raspberry color will also give a striking visual contrast.
Storing and Bringing It Back to Life
Fridge Storage
Wrap the cooled brownies tightly in plastic wrap and store in an airtight container at room temperature for up to 3 days. The brownies will stay moist and fresh if kept away from direct sunlight. If you notice the chocolate coating softening, reheat briefly in the microwave for a few seconds. This method restores the glossy finish. Avoid placing the brownies in the refrigerator; the cold can cause condensation and alter the texture.
Freezer Friendly
For longer storage, wrap each brownie individually in parchment paper, then place them in a freezer bag. They can be kept for up to 3 months without loss of flavor. Thaw at room temperature for 30 minutes before serving. The chocolate coating remains firm, and the brownies stay moist. This is perfect for parties or a quick dessert on a busy day.
Best Reheating Method
To reheat, place the brownies on a parchment-lined baking sheet and warm them in a preheated oven at 300°F (150°C) for 5 minutes. This gentle heat restores the fudginess without drying them out. If you prefer a softer center, microwave on low power for 15-20 seconds. The key is to keep the brownies from overheating. Serve immediately for the best taste and texture.
All right, you’ve made a batch that’s going to make everyone swoon. The glossy chocolate coating, the burst of fresh strawberry, the fudgy interior—all combine into a dessert that feels like a celebration. If you’ve ever wanted to impress friends or family with a showstopper, this is the recipe that will do it. Now, take a bite, savor the flavors, and let the moment linger. And remember, the best part of cooking is sharing it with those you love.