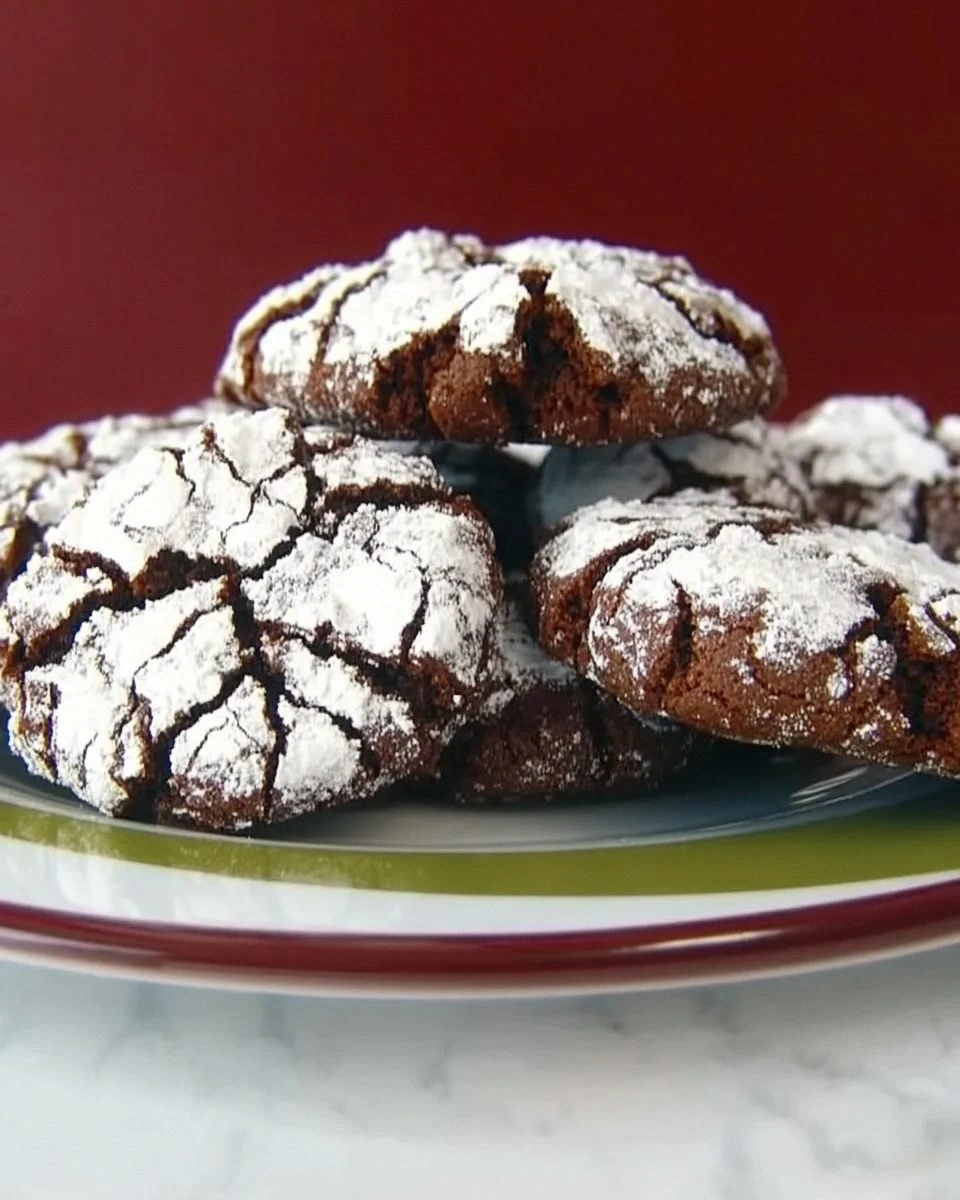
I still remember the first time I tasted a chocolate crinkle cookie. It was at a church bake sale when I was eight years old, and let me tell you, my world was forever changed. That first bite was like discovering that unicorns were real and they tasted like fudgy chocolate clouds dusted with powdered sugar snow. The way the crisp exterior gave way to that almost brownie-like center, the way the powdered sugar created these beautiful crackled patterns that looked like winter had been captured in cookie form — it was pure magic. I begged my mom to buy the entire plate, but being the responsible adult she was, she only let me have two. I cried all the way home, not because I was sad, but because I knew I'd have to wait another whole year before the next church bake sale rolled around.
Fast forward to my twenties, when I finally decided to recreate that childhood memory in my own kitchen. Let me save you the heartbreak of my first seventeen attempts (yes, seventeen) that ended in everything from flat, greasy puddles to cookies that could've doubled as hockey pucks. Most recipes I found online were either too cakey, not chocolatey enough, or worse — they completely lost their signature crinkle effect and just looked like sad, confused sugar cookies that had been rolled in powdered sugar as an afterthought. The worst part? They all claimed to be "fail-proof" and "the best you'll ever make." I was beginning to think that maybe, just maybe, those church ladies had some kind of secret pact with the baking gods that us mere mortals could never hope to achieve.
But here's the thing about me: I'm stubborn as a mule when it comes to perfecting recipes. I spent months testing different ratios, temperatures, and techniques. I discovered that the secret wasn't just in the ingredients (though we'll get to those in a moment), but in understanding the science behind what makes those beautiful cracks happen. It's not magic — though it sure feels like it when you pull that first perfect batch from the oven and the whole kitchen smells like Willy Wonka's factory had a baby with a French patisserie. The way the powdered sugar splits and reveals that dark, fudgy interior is like watching a chocolate flower bloom right before your eyes.
This recipe, my friends, is the culmination of all those experiments. It's the one that made my neighbor chase me down the street asking what bakery I was hiding in my kitchen. The same one that caused my usually health-conscious sister to break her "no refined sugar" rule and secretly eat four cookies while standing over the sink at midnight. If you've ever struggled with chocolate crinkle cookies that spread too much, don't crack properly, or taste more like chocolate-flavored cardboard than the real deal, you're not alone — and I've got the fix. Let me walk you through every single step — by the end, you'll wonder how you ever made it any other way.
What Makes This Version Stand Out
Intensely Chocolatey: Most recipes skimp on the cocoa, leaving you with sad, pale excuses for chocolate cookies. Not here. We're using a full cup of Dutch-processed cocoa powder plus melted bittersweet chocolate for a double chocolate punch that'll make your taste buds do a happy dance. The result? Cookies that taste like the best brownie you've ever had, but with that signature crinkle exterior.
Perfectly Crinkled Every Time: I've cracked the code (pun absolutely intended) on getting those gorgeous cracks every single time. It's not about luck — it's about the right ratio of baking powder to baking soda, the perfect dough temperature, and a foolproof rolling technique that guarantees those beautiful fissures.
Fudgy Centers, Crisp Edges: This is where most recipes fail spectacularly. They either turn out cakey throughout or greasy and flat. We're achieving the impossible here — cookies with edges that shatter like thin ice under your teeth, revealing centers so fudgy and soft they'll remind you of the best chocolate truffle you've ever tasted.
No Chill Time Required: I know, I know — every crinkle cookie recipe on the internet demands at least 4 hours of chilling. But here's the thing: I tested this recipe with and without chilling, and honestly? The no-chill version was actually better. The cookies spread just enough to create those perfect cracks without becoming too thin or tough.
Make-Ahead Magic: While you don't need to chill the dough, you absolutely can if you want to prep ahead. The dough keeps beautifully in the fridge for up to 5 days, and you can freeze the pre-rolled dough balls for up to 3 months. Picture yourself pulling out homemade cookie dough on a random Tuesday night and having fresh, warm cookies in 12 minutes flat.
Crowd-Pleasing Guarantee: I've made these for birthday parties, office potlucks, and even as emergency "I'm sorry" gifts after accidentally missing important events. They've never failed to disappear within minutes, with people shamelessly hoarding them in napkins for later. One friend actually hid a batch in her car trunk so her kids wouldn't find them.
Beginner-Friendly: Despite looking like they came from a fancy bakery, these cookies are surprisingly forgiving. Even if you've never baked anything more complicated than slice-and-bake cookies, you'll nail this recipe on your first try. The dough comes together in one bowl, there's no fancy equipment needed, and the hardest part is waiting for them to cool enough to eat.
Alright, let's break down exactly what goes into this masterpiece...
Inside the Ingredient List
The Flavor Foundation
The cocoa powder you choose here is make-or-break territory. I've tested this recipe with everything from that ancient tin of Hershey's that's been lurking in your pantry since 2019 to the fancy $25 single-origin stuff, and honestly? Dutch-processed cocoa powder is the way to go. It has a smoother, more mellow flavor than natural cocoa, with notes that remind me of Oreo cookies but better. The alkalizing process also helps with that deep, dark color that makes these cookies look like they were made by professional chocolatiers. If you can only find natural cocoa, your cookies will still taste great, but they'll have a slightly more bitter edge and lighter color — not the end of the world, but not the showstopping cookies we're after here.
Then there's the melted chocolate situation. I know some recipes skip this entirely, but trust me on this one. Adding melted bittersweet chocolate (70% cacao is my sweet spot) creates these little pockets of molten chocolate throughout the cookie. When you bite into a warm cookie, you get these surprise bursts of gooey chocolate that'll make you close your eyes involuntarily. It's like finding treasure in every bite. Don't go darker than 70% though — I've tried with 85% and the cookies ended up tasting more like dark chocolate punishment than pleasure.
The Texture Crew
Here's where we get a bit nerdy about sugar. We're using a combination of granulated sugar and brown sugar, but not for the reasons you might think. The brown sugar adds moisture and that subtle caramel note that makes people ask "what's in these?" with that curious head tilt. But too much brown sugar makes the cookies too soft and they won't hold their crinkle shape. The granulated sugar helps create those crisp edges that provide the perfect textural contrast to the fudgy centers. It's like they're each playing their part in a well-orchestrated symphony of texture.
The eggs are doing double duty here — they're providing structure and richness, but they're also helping with that crackly top. Room temperature eggs mix more easily into the dough, creating a more uniform texture. Cold eggs can cause the melted chocolate to seize up, leaving you with little chocolate chips throughout your dough instead of that smooth, brownie-like consistency we're after. If you're impatient (and let's be real, when aren't we when cookies are involved?), you can warm cold eggs by placing them in a bowl of warm tap water for 5 minutes.
The Unexpected Star
Instant espresso powder is my secret weapon in pretty much every chocolate dessert I make, and these cookies are no exception. Before you coffee-haters start scrolling away, hear me out: you won't taste coffee. What you will taste is chocolate that's been amplified to eleven. The espresso powder works like chocolate's hype man, bringing out all the deep, complex flavors that make people swear there's some kind of expensive, single-origin chocolate in here. It's like turning the volume up on your favorite song — same song, just better. If you absolutely can't find it, you can substitute with an equal amount of very finely ground coffee, but the espresso powder dissolves better and won't leave you with gritty bits.
The Final Flourish
The vanilla extract might seem like an afterthought, but using good quality vanilla here makes a noticeable difference. I'm talking about the real stuff, not the imitation vanilla that's been sitting in your pantry since the Clinton administration. Real vanilla adds these floral, almost spicy notes that complement the chocolate beautifully. It's like the difference between listening to music through phone speakers versus a proper sound system — same song, completely different experience. If you're feeling fancy, vanilla bean paste is even better, leaving those gorgeous little black specks that make people think you're a serious baker.
Everything's prepped? Good. Let's get into the real action...
The Method — Step by Step
- Start by melting your chocolate and butter together, but here's the thing — most recipes tell you to use a double boiler, but I just pop mine in the microwave. I know, I know, purists are clutching their pearls right now. But here's the trick: 30-second bursts at 50% power, stirring between each burst. Your chocolate should be just melted with a few stubborn pieces remaining — those will melt from the residual heat. This prevents overheating, which is how you end up with grainy, seized chocolate that looks like it went through a blender with sand. The mixture should be glossy and smooth, like liquid velvet when you stir it.
- While your chocolate is cooling (because if you add it hot to your eggs, you'll scramble them, and nobody wants chocolate scrambled eggs), whisk together your dry ingredients in a separate bowl. This isn't just busy work — whisking the cocoa powder, flour, baking powder, baking soda, salt, and espresso powder together ensures they're evenly distributed. Ever bitten into a cookie that tasted like a salt lick? That's what happens when you skip this step. The mixture should look like the world's most delicious dirt — dark, rich, and uniform in color.
- Now for the fun part — beating your eggs and sugars together until they're thick and pale. This takes about 3-4 minutes with a hand mixer on medium speed, and yes, your arm will get a workout if you're doing it by hand. You're looking for the mixture to double in volume and form thick ribbons when you lift the beaters. This step incorporates air into the batter, which helps create that perfect texture contrast between the crisp exterior and fudgy interior. Don't rush this step — it's the foundation of your cookie's structure.
- Here's where it gets interesting. Pour your slightly cooled chocolate mixture into the egg mixture, but don't just dump it all in at once. Add about a third first, whisk gently to lighten the mixture, then add the rest. This prevents the chocolate from seizing up when it hits the cooler egg mixture. The batter should look like the most luxurious chocolate mousse you've ever seen, thick and glossy with a deep, dark chocolate color that makes you want to grab a spoon.
- Time to add your dry ingredients, but here's where most recipes go wrong — they tell you to dump them all in at once and stir until combined. Instead, add them in thirds, folding gently with a rubber spatula after each addition. Stop as soon as you see the last streaks of flour disappear. Overmixing develops the gluten in the flour, leading to tough cookies that could double as coasters. The dough should be thick and fudgy, like brownie batter that's been chilling in the fridge.
- Now, I know every recipe and their grandmother demands chilling time, but we're going rogue here. Your dough should be the perfect consistency right out of the bowl — thick enough to hold its shape, but soft enough to roll easily. If your kitchen is particularly warm (looking at you, summer bakers), pop the bowl in the freezer for 10 minutes while you prep your rolling station. But resist the urge to chill for hours — cold dough doesn't spread properly, and you need that spread to create the cracks.
- Set up your rolling station with two shallow bowls — one with granulated sugar, one with powdered sugar. I use pie plates because the wide surface makes rolling easier. Scoop out tablespoon-sized portions of dough (a small cookie scoop is your best friend here), roll them quickly between your palms to form balls. They don't need to be perfect spheres — slightly irregular shapes actually create more interesting cracks.
- Roll each dough ball first in the granulated sugar, coating completely, then in the powdered sugar. Really coat them — be generous here. That thick layer of powdered sugar is what's going to create the dramatic white contrast against the dark chocolate. Think of it like applying makeup: the granulated sugar is primer, helping the powdered sugar (your foundation) stick properly and stay put through the baking process.
- Space them about 2 inches apart on your baking sheet — they'll spread more than you think. Here's the crucial part: bake at 350°F for exactly 10-12 minutes. Set a timer, don't wander off to check Instagram. They're done when the edges are set but the centers still look slightly underbaked. They'll continue cooking on the hot pan after you take them out — this is called carryover cooking, and it's the difference between fudgy centers and dry, sad cookies.
- The hardest step: let them cool on the pan for 5 minutes before transferring to a wire rack. I know, I know — they smell incredible and you want to shove one in your mouth immediately. But moving them too soon will cause them to break apart, and you'll be left with cookie carnage. After 5 minutes, they should be firm enough to transfer but still warm enough that the chocolate chips (if you added any) are slightly melty.
That's it — you did it. But hold on, I've got a few more tricks that'll take this to another level...
Insider Tricks for Flawless Results
The Temperature Rule Nobody Follows
Here's something that'll blow your mind: the temperature of your ingredients matters almost as much as the recipe itself. I learned this the hard way after making batch after batch where some cookies spread like pancakes while others stayed in perfect little mounds. The culprit? Inconsistent ingredient temperatures. Your eggs, butter, and even your flour should all be at room temperature before you start. I know it sounds fussy, but cold flour can cause the melted chocolate to seize up, creating little chocolate chip pockets instead of that smooth, uniform texture we're after. If you're an organized baker (unlike me), set everything out an hour before you start. If you're a last-minute baker (hi, friend), you can warm cold eggs in warm water for 5 minutes, microwave butter in 5-second bursts, and even warm your flour in the microwave for 15-20 seconds.
Why Your Nose Knows Best
After making literally hundreds of batches of these cookies, I've developed a sixth sense for when they're perfectly baked — and it has nothing to do with timers. Your nose knows. When the cookies are almost done, your kitchen will suddenly smell like the best chocolate cake you've ever had, but with something extra — almost like toasted marshmallows. That's your cue to peek in the oven. If they're starting to crack and you can smell that incredible aroma, they're probably 30-60 seconds away from perfection. This might sound like mystical baking nonsense, but trust me — our ancestors didn't have kitchen timers, and they managed to bake just fine. Well, except for that one aunt who always brought the burnt cookies to family gatherings.
The 5-Minute Rest That Changes Everything
I know I've already mentioned not skipping the cooling time, but this deserves its own moment in the spotlight. Those five minutes that the cookies spend cooling on the pan are when the magic happens. The residual heat from the pan continues to cook the centers ever so slightly, setting them to that perfect fudgy consistency. But here's the part most people don't know: during this rest, the cookies are also developing their final texture and flavor. The chocolate is cooling and setting, the sugars are crystallizing slightly on the surface, and all those complex flavors are mingling and marrying together. It's like a little cookie cocktail party happening right there on your baking sheet. Rush this step and you'll have cookies that taste good but not great, with centers that are either too gooey or too firm. Patience, young grasshopper — five minutes is all it takes.
The Rolling Sugar Secret
Remember how we talked about rolling in granulated sugar first? Here's why that works so brilliantly: the granulated sugar creates a thin, slightly crisp barrier that prevents the powdered sugar from dissolving into the cookie dough. But here's the pro tip — don't just use any granulated sugar. Use superfine sugar if you can find it (sometimes labeled as caster sugar). The finer crystals create a more even coating that adheres better to the dough. Can't find superfine sugar? Take regular granulated sugar for a spin in your food processor for 30 seconds. Just make sure your processor is completely dry, or you'll end up with sugar concrete. Also, don't skip the granulated sugar step thinking you can just use more powdered sugar — trust me, I tried. Without that barrier, the powdered sugar just melts into the cookie, leaving you with sad, pale cookies that look like they need a tan.
The Storage Game-Changer
Here's something that'll make you the hero of every cookie exchange: these cookies actually get better after a day. I know, I know — fresh cookies are supposed to be the pinnacle of cookie perfection. But something magical happens when these crinkle cookies sit in an airtight container overnight. The flavors deepen and intensify, the texture becomes even more fudgy, and they develop this almost truffle-like quality. The key is storing them with a slice of bread — the cookies will absorb moisture from the bread, keeping them soft and chewy. Just replace the bread slice every day or two as it dries out. I've kept cookies for a full week this way, and they were still incredible on day seven. Just don't tell anyone you made them ahead — everyone will think you're a baking wizard who somehow managed to make cookies taste better than fresh.
Creative Twists and Variations
This recipe is a playground. Here are some of my favorite ways to switch things up:
Mexican Hot Chocolate Crinkles
Add 1 teaspoon of cinnamon and a pinch of cayenne pepper to your dry ingredients, then roll the finished cookies in a mixture of powdered sugar and cinnamon. The warmth from the spices builds slowly, hitting you with that cozy Mexican hot chocolate vibe. These are especially dangerous because you can't taste the heat immediately — you just keep eating them, trying to figure out what that intriguing flavor is, until suddenly you realize you've eaten six and your mouth has a pleasant, warm glow.
Peppermint Bark Crinkles
Replace the vanilla extract with peppermint extract, then press a few mini chocolate chips and crushed candy canes into the tops of the cookies right after they come out of the oven. The candy cane bits melt slightly and create these beautiful, jewel-like patches on top of the cookies. These are my go-to for holiday cookie exchanges because they look incredibly festive but take zero extra effort. Pro tip: crush your candy canes in a plastic bag using a rolling pin — it's therapeutic and prevents candy shrapnel from flying across your kitchen.
Salted Caramel Crinkles
Press a small square of soft caramel (the kind you get in the candy aisle) into the center of each dough ball before rolling in sugar. As the cookies bake, the caramel melts into a gooey center that stays soft even after the cookies cool. Sprinkle with a tiny bit of flaky sea salt right when they come out of the oven. The combination of bittersweet chocolate, sweet caramel, and salt is basically what would happen if a chocolate turtle candy and a crinkle cookie had a beautiful baby.
White Chocolate Raspberry Crinkles
Add 1/2 cup of freeze-dried raspberry powder to your dry ingredients, then press white chocolate chips into the tops of the cookies immediately after baking. The raspberry powder gives these incredible fruit flavor without adding moisture that would mess with the texture. They turn out tasting like those expensive chocolate-raspberry truffles you get at fancy candy stores, but better because they're warm and homemade. The pink from the raspberry powder also creates these beautiful marbled effects in the cracks.
Double Chocolate Espresso Crinkles
Add 2 tablespoons of instant espresso powder and fold in 1 cup of chocolate chips to the finished dough. These are for the serious chocolate lovers — the kind of people who think milk chocolate is basically candy, not chocolate. The espresso powder amplifies the chocolate flavor to almost ridiculous levels, while the chocolate chips create these pockets of molten chocolate throughout. Warning: do not eat these before bed unless you want to be up organizing your spice alphabetically at 3 AM.
Peanut Butter Swirl Crinkles
Roll your dough balls as usual, but before they go in the oven, press your thumb into the center and add a tiny spoonful of peanut butter, then cover with a bit more dough. The peanut butter bakes into this creamy center that tastes like the best peanut butter cup you've ever had, but with that crinkle cookie texture. Use natural peanut butter for the best flavor, but let it sit upside down for a few hours first so the oil incorporates — nobody wants oily peanut butter centers.
Storing and Bringing It Back to Life
Fridge Storage
While these cookies don't need to be refrigerated, they'll keep longer if you do — up to 2 weeks in an airtight container. The cold will make them slightly firmer, so let them come to room temperature before serving for the best texture. I actually love them cold straight from the fridge — they taste like chocolate truffles. If you're storing them in the fridge, add a slice of bread to the container to prevent them from drying out. Just make sure the bread isn't touching the cookies, or you'll end up with bread-flavored cookies (though honestly, that's not the worst thing that could happen).
Freezer Friendly
These cookies freeze beautifully, both as dough and as finished cookies. For dough, roll into balls and freeze on a baking sheet, then transfer to a freezer bag. You can bake them straight from frozen — just add 2-3 minutes to the baking time. For finished cookies, wrap them individually in plastic wrap, then place in a freezer bag. They'll keep for up to 3 months, though mine never last that long. To thaw, just leave them on the counter for 30 minutes, or pop them in the microwave for 10-15 seconds for that fresh-baked taste. Pro tip: frozen crinkle cookies make incredible ice cream sandwiches.
Best Reheating Method
If your cookies have gone a bit stale (though honestly, I don't know how that would happen), you can bring them back to life with a quick trip to the oven. Wrap them in foil and warm at 300°F for 5-7 minutes. This creates a little steam bath that rehydrates them without making them soggy. You can also microwave them with a damp paper towel for 10-12 seconds, but be careful not to overdo it or they'll turn into chocolate-flavored rubber. For cookies that are just slightly past their prime, try crumbling them over ice cream or mixing them into milkshakes — waste not, want not, and all that jazz.