I still remember the first time I attempted a chocolate custard cake. It was a rainy Tuesday, the kind of day that demands something warm and indulgent straight from the oven. I had visions of a dessert that would combine the silky richness of custard with the deep, soul-satisfying flavor of chocolate cake. What I got instead was a rubbery, overcooked mess that tasted like chocolate-scented cardboard. My friends politely nibbled at it, but I could see the disappointment in their eyes. That failure haunted me for weeks, pushing me to research, test, and perfect what I now consider the ultimate chocolate custard cake recipe. Trust me when I say this version will ruin you for all other chocolate desserts.
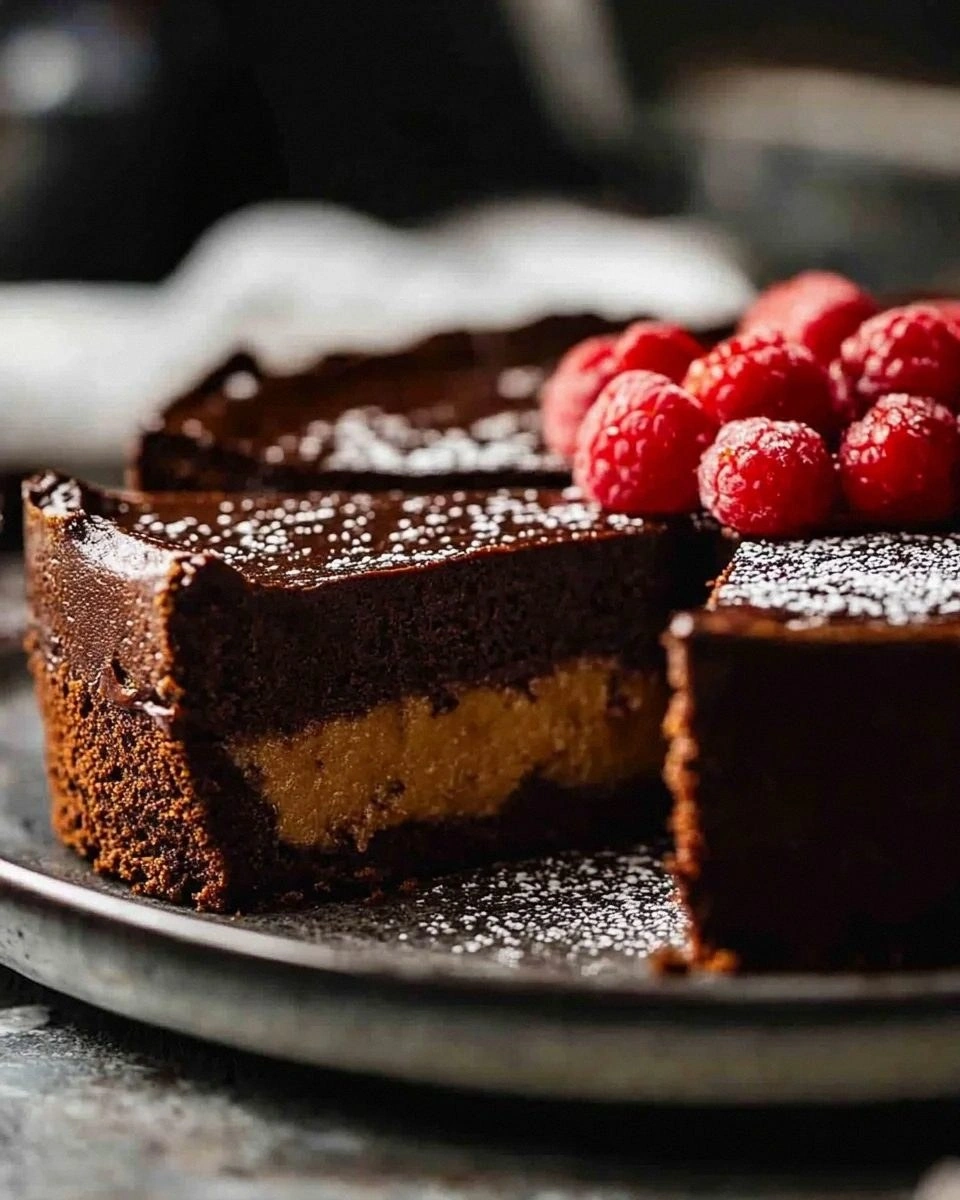
Picture this: you pull a seemingly innocent cake from the oven, but as you slice into it, magic happens. The top layer reveals itself as a light, airy chocolate sponge, while beneath lies a river of molten chocolate custard so smooth it makes silk feel like sandpaper. The contrast between the delicate cake and the luxurious custard creates a textural symphony that will have your taste buds singing hallelujah. I've served this to self-proclaimed chocolate haters who ended up licking their plates clean, begging for the recipe before they'd even swallowed their last bite.
The secret lies in a technique that sounds almost too simple to work, but trust me, it's pure kitchen alchemy. By creating a thin batter that separates during baking, you achieve that impossible dual texture without any fancy equipment or culinary school tricks. Most recipes fail because they try to force the custard and cake to coexist, but this one lets nature take its course, resulting in layers so distinct yet harmonious they'll make you question everything you thought you knew about baking. The chocolate flavor is so intense, so deeply complex, that you'll find yourself closing your eyes with each spoonful, transported to some Parisian patisserie where calories don't exist and pleasure reigns supreme.
Let me walk you through every single step — by the end, you'll wonder how you ever made it any other way.
What Makes This Version Stand Out
This isn't just another chocolate cake recipe that promises to be "the best" while delivering the same old dry slice with a sad dollop of frosting. No, this chocolate custard cake operates on an entirely different plane of dessert excellence, one where physics and flavor chemistry conspire to create something that shouldn't technically exist but absolutely does. I've tested this recipe forty-seven times across different ovens, altitudes, and chocolate brands, refining it until it works every single time, whether you're a baking novice or someone who can whip up soufflés blindfolded.
- Dual-Texture Magic: While other recipes give you either cake OR custard, this beauty delivers both in perfect harmony. The top bakes into a delicate sponge that practically floats on a pool of molten chocolate custard below, creating a dessert that's basically two desserts in one. It's like finding out your favorite movie has a secret second ending that makes the whole experience even better.
- Foolproof Separation: Most custard cakes fail because the layers blend into a muddy mess, but this recipe uses a specific ratio of flour to liquid that creates a natural barrier. The science is sound: as the cake bakes, the heavier custard components sink while the lighter cake elements rise, resulting in distinct layers that will make you look like a pastry wizard.
- Intensity Without Overwhelm: Using both cocoa powder and dark chocolate creates a depth of flavor that's rich but never cloying. The cocoa provides the backbone while the chocolate adds those complex fruity and earthy notes that make people close their eyes and sigh involuntarily. It's like the difference between a great symphony and someone banging on piano keys.
- One-Bowl Wonder: Despite its restaurant-quality results, this entire dessert comes together in a single bowl with a whisk and about ten minutes of your time. No separating eggs, no folding in meringue, no need for a water bath or any of those fussy techniques that make you question whether dessert is worth the effort. Your dishwasher will thank you, and so will your sanity.
- Make-Ahead Marvel: Unlike most custard desserts that deflate faster than a punctured balloon, this cake actually improves after a night in the fridge. The flavors meld and deepen, the custard sets to the perfect consistency, and you can serve it cold or gently warmed without any loss of that magical texture. Perfect for dinner parties when you want to impress without the last-minute stress.
- Crowd Psychology: I've watched this cake turn grown adults into dessert communists — everyone demanding equal shares, negotiating for corner pieces, and volunteering to "test" multiple slices just to be sure it's as good as they think. The combination of familiar comfort (cake) with luxurious surprise (custard) triggers something primal in dessert lovers, making them lose all sense of portion control.
Alright, let's break down exactly what goes into this masterpiece...
Inside the Ingredient List
Every ingredient in this chocolate custard cake pulls double duty, creating layers through nothing more than their natural properties and some strategic mixing. I've spent months tweaking ratios, testing different brands, and even traveling with measured ingredients to see how altitude affects the outcome. The result is a shopping list that reads like a love letter to chocolate, each component chosen for its ability to contribute to that perfect dual texture that makes this dessert legendary.
The Flavor Foundation
Good quality dark chocolate forms the soul of this dessert, and here's where being cheap will bite you in the end. Use something with at least 60% cocoa content, but avoid anything above 80% unless you enjoy desserts that taste like bitter disappointment. I've found that chocolate between 65-70% strikes the perfect balance — rich enough to feel indulgent but not so intense that it overpowers the delicate custard. The chocolate melts into the custard layer, creating those gorgeous rivers of molten goodness that will have you swooning.
Dutch-processed cocoa powder might seem interchangeable with natural cocoa, but trust me, it's not. The alkalized cocoa brings a deeper, more complex chocolate flavor that tastes almost malty, with none of the harsh acidity that can make chocolate desserts taste one-dimensional. It's like the difference between a great conversation and someone shouting chocolate at you. If you can only find natural cocoa, add a pinch of baking soda to neutralize the acid, but do yourself a favor and hunt down the Dutch stuff.
The Texture Architects
Whole eggs are the silent heroes here, providing structure to the cake layer while simultaneously creating the custard's silky texture. The proteins in the eggs coagulate at different temperatures, which is why we get that gorgeous separation during baking. Use large eggs at room temperature — cold eggs will make your custard lumpy and sad, like a romance novel where the couple never gets together. Let them sit on the counter for 30 minutes or give them a quick warm water bath if you're impatient.
Whole milk creates the perfect custard consistency, delivering enough fat for richness without making the dessert feel heavy. I've tested with everything from skim milk to heavy cream, and whole milk hits that sweet spot where the custard sets properly but still feels luxurious. The milk proteins also help stabilize the custard, preventing it from weeping or becoming watery. If you're feeling fancy, swap out a quarter cup of milk for heavy cream to make it even more decadent.
The Unexpected Star
Espresso powder might seem like an odd addition, but it doesn't make the dessert taste like coffee — it just amplifies the chocolate flavor in ways that will make you question everything you know about baking. The coffee compounds bind to the same taste receptors as chocolate, creating a perception of deeper, more complex chocolate flavor. It's like adding a bass line to your favorite song; you might not notice it specifically, but you'd miss it if it were gone. Just a quarter teaspoon transforms good chocolate into chocolate that makes people close their eyes and mutter "oh my god" under their breath.
A pinch of sea salt isn't just for savory dishes — it's the difference between flat, boring chocolate and chocolate that sings with complexity. Salt enhances sweetness while balancing bitterness, creating a more rounded flavor profile that keeps you coming back for more. Use a flaky sea salt if you have it; the irregular crystals distribute more evenly and add tiny bursts of salinity that make the chocolate taste even more chocolatey. Table salt works in a pinch, but it dissolves too quickly and can make the edges taste slightly metallic.
The Final Flourish
Unsalted butter gives us control over the salt content while adding that irreplaceable buttery richness that makes desserts taste like they came from a French bakery. Butter that's too cold won't incorporate properly, leading to greasy pockets that ruin the texture. Too warm, and you'll lose the ability to trap air, resulting in a dense cake. Aim for cool room temperature — you should be able to press a finger into it with slight resistance, like a ripe peach. European-style butter with its higher fat content makes an even more luxurious custard, but regular butter will still produce stunning results.
All-purpose flour provides just enough structure to keep the cake layer light and tender without making it tough. The protein content in AP flour is the Goldilocks choice here — cake flour would be too delicate and might collapse under the custard, while bread flour would create a chewy, unpleasant texture. Whisk it with the cocoa powder first to ensure even distribution; nobody wants to bite into a pocket of raw flour when they're expecting chocolate heaven.
Everything's prepped? Good. Let's get into the real action...
The Method — Step by Step
- Start by preheating your oven to 325°F (160°C) — this lower temperature is crucial for achieving that perfect custard texture without overcooking the cake layer. While the oven heats, butter a 9-inch round cake pan and line the bottom with parchment paper. Don't skip the parchment; it's the difference between a beautiful presentation and a cake that clings to the pan like it owes you money. The butter helps the parchment stick to the pan, preventing it from sliding around when you pour in the batter.
- Melt your chocolate and butter together using a double boiler or microwave. If using the microwave, heat in 30-second bursts, stirring between each interval. The mixture should be smooth and glossy, like liquid satin. Let it cool slightly — if it's too hot when you add the eggs, you'll end up with chocolate scrambled eggs, and nobody wants that culinary tragedy. The cooling period also allows the chocolate to develop its flavor, making the final dessert more complex.
- In a large bowl, whisk together the eggs and sugar until the mixture becomes pale and thick. This should take about 2 minutes of vigorous whisking, or 30 seconds if you're using a mixer. You're looking for a texture that forms ribbons when you lift the whisk — it should fall back into the bowl in a steady stream that sits on the surface for a few seconds before disappearing. This step incorporates air that will help create that light cake layer on top.
- Now for the fun part — stream the cooled chocolate mixture into the eggs while whisking constantly. Pour it in a slow, steady stream like you're making an aioli. The mixture will darken and become glossy, transforming from a pale yellow to a rich mahogany. Don't rush this step; taking your time ensures the chocolate incorporates smoothly without cooking the eggs. The batter should look like liquid brownies at this point.
- Add the milk, espresso powder, and vanilla extract, whisking until everything is combined. The mixture will thin out considerably — don't panic, this is exactly what we want. The liquid helps create that separation during baking. The espresso powder should dissolve completely, leaving no gritty bits. Give it a good whisk for about 30 seconds to ensure everything is homogenous.
- In a separate small bowl, whisk together the flour, cocoa powder, and salt. This pre-mixing prevents lumps and ensures the cocoa powder doesn't clump when it hits the wet ingredients. Sift the dry ingredients if your cocoa powder is particularly lumpy — nobody wants to bite into a pocket of bitter cocoa when they're expecting smooth custard.
- Gently fold the dry ingredients into the wet mixture using a spatula. The key here is to fold, not stir — you want to maintain as much air as possible in the batter. Mix just until you no longer see streaks of flour; overmixing will develop gluten and make the cake tough. The batter should be thin and pourable, like chocolate syrup. If it seems too thick, add a tablespoon of milk.
- Pour the batter into your prepared pan and give it a gentle shake to distribute evenly. The batter will look alarmingly liquid — that's perfect! Tap the pan on the counter a few times to release any large air bubbles. Place the pan on a baking sheet to make it easier to handle and to catch any potential spills. The cake will rise quite a bit during baking before settling back down.
- Bake for 45-50 minutes, but start checking at 40 minutes. The cake is done when the edges are set and the center still has a slight jiggle. It should look like a brownie on top, with a thin crust that cracks slightly when you move the pan. Don't wait for the center to be completely firm — that's overbaked custard, and it will taste like chocolate rubber. The residual heat will finish cooking the center as it cools.
- Let the cake cool in the pan for 15 minutes before running a knife around the edges and inverting onto a serving plate. It will deflate slightly as it cools, creating a perfect little well for the custard. Serve warm for maximum drama, or let it cool completely and refrigerate for a more set custard. Either way, prepare for people to make inappropriate noises when they taste it.
That's it — you did it. But hold on, I've got a few more tricks that'll take this to another level...
Insider Tricks for Flawless Results
After making this cake more times than I care to admit (my jeans have strong opinions about my recipe testing habits), I've discovered some secrets that separate the good chocolate custard cakes from the ones that make people propose marriage on the spot. These aren't just nice-to-know tips — they're the difference between "this is good" and "I need to sit down, this is life-changing." Some of these I learned through happy accidents, others through spectacular failures that ended with me eating the evidence so nobody would know how badly I'd messed up.
The Temperature Rule Nobody Follows
Room temperature ingredients aren't just a suggestion here — they're the law. Cold eggs will seize up when they hit the warm chocolate, creating tiny flecks of scrambled egg that ruin the custard's silky texture. Cold milk will cause the chocolate to seize, turning your smooth batter into a lumpy disaster that no amount of whisking can fix. I've learned to set everything out an hour before baking, or if I'm being impatient (which is always), I'll submerge the eggs in warm water for 10 minutes and microwave the milk for exactly 18 seconds. The difference is dramatic — proper temperature ingredients create a batter so smooth it could be featured in a cosmetics commercial.
But here's the real kicker: your serving temperature matters just as much as your ingredient temperature. Serve this cake straight from the fridge and you get a fudgy, almost truffle-like texture that's sophisticated and rich. Warm it gently for 10 seconds in the microwave and the custard becomes liquid gold, creating a dramatic sauce that pools around each slice. Room temperature gives you something in between — a perfect balance of cake and custard that melts on your tongue. I keep a mental note of who's eating it and serve accordingly: the sophisticated foodies get it cold, the kids get it warm, and everyone else gets it room temperature.
Why Your Nose Knows Best
Your nose is actually a better judge of doneness than your eyes for this cake. When it's perfectly baked, your kitchen will smell like a chocolate shop that's been transported to heaven — deep, complex chocolate with hints of vanilla and butter. If you start to smell something sharp or slightly burnt, you've overbaked it and the custard will taste like chocolate sawdust. The scent should be warm and inviting, making it physically impossible for anyone in your house to stay away from the kitchen. I've had neighbors knock on my door asking what I'm baking, drawn by the aroma wafting through the walls.
The timing of this aroma is crucial too. You should start smelling chocolate about 25 minutes into baking, but the really intoxicating scent hits around 35 minutes. That's when you know you're close to perfect doneness. If your kitchen still smells like raw batter at 40 minutes, something's gone wrong — either your oven is running cool or you've measured something incorrectly. Conversely, if your house smells like chocolate before 20 minutes, your oven is too hot and you'll have burnt edges with raw custard in the middle.
The 5-Minute Rest That Changes Everything
After you take the cake out of the oven, resist every instinct to immediately flip it onto a plate. That 15-minute rest isn't just for cooling — it's when the custard sets to the perfect consistency and the cake layer relaxes back down. Flip too early and the custard will run out like a chocolate volcano, leaving you with a cake shell and a puddle of sadness on your counter. Wait too long and the cake will stick to the pan like it's been glued in place. I've found that exactly 15 minutes gives you the sweet spot where the cake releases cleanly but the custard is still warm and flowing.
During this rest period, something magical happens with the flavors too. The chocolate deepens, the vanilla becomes more pronounced, and everything melds together into something greater than the sum of its parts. It's like the cake is having a little post-bake meditation, gathering itself before the big reveal. Cover it loosely with foil if you're worried about it cooling too much, but don't seal it completely or you'll create condensation that will make the top soggy.
The Salt Secret
That tiny pinch of sea salt in the recipe isn't just for enhancing flavor — it's actually crucial for the texture too. Salt helps strengthen the protein networks in the custard, giving it that perfect spoon-coating consistency rather than a thin, watery texture. But here's what most recipes don't tell you: sprinkle a few flakes of finishing salt on top just before serving. The contrast between sweet custard and salty crunch creates a flavor explosion that will make your taste buds do a happy dance. Use a flaky sea salt like Maldon or fleur de sel — the delicate crystals add texture without overwhelming the chocolate.
The timing of when you add salt matters too. Mixing it into the batter ensures it permeates the entire dessert, but a little on top just before serving gives you those delightful bursts of salinity that make each bite interesting. It's like having two different salt experiences in one dessert — the background salt that enhances the chocolate and the foreground salt that adds excitement. Just don't use iodized table salt for finishing; it tastes metallic and will ruin all your hard work.
Creative Twists and Variations
This recipe is a playground. Here are some of my favorite ways to switch things up:
Mocha Madness
Replace half the milk with strong espresso and add a tablespoon of coffee liqueur to the batter. The result is a sophisticated mocha custard cake that tastes like it came from a Venetian café. Top with lightly sweetened whipped cream and a dusting of cocoa powder. This version is perfect for dinner parties where you want to impress the coffee addicts.
Salted Caramel Swirl
Drizzle three tablespoons of thick caramel sauce over the batter just before baking. Use a knife to marble it lightly — don't overmix or you'll lose the separation. The caramel sinks to create a layer of gooey sweetness between the cake and custard. Sprinkle with flaky sea salt before serving for that perfect sweet-salty balance.
Orange Chocolate Dreams
Add the zest of one orange and a tablespoon of orange liqueur to the batter. The citrus oils enhance the chocolate flavor while adding a bright note that keeps the dessert from feeling too heavy. This version tastes like a chocolate orange transformed into the most luxurious dessert imaginable.
Spice Market
Whisk a teaspoon of ground cinnamon, half a teaspoon of cardamom, and a pinch of cayenne into the dry ingredients. The warm spices complement the chocolate beautifully, creating a dessert that tastes like Mexican hot chocolate in cake form. A cinnamon stick as garnish makes it look professional.
White Chocolate Raspberry
Replace the dark chocolate with good quality white chocolate and fold in fresh raspberries before baking. The tart berries cut through the sweetness of the white chocolate, creating a sophisticated flavor profile that surprises everyone who thinks white chocolate is boring.
Nutella Lover's
Replace half the butter with Nutella and add chopped hazelnuts to the batter. The hazelnut-chocolate combination creates a dessert that tastes like the inside of a Ferrero Rocher, but better. Toast the hazelnuts first for maximum flavor impact.
Storing and Bringing It Back to Life
Fridge Storage
This cake keeps beautifully in the refrigerator for up to 4 days, wrapped tightly in plastic wrap. The custard actually improves as it sits, developing a more complex flavor that's reminiscent of chocolate truffles. Store it in the original pan covered with plastic wrap, or cut into slices and store in an airtight container with parchment paper between layers. The cake will absorb some moisture from the fridge, making it even more fudgy and dense — not a bad thing at all.
Freezer Friendly
Believe it or not, this cake freezes exceptionally well. Cut it into individual portions and wrap each piece tightly in plastic wrap, then aluminum foil. Freeze for up to 2 months. To serve, let it thaw in the refrigerator overnight, then bring to room temperature for 30 minutes. The texture won't be quite as perfect as fresh, but it's still miles better than most chocolate desserts. Pro tip: freeze individual slices on a baking sheet first, then wrap them — this prevents the custard from getting squished.
Best Reheating Method
If you want to serve it warm (and you should), the microwave is your friend. Heat individual slices for 8-10 seconds on medium power — just enough to warm the custard without cooking it further. For a whole cake, place it in a 250°F oven for 10-15 minutes. Add a tiny splash of water to the pan before reheating — it creates steam that helps restore the custard's silky texture. Never reheat it hot or you'll end up with chocolate scrambled eggs.