I was in the middle of a frantic Saturday night, juggling a half‑finished lasagna, a crying toddler, and a relentless craving for something that felt both elegant and comforting. My fridge was whispering sweet nothings about leftover cream cheese, while the pantry sang a siren song of sugar cookie mix. I thought, “What if I could combine the buttery crunch of a cookie crust with the silky decadence of crème brûlée, all wrapped in a cheesecake’s hug?” The idea was half‑madness, half‑genius, and entirely inevitable. I grabbed the ingredients, turned up the oven, and set out on a culinary adventure that would soon become my go‑to party show‑stopper.
Picture this: the kitchen filled with the warm, caramel‑kissed aroma of toasted sugar cookie crust, the faint perfume of vanilla swirling in the air like a soft‑spoken promise, and the faint crackle of toffee bits as they melt into a glossy sheen. The sound of the mixer whirring is a comforting hum, while the buttery crust cools on the countertop, firm yet yielding to a gentle press. When the batter meets the oven, the heat transforms it into a golden, slightly puffed canvas, and the top begins to caramelize into a crackly, amber crust that shatters like delicate glass under a spoon. Every sense is on fire, and you can’t help but smile at the sheer indulgence about to unfold.
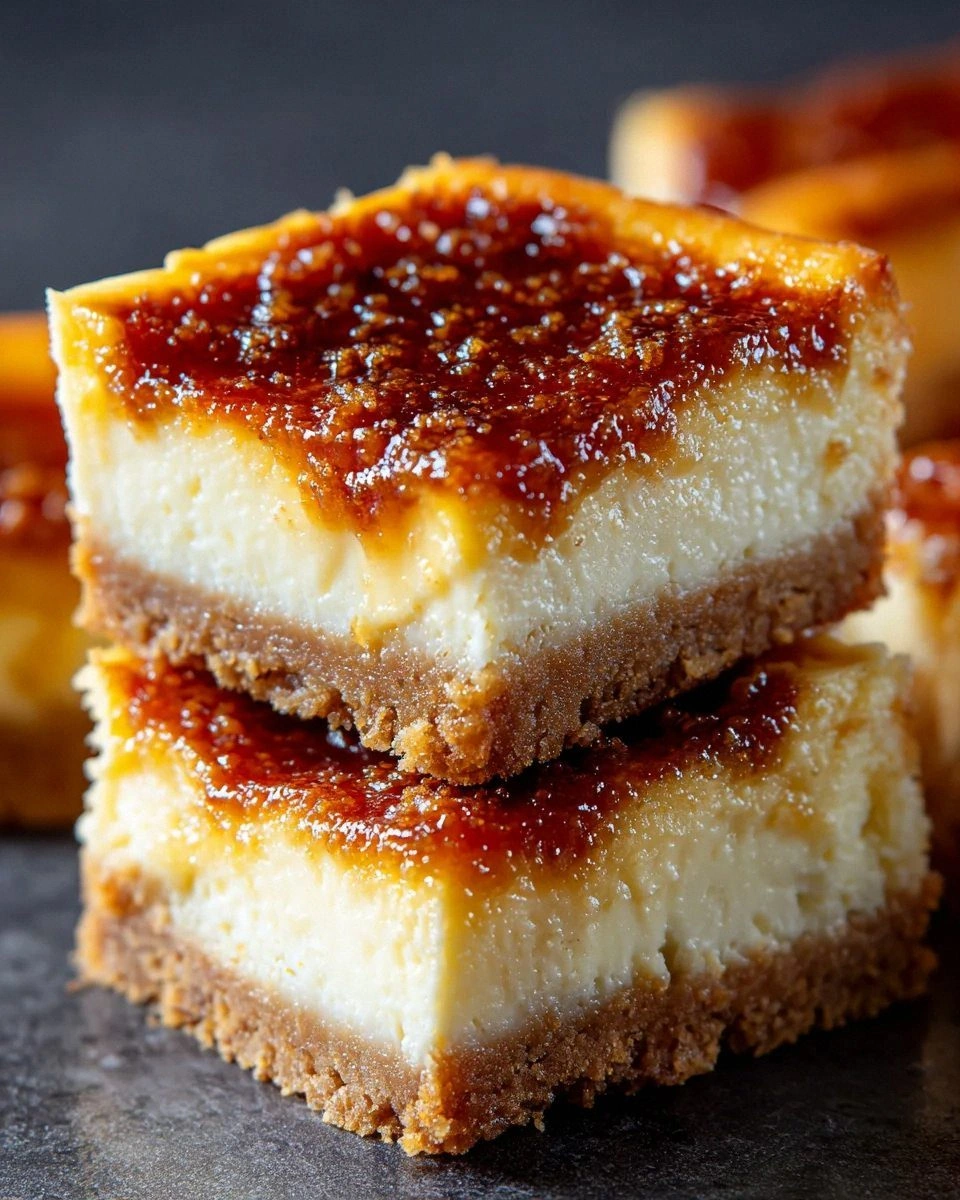
Most crème brûlée cheesecake recipes I've tried either end up soggy, overly sweet, or just plain confusing. This version, however, sidesteps the pitfalls by marrying a ready‑made sugar cookie mix for a rock‑solid base with instant French vanilla pudding for that unmistakable, buttery‑vanilla depth. The addition of toffee bits gives you that classic brûlée crunch without the dreaded torch‑burned mess. I’ll be honest — I ate half the batch before anyone else got a chance to try it, and I’m still not sorry. This is hands down the best version you’ll ever make at home, and I dare you to taste it and not go back for seconds.
Let me walk you through every single step — by the end, you’ll wonder how you ever made it any other way. Okay, ready for the game‑changer? The secret weapon is a splash of sour cream that adds a subtle tang, keeping the dessert from turning into a sugar‑laden nightmare. And now the fun part: we’ll blend, bake, and brûlée our way to bar perfection. Stay with me here — this is worth it.
What Makes This Version Stand Out
- Flavor Explosion: The instant French vanilla pudding mix injects a rich, custardy depth that ordinary cheesecake mixes simply can’t match.
- Texture Harmony: A crisp, buttery cookie crust meets a silky, airy filling, while the toffee topping adds a satisfying crunch that shatters like thin ice.
- Simplicity Meets Sophistication: Using a pre‑made sugar cookie mix saves time without sacrificing that homemade feel.
- Unique Twist: The toffee bits double as a brûlée topping, eliminating the need for a kitchen torch and ensuring an even caramelization.
- Crowd‑Pleaser: Even the pickiest dessert skeptics can’t resist the buttery‑vanilla aroma that fills the room as soon as you open the oven.
- Ingredient Quality: Unsalted butter lets you control the salt balance, while real cream cheese guarantees that luxurious mouthfeel.
- Cooking Method: Baking the bars in a single pan ensures uniform cooking and makes cutting into perfect squares a breeze.
- Make‑Ahead Potential: These bars keep beautifully in the fridge for up to three days, making them perfect for party prep.
Inside the Ingredient List
The Flavor Base
The star of this recipe is the instant French vanilla pudding mix. It’s not just a filler; it brings a deep, buttery vanilla flavor that echoes the classic crème brûlée profile. If you skip it, you’ll lose that signature custard richness, and the bars will feel like a plain cheesecake. For a dairy‑free twist, try a coconut‑based vanilla pudding mix, but expect a subtle coconut undertone.
The Texture Crew
Sugar cookie mix provides the sturdy, buttery crust that holds everything together. Using a high‑quality mix ensures a tender crumb that doesn’t crumble when you cut the bars. If you’re feeling adventurous, substitute with a graham cracker blend for a slightly nuttier flavor. Unsalted butter melted into the crust adds richness; using salted butter would throw off the delicate balance, making the bars overly salty.
The Unexpected Star
Toffee bits are the surprise element that mimics the caramelized sugar topping of a traditional crème brûlée. They melt slightly during baking, forming a glossy, crunchy layer that shatters delightfully under a fork. If you can’t find toffee bits, crush some caramel candies or use chopped pecans for a nutty crunch.
The Final Flourish
Cream cheese is the creamy foundation of the filling, delivering that signature tang and velvety texture. Choose a full‑fat version for the best mouthfeel; low‑fat alternatives can make the bars dense and dry. Sour cream adds a subtle acidity that cuts through the sweetness, preventing the dessert from feeling cloying. If you’re out of sour cream, Greek yogurt works as a 1:1 swap, though it will introduce a slightly tangier note.
Granulated sugar and light brown sugar together create a balanced sweetness with a hint of caramel depth. The brown sugar’s molasses content enriches the flavor, while the white sugar ensures a clean, sweet finish. Vanilla extract is the aromatic glue that ties all flavors together; a high‑quality pure extract makes a noticeable difference. Finally, the egg acts as a binder, giving the bars structure and a delicate rise. Skipping the egg will result in a crumbly mess that refuses to hold its shape.
Everything's prepped? Good. Let's get into the real action...
The Method — Step by Step
Preheat your oven to 350°F (175°C). While the oven warms up, line a 9×13‑inch baking pan with parchment paper, leaving an overhang on the sides for easy removal later. This step ensures the bars don’t stick and makes cleanup a breeze.
In a medium bowl, combine the sugar cookie mix with melted unsalted butter. Stir until the mixture resembles wet sand, then press it firmly into the prepared pan, spreading it evenly to the edges. The crust should be compact; think of it as a buttery foundation that won’t crumble under the weight of the filling.
Kitchen Hack: Use a piece of wax paper to roll a flat-bottomed glass over the crust for an ultra‑smooth surface.Place the crust in the oven for 8‑10 minutes, just until it starts to turn a light golden hue. You’ll hear a faint sizzle as the butter bubbles—this is the sound of flavor forming. Remove it and let it cool slightly while you prepare the filling.
In a large mixing bowl, beat the cream cheese until smooth and free of lumps. Add the egg, vanilla extract, and both sugars, mixing on low speed until fully incorporated. The mixture should be glossy and slightly thick, indicating that the sugars have dissolved.
Stir in the instant French vanilla pudding mix, followed by the sour cream. This is the moment of truth—the pudding mix will thicken the batter, giving it that classic crème brûlée custard body. Once combined, fold in the toffee bits gently, reserving a handful for topping.
Pour the filling over the pre‑baked crust, spreading it with a spatula so the edges are flush with the pan. Sprinkle the remaining toffee bits evenly across the top; they’ll melt and caramelize, forming that signature crackly surface.
Bake the assembled bars for 25‑30 minutes, or until the center is set but still slightly jiggles like a firm gelatin. The edges should pull away from the pan, and the top will develop a light amber crust. Keep a close eye on the color; you want a golden‑brown finish, not a burnt one.
Watch Out: Opening the oven door too early can cause the top to deflate. Trust the timer and resist the urge to peek.Once baked, turn off the oven, crack the door open just a crack, and let the bars sit for 10 minutes. This gentle cooling helps the caramelized topping set without becoming too hard. While they’re cooling, the kitchen will be filled with an intoxicating vanilla‑toffee aroma that makes you want to lick the pan.
After the brief oven rest, transfer the pan to a wire rack and allow the bars to cool completely, about 1‑2 hours. Then, using the parchment overhang, lift the whole slab onto a cutting board and slice into squares. For clean cuts, dip a sharp knife in hot water between each slice.
That's it — you did it. But hold on, I've got a few more tricks that'll take this to another level. The next section reveals insider tips that will make your bars flawless every single time.
Insider Tricks for Flawless Results
The Temperature Rule Nobody Follows
Never bake cheesecake at a scorching 400°F; the high heat forces the proteins to seize, leading to cracks. Keep the oven at a gentle 350°F and use a water bath if you’re aiming for a perfectly smooth top. I once tried a hotter oven and ended up with a cracked surface that looked more like a broken mirror than a dessert.
Why Your Nose Knows Best
When the crust turns a light golden brown and you catch that buttery, toasted scent, you’re at the perfect point to pull it out. Trust that nose signal more than the timer— ovens can vary by a few minutes. The moment you smell that caramel‑vanilla perfume, you know the magic is happening.
The 5‑Minute Rest That Changes Everything
Allow the bars to rest in the turned‑off oven with the door ajar for five minutes before cooling on a rack. This gradual temperature drop prevents the top from shrinking too quickly, which is the main cause of those unsightly cracks. I’ve seen bars that went from perfect to cracked simply because they were rushed out of the oven.
Toasting the Toffee Bits
Before folding them into the batter, toast the toffee bits in a dry skillet for 30 seconds. This amplifies their buttery flavor and ensures an even caramelization on the surface. The result? A deeper, richer crunch that rivals a professionally torch‑brûléed dessert.
The Chill‑Before‑Serve Secret
Refrigerate the cut bars for at least an hour before serving. The chill firms up the custard, making each bite silky and allowing the toffee topping to stay crisp. If you serve them warm, the topping softens and loses its signature snap.
Creative Twists and Variations
This recipe is a playground. Here are some of my favorite ways to switch things up:
Salted Caramel Swirl
Swirl in a homemade salted caramel sauce before baking. The salty ribbons cut through the sweetness and add a luxurious depth that will wow anyone who loves sweet‑and‑salty combos.
Espresso‑Infused
Add a tablespoon of instant espresso powder to the filling for a subtle coffee note. Pair it with dark chocolate shavings on top for a mocha‑brûlée hybrid that’s perfect for brunch.
Berry Burst
Fold in fresh raspberries or blueberries into the batter. The fruit’s acidity balances the richness, and when baked, they create tiny pockets of jammy surprise.
Nutty Crunch
Replace half of the toffee bits with toasted chopped almonds or hazelnuts. The nutty aroma adds another layer of texture and a sophisticated flavor profile.
Coconut Dream
Swap half of the cream cheese for coconut cream cheese and sprinkle toasted coconut flakes on top. This gives the bars a tropical twist that pairs beautifully with a lime‑infused glaze.
Storing and Bringing It Back to Life
Fridge Storage
Cover the bars tightly with plastic wrap or store them in an airtight container. They stay fresh for up to three days, and the toffee topping remains pleasantly crisp.
Freezer Friendly
Wrap each bar individually in parchment, then place them in a freezer‑safe bag. They freeze well for up to two months. When you’re ready to enjoy, thaw overnight in the fridge.
Best Reheating Method
To revive the bars, preheat the oven to 300°F (150°C), place the bars on a baking sheet, and add a tiny splash of water to the pan’s edge. The steam gently re‑moisturizes the interior while the top regains its caramelized snap. In just 8‑10 minutes, they’ll be as good as fresh out of the oven.