I still remember the first time I tried to make candy apples. The kitchen looked like a crime scene—ruby-red sugar splattered across the backsplash, wooden sticks rolling underfoot, and a smoke detector screaming like it was auditioning for a horror movie. Somewhere between the molten sugar bubbling like Mount Doom and my frantic Google search for “how to remove candy coating from ceiling,” I realized most recipes skip the parts that actually matter. Fast-forward through three burnt pans, one minor sugar burn, and a very patient dog hiding under the table, and I finally cracked the code. These striped candy apples aren’t just prettier than the classic carnival version—they’re easier, more flavorful, and they’ll make you look like the kind of culinary wizard who casually juggles thermometers and edible glitter before breakfast.
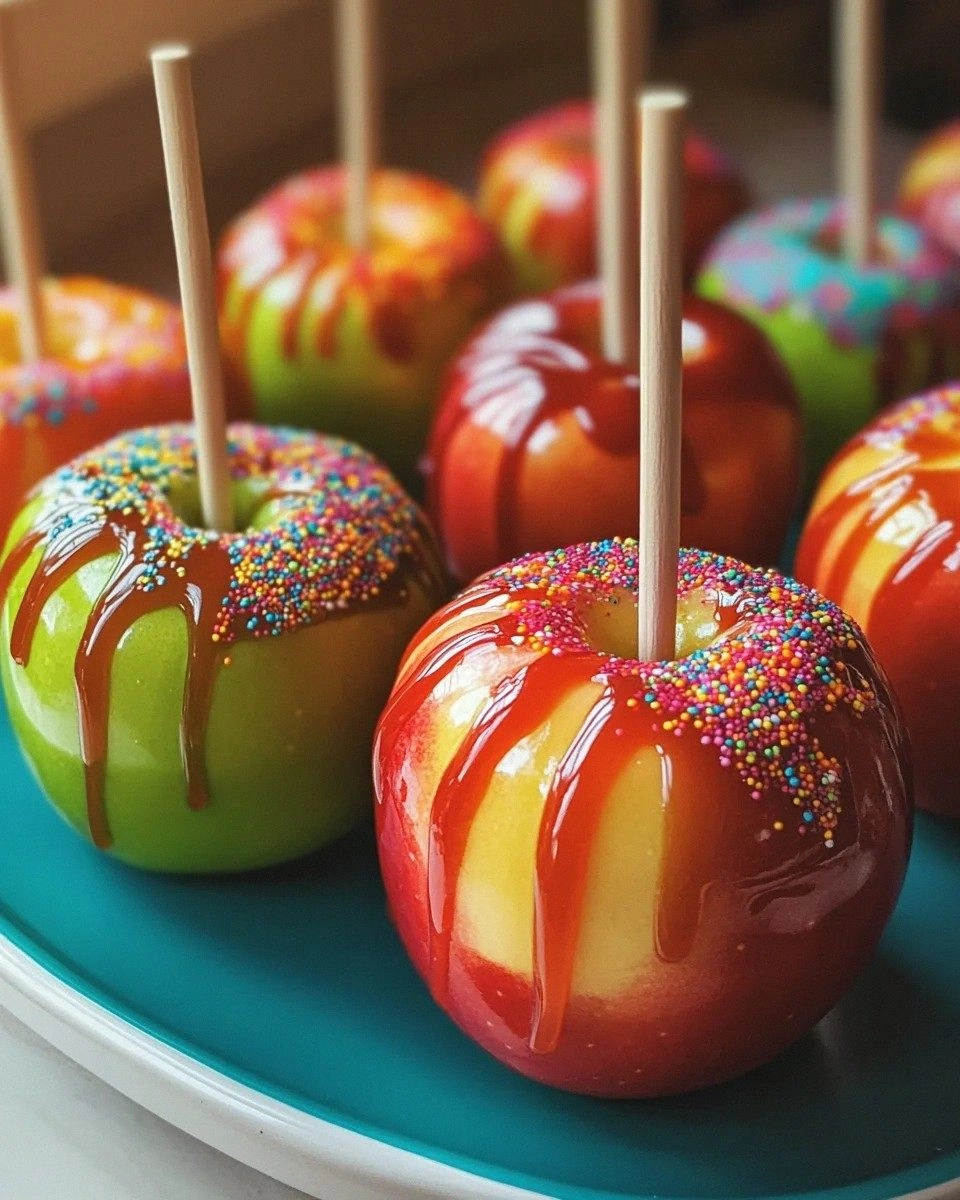
Picture this: late-October sunlight slanting through the kitchen window, the air thick with the smell of crisp apples and vanilla, a faint hiss as sugar hits the golden temperature sweet spot. You tilt the pot, watching ribbons of glossy syrup cascade like liquid stained glass, and for a moment everything feels enchanted. That first bite—candy shell fracturing into a thousand delicate shards, revealing the cool, juicy apple beneath—should come with its own soundtrack. The stripes add a playful sophistication: crimson, snow-white, and a cheeky ribbon of electric blue that tastes like summer carnival nights even if it’s the middle of tax season. I dare you to set these out at a party and not feel smug when guests start taking photos before they even taste one.
Most recipes treat candy apples like a chemistry exam: clamp on a candy thermometer, pray to the sugar gods, and hope you don’t end up with a kitchen that resembles a Jackson Pollock painting. Here’s the truth—once you understand two tiny details (the “temperature pause” and the “stripe window”) the whole process flips from stressful to stupidly fun. You’ll swirl colors like a laid-back artist, the apples will spin like ballerinas on your parchment, and you’ll wonder why everyone else is still scraping burnt sugar off their stove at midnight. Stay with me here—this is worth it.
I’ve smuggled these to football tailgates, tucked them into gift baskets, and even used them as edible place-card holders at a fall wedding. Kids lose their minds over the colors; adults get that nostalgic glaze in their eyes before the first crunch. And yes, I’ll confess right now: I ate three in a row the last batch, standing at the counter in my pajamas, telling myself the apples counted as fruit servings. Let me walk you through every single step—by the end, you’ll wonder how you ever made it any other way.
What Makes This Version Stand Out
Striped Magic: Instead of one thick, tooth-cracking shell, we paint thin alternating layers—each stripe hardens in under a minute, giving you crisp snap without the jaw workout. You get color contrast that actually tastes like separate flavors instead of a one-note sugar bomb.
Flavor-Infused Syrup: A whisper of vanilla bean and a squeeze of fresh lemon juice turn basic hard candy into something that tastes like grown-up Jolly Ranchers. Your kitchen will smell like a French confiserie instead of a dentist’s office.
Fail-Proof Temperature Hack: We use the “cold-water ball test” plus a narrow-range thermometer zone so you never overshoot 300°F. Translation: no scary amber lava that sets off smoke alarms.
One-Pot Cleanup: The same saucepan melts sugar, colors stripes, and reheats leftovers for drizzles. Less dishes, more Netflix time—my kind of dessert.
Apple Armor: A quick dip in boiling water plus a swipe of vinegar strips the natural wax so candy grabs like superglue. No more sliding shells that shatter on the floor like Christmas ornaments.
Make-Ahead Friendly: These beauties hold their shine for 48 hours if you stash them in a cake box with a tiny pouch of silica gel. Perfect for party planners or procrastinators (same thing, right?).
Color-Your-Own Adventure: Gel colors mean you can match team colors, baby-shower pastels, or that Pantone swatch you’ve been obsessed with. I once did ombre lavender for a book-club brunch; the host still texts me for the color code.
Alright, let’s break down exactly what goes into this masterpiece...
Inside the Ingredient List
The Flavor Base
Granulated Sugar: Plain white sugar gives the clearest, shiniest finish. Organic sugar contains molasses remnants that can turn your stripes murky—save the health halo for your morning oatmeal. If you absolutely must swap, superfine caster dissolves faster but costs more and doesn’t add any real benefit here.
Light Corn Syrup: This is your insurance policy against crystallization—sugar’s bratty habit of turning back into gritty sand. Corn syrup acts like the diplomatic friend who keeps everyone playing nice. Skip it and you’ll spend the evening chewing what feels like sweet gravel. Golden syrup works in a pinch but adds a butterscotch note that muddies bright colors.
Water: Just enough to wet the sugar so it melts before it burns. Use tap water; fancy spring water won’t make a lick of difference once it boils away. Measure carefully—too much and you’ll be waiting forever for the temperature to climb.
The Texture Crew
Fresh Apples: Go small or go home—golf-ball-sized fruits give you a higher candy-to-apple ratio, meaning more crackle per bite. Granny Smiths stay perky and tart, Honeycrisp bring floral sweetness, and a mix looks adorable in a striped bouquet. Avoid Red Delicious; their mealy flesh collapses faster than my willpower near a plate of brownies.
Wooden Sticks: Classic craft sticks are cheap and food-safe, but I’m partial to trimmed birch twigs for that fairy-tale vibe. Whatever you choose, spear straight through the stem cavity so the apple sits balanced—nobody wants a Leaning Tower of Pisa situation once the candy sets.
The Unexpected Star
White Food-Coloring Base: This sounds like foodie overkill, but a teaspoon makes pastel stripes pop instead of looking washed-out. It’s basically edible White-Out and keeps your colors Instagram-bright even under yellow kitchen bulbs. If you skip it, expect sad, vintage-tinted ribbons that scream “grandma’s Tupperware party.”
Gel Food Colors: Liquids dilute the syrup and can cause seizing; gels concentrate pigment without extra water. Americolor and Chefmaster are my ride-or-die brands—one dip with a toothpick gives carnival vibrancy. Buy primary colors and you can mix any shade; I once nailed the exact teal of my best friend’s bridesmaid dresses for her bridal-shower favors.
The Final Flourish
Vanilla Bean Paste: Those tiny flecks read “artisanal” even if you bought the apples at a gas station. Paste is stronger than extract and won’t add alcohol that can sputter in hot sugar. In a bind, scrape half a pod or use 1 tsp good extract, but expect a slightly softer shell.
Lemon Juice: A few drops brighten the whole flavor profile, cutting cloying sweetness the way a squeeze perks up iced tea. Use fresh; the bottled stuff carries a metallic aftertaste that competes with your candy’s fruit notes. Think of it as the pinch of salt in caramel—imperceptible but essential.
Everything’s prepped? Good. Let’s get into the real action...
The Method — Step by Step
- Wash your apples in boiling water for 8 seconds—no longer or the skin wrinkles like a shar-pei. Swipe each with a vinegar-damp paper towel to nuke any wax. Dry like your life depends on it; stray water drops will make candy sputter like tiny fireworks. Twist wooden sticks through the stem end until they feel anchored but don’t poke out the other side—think lollipop, not shish kebab.
- Line a half-sheet pan with parchment and slide it next to the stove. Clip a candy thermometer to a heavy 2-quart saucepan, making sure the bulb doesn’t scrape the bottom or you’ll get false readings. Off-heat, add sugar, corn syrup, and water in that order—sugar first keeps it from sticking. Stir with a wet finger until the mixture looks like wet sand; any dry sugar on the sides will crystallize and ruin your day.
- Cook over medium heat, swirling—never stirring—until the syrup goes clear and starts to bubble like a Jacuzzi. When the surface looks like it’s breathing, brush the inner walls with a wet pastry brush to wash down sugar crystals. This is the zen moment; watch the bubbles slow and thicken, smell the faint caramel whisper.
- Now crank to medium-high and watch the temperature rocket. At 250°F, drop in vanilla paste and lemon juice—small pot, big sizzle. The syrup will foam like an excited puppy; that’s good. Keep cooking until the mercury hits 300°F (hard-crack stage). If you don’t have a thermometer, spoon a drop into ice water; it should form brittle threads that snap when you bite. If it bends, keep boiling.
- Remove from heat, count to ten so bubbles subside, then divide syrup into heat-proof ramekins—one per color. Work fast: stir gel color into each ramekin with a bamboo skewer; the syrup cools quickly and will thicken like taffy if you dawdle. Aim for bold hues because candy lightens as it sets.
- Hold an apple by the stick over the parchment, tilt a ramekin, and drizzle a thin ribbon around the equator. Rotate the apple, not the spoon, so stripes stay straight. Each coat sets in 45 seconds; you’ll hear a faint crack as sugar crystallizes. Alternate colors, leaving negative space for that chic striped effect. If syrup starts to stiffen, microwave ramekin 5 seconds—no longer or you’ll scorch the color.
- Once you’ve done 3-4 stripes, dunk the entire apple into the base color (usually red) for a final glossy coat. Swirl quickly; the cold apple thickens the candy so it grabs. Invert and twirl over the pot so excess drips off in a perfect teardrop tail. Place on parchment to set—about 90 seconds. You’ll hear a satisfying click when you tap the shell.
- Repeat with remaining apples, reheating syrup 3-second bursts if needed. If candy clouds, it’s absorbed moisture—pop it back on the stove for 30 seconds to drive off water. Work in batches of three so syrup stays fluid; cold apples are your built-in timer.
- Let apples cool 10 minutes, then lift and twist to check the underside. If parchment sticks, slide a warm knife underneath to release. Buff any fingerprints with a microfiber cloth for mirror shine. Store standing up in a parchment-lined box; do not refrigerate or condensation will fog the candy.
- Optional finale: Melt white chocolate, tint with matching gel color, and flick speckles across stripes with a fork for galaxy vibes. Or drizzle leftover candy in scribbles on parchment, break into shards, and tuck around the apples for edible confetti. Stand back and bask in the oohs and aahs—this is your kitchen flex moment.
That’s it—you did it. But hold on, I’ve got a few more tricks that’ll take this to another level...
Insider Tricks for Flawless Results
The Temperature Rule Nobody Follows
Most recipes scream “310°F or bust,” but that extra ten degrees pushes candy into bitter territory. Pull at 300°F exactly; carry-over heat will nudge it to 305°F while you color. If you overshoot, dip the pot bottom in a shallow ice bath for 5 seconds—sugar stops cooking on a dime. A friend tried skipping this once; her candy tasted like scotch tape and guests politely nibbled once, then ditched them behind the bar.
Why Your Nose Knows Best
Right before hard-crack, the scent shifts from plain sweet to toasted marshmallow. When you catch that whiff, yank the pan off heat even if the thermometer lags by a couple degrees. Sugar can rise 5°F in the time it takes to Instagram the bubbles, so trust your senses over gadgets. Plus, your kitchen will smell like a French patisserie, which is basically free aromatherapy.
The 5-Minute Rest That Changes Everything
After striping, park apples on a wire rack instead of flat parchment. Air circulates, so bottoms stay crisp, not sweaty. If you’re transporting them, slide a mini silicone packet (the kind from shoe boxes) into the container. It sucks up humidity so your candy stays glassy for two full days—no sad, sticky patches that glue to cellophane.
Creative Twists and Variations
This recipe is a playground. Here are some of my favorite ways to switch things up:
Cotton-Candy Carnival
Swap vanilla for strawberry extract, tint stripes pink and baby-blue, then dust with a puff of cotton-candy sugar right before serving. The sugar melts on contact with your tongue, releasing a burst of airy sweetness that tastes like summer fairs and Ferris-wheel kisses.
Midnight Mocha
Stir a teaspoon of espresso powder into the base syrup, stripe with white and espresso-brown, then drizzle with melted dark chocolate and flaky salt. Coffee bitterness tames the sugar rush, making these acceptable breakfast fare for finals week—don’t judge me.
Spicy Margarita
Add a pinch of chili flakes and a tablespoon of lime zest to the sugar mixture. Stripe neon green and sunset orange, rim the finished apple in margarita salt. The sweet-heat combo is dangerously addictive—serve with actual tequila shots if you’re feeling frat-party nostalgic.
Peppermint Bark
Replace lemon juice with peppermint extract, stripe red and white, then roll bottoms in crushed candy canes once the candy is tacky but set. They look like Christmas ornaments and taste like winter vacation—perfect for stuffing stockings or bribing Santa.
Gold-Dusted Champagne
Use prosecco instead of water in the syrup (alcohol boils off), stripe pale gold and blush pink, then flick edible gold leaf across the surface. These scream New Year’s Eve and pair beautifully with actual bubbly—just warn guests the sticks double as wands for midnight wishes.
S’mores Campfire
Roll finished apples in crushed graham crackers while stripes are still warm, then drizzle with melted milk chocolate and miniature marshmallows toasted under a broiler for 30 seconds. The crackly shell gives way to gooey campfire vibes without the mosquito bites.
Storing and Bringing It Back to Life
Fridge Storage
Don’t. Just don’t. Refrigeration breeds condensation, which turns glossy shells cloudy faster than gossip spreads at book club. Instead, keep apples in a cool, dry cupboard, standing upright in a cardboard cake box. Slip in a silica packet or a small pouch of uncooked rice to wick moisture. They’ll stay pristine for 48 hours, though I’ve never seen them last longer than 24 around teenagers.
Freezer Friendly
Technically you can freeze them, but the candy will sweat and go sticky upon thawing. If you must, flash-freeze on a tray until rock solid, then wrap individually in waxed paper and stash in a zipper bag for up to a week. Thaw unwrapped in the fridge for 2 hours, then buff with a silk cloth to restore some shine—yes, I’m serious, silk works like magic.
Best Reheating Method
There isn’t one—candy apples are a one-shot deal. If the shell softens, you can remelt the candy off, scrape the apple, and start over, but honestly that’s more work than making a fresh batch. Instead, chop leftover apples into a spinach salad with candied pecans and blue cheese; the candy shards become gourmet croutons that make guests swoon.