I was halfway through a late‑night kitchen experiment when the pot on the stove exploded, splattering tomato sauce everywhere and leaving me with a burnt, soggy mess that tasted like regret. I stared at the charred edges, wondering if the world of comfort food was truly that fragile. Then, a memory flickered—my grandma’s pot pie, the way the crust crackled like a snowflake, the aroma of thyme drifting through the air, and the way every bite felt like a hug. That memory became my mission: to recreate that hug in a dish that would not only satisfy my cravings but also make every kitchen disaster feel like a triumph. I’m about to share a version so bold, so luscious, that you’ll swear you’re watching a culinary fireworks show in your own oven.
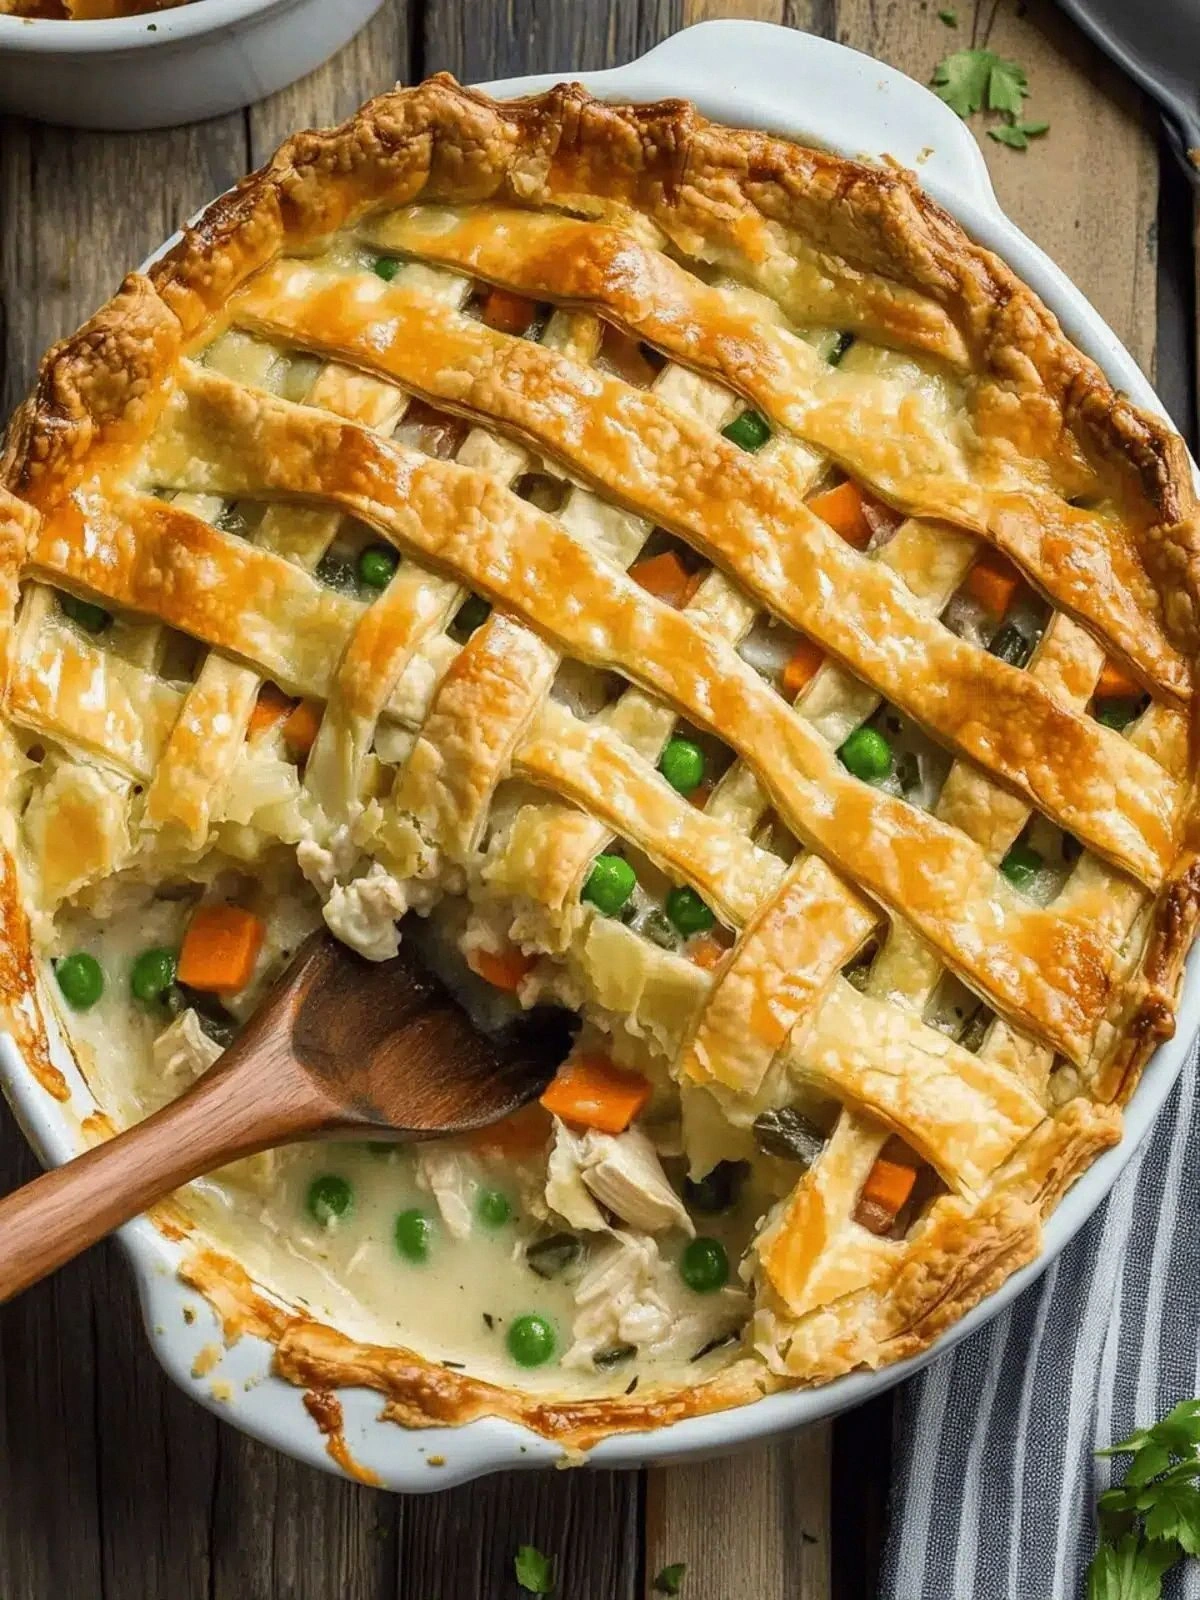
Picture this: the moment the pie comes out of the oven, the steam rises in golden ribbons, and the scent of garlic, onions, and mushrooms fills the kitchen like a warm blanket. You hear the gentle crackle of the crust as it cools, a sound that signals the promise of a perfect bite. The first forkful is a revelation—the creamy sauce clings to the tender chicken, the carrots soften to a silky consistency, and the peas pop with a bright, sweet burst. The crust, golden and flaky, delivers a satisfying crunch that shatters like thin ice, releasing a burst of buttery flavor. You’ll taste the subtle sweetness of the white wine and the aromatic depth of thyme, and you’ll wonder why you’ve been making pot pie the same way all these years.
What sets this recipe apart isn’t just the ingredients—it’s the way they dance together. The sauce is a velvety coat that glazes each morsel, the crust is a buttery fortress that protects the moist filling, and the herbs add a fresh counterpoint that lifts the entire dish. The method is streamlined yet precise, ensuring that every component reaches its peak without compromising the other. You’ll discover that the secret to a truly irresistible pot pie is in the subtle balance between richness and brightness, and that a splash of white wine can elevate the flavor profile to something almost cinematic. I dare you to taste this and not go back for seconds; it’s a culinary cliffhanger that will keep you craving more.
If you’ve ever struggled with a pot pie that turns out too heavy or too dry, you’re not alone—and I’ve got the fix. The trick is to keep the sauce silky, the filling moist, and the crust crisp. This version uses a combination of butter and olive oil for a richer flavor, a splash of wine for depth, and a careful balance of flour and cream to achieve the perfect consistency. Most recipes get this completely wrong, but here’s what actually works: a measured amount of flour to thicken without thickening, a controlled simmer to meld the flavors, and a final bake that crisps the crust just right. Picture yourself pulling this out of the oven, the whole kitchen smelling incredible, and feeling that triumphant moment when you know you’ve mastered a comfort classic.
Okay, ready for the game‑changer? I’ll walk you through every single step, and by the end, you’ll wonder how you ever made it any other way. From the first sizzling sauté to the final golden crust, each moment is designed to bring out the best in the ingredients and create a dish that feels both humble and extraordinary. So grab a notebook, preheat that oven, and let’s dive into a pot pie that’s not just food—it's an experience.
What Makes This Version Stand Out
- Taste: The sauce marries the savory depth of chicken broth with the subtle sweetness of white wine, creating a flavor profile that feels both comforting and sophisticated.
- Texture: A flaky crust that crackles with every bite, paired with a silky sauce that clings to each morsel, delivers a multi‑sensory experience.
- Simplicity: Despite its gourmet flavor, the recipe requires only a handful of pantry staples and a straightforward assembly process.
- Uniqueness: The addition of a splash of wine and a dash of thyme elevates the classic pot pie into a dish worthy of a fine‑dining menu.
- Crowd Reaction: Guests rave about the balanced richness and the “home‑cooked” aroma that instantly feels familiar and comforting.
- Ingredient Quality: Fresh, high‑quality produce and a good quality pie crust make the difference between a good pot pie and a great one.
- Cooking Method: A quick sauté followed by a gentle simmer ensures that the vegetables retain their bite while the chicken stays juicy.
- Make‑Ahead Potential: Assemble the filling in advance, refrigerate, and bake when ready—perfect for busy weeknights.
Inside the Ingredient List
The Flavor Base
The sweet yellow onion is the foundation of this dish, offering a mellow sweetness that balances the savory notes of the chicken and mushrooms. When it caramelizes just enough, it releases a natural sugar that deepens the overall flavor profile. Skipping the onion would leave the filling feeling thin and lacking depth; instead, let it sauté until it turns translucent and fragrant. For a smokier twist, add a pinch of smoked paprika during the sauté stage.
Garlic is the aromatic heartbeat of the pot pie. Two cloves, minced, infuse the oil and butter with a punch of flavor that permeates every bite. Be careful not to burn the garlic—keep the heat moderate so it releases its oils without turning bitter. If you’re sensitive to garlic, use a small amount of garlic-infused oil instead, but don’t compromise the richness that garlic brings.
The Texture Crew
Carrots and celery add crunch and natural sweetness. Two pieces of carrot and two ribs of celery, chopped into bite‑sized pieces, provide a satisfying bite that contrasts with the creamy sauce. If you prefer a softer texture, blanch the vegetables briefly before adding them to the skillet. They should retain a slight firmness to keep the filling interesting.
The peas are a pop of color and a burst of sweetness that brightens the dish. A cup of frozen peas, tossed in at the end of the cooking process, keeps them crisp and vibrant. If you’re using fresh peas, blanch them until just tender to preserve their bright green hue.
The Unexpected Star
Button mushrooms bring an earthy umami that elevates the filling. Four ounces, sliced thin, absorb the flavors of the broth and wine, adding depth and a meaty texture. If you’re a mushroom lover, feel free to increase the amount, but remember that too many can make the filling watery.
The Final Flourish
The sauce’s silky texture comes from a careful balance of flour, broth, wine, and cream. The ¼ cup of flour is the secret to thickening the sauce without making it clumpy. The white wine adds a subtle acidity that cuts through the richness, while the heavy cream brings a luxurious mouthfeel. If you’re looking for a lighter version, substitute half the cream with milk, but the result will be less velvety.
Everything’s prepped? Good. Let’s get into the real action and watch the flavors come together like a well‑tuned orchestra.
The Method — Step by Step
- Preheat and Prepare: Preheat the oven to 375°F (190°C). Line a 9‑inch pie dish with the crust, pressing it into the corners and trimming any excess. Set aside the crust while you work on the filling; this ensures a crisp bottom.
- Sauté Aromatics: In a large skillet, melt 4 tablespoons of butter with 2 tablespoons of olive oil over medium heat. Add the diced onion and minced garlic, cooking until the onion is translucent and the garlic is fragrant—about 3 minutes. This step releases the onion’s natural sugars and creates a flavor base that the rest of the filling will build upon.
- Brown Vegetables: Toss in the chopped carrots, celery, and sliced mushrooms. Cook, stirring occasionally, until the vegetables begin to soften and the mushrooms release their juices—roughly 5 minutes. This caramelization deepens the dish’s flavor profile and adds a subtle sweetness.
- Introduce the Chicken: Add the 3 cups of cubed cooked chicken to the skillet, stirring to combine. Let it heat through for 2 minutes, allowing the chicken to absorb the aromatic base. This step ensures the meat stays moist and flavorful.
- Thicken the Sauce: Sprinkle the ¼ cup of all‑purpose flour over the mixture, stirring constantly to coat the vegetables and chicken evenly. Cook for 1 minute to eliminate the raw flour taste. Then, pour in 2 cups of low‑sodium chicken broth and ¼ cup of white wine, whisking until smooth. Bring the mixture to a gentle simmer, letting it thicken into a velvety sauce.
- Watch Out: This is the trickiest step—adding the heavy cream. Pour 1 cup of heavy cream slowly while stirring, and let the sauce reach a silky consistency. If the sauce thickens too quickly, lower the heat and stir continuously to avoid scorching.
- Season: Add ½ teaspoon of kosher salt, 1 teaspoon of freshly ground black pepper, ½ teaspoon of dried thyme, and ¼ teaspoon of ground sweet basil. Stir until the herbs are evenly distributed. Taste and adjust the seasoning if needed—remember that the crust will slightly mellow the flavors.
- Finish the Filling: Fold in the cup of frozen peas, ensuring they’re evenly dispersed. Remove the skillet from heat, let the mixture cool slightly for 5 minutes, then transfer it into the prepared pie crust.
- Top and Bake: Cover the filling with the remaining pie crust, sealing the edges by pinching them together. Cut a few slits in the top crust to allow steam to escape. Bake in the preheated oven for 30 minutes, or until the crust is golden brown and the filling is bubbling. The edges should start pulling away, signaling that the pie is ready.
- Cool and Serve: Let the pie rest for 10 minutes before slicing. This resting period allows the sauce to set, making it easier to serve without spilling. Serve hot, perhaps with a side of buttery mashed potatoes or a crisp green salad.
That’s it—you did it. But hold on, I’ve got a few more tricks that will take this to another level.
Insider Tricks for Flawless Results
The Temperature Rule Nobody Follows
Many cooks keep the sauce simmering on high, but a gentle simmer is key to preventing the sauce from burning or separating. Keep the heat low enough that you see small bubbles forming, but not so low that the sauce doesn’t thicken. This subtle control ensures a silky texture and a rich flavor that’s not overcooked.
Why Your Nose Knows Best
Before you add the final crust, pause and sniff the sauce. The aroma will tell you if the seasoning needs a tweak—if it smells too bland, add a pinch of salt; if it’s too acidic, a splash of cream can balance it. Your nose is the best judge of flavor balance.
The 5‑Minute Rest That Changes Everything
After baking, let the pie rest for exactly five minutes. During this time, the residual heat will finish cooking the filling and the crust will firm up, making it easier to slice cleanly. Skipping this rest often leads to a soggy bottom and messy servings.
The Perfect Crust Sealer
Brush the edges of the crust with beaten egg before sealing them. This not only gives a beautiful golden finish but also creates a tighter seal that keeps the filling from leaking during baking. The egg wash adds a subtle sheen that makes the pie look professionally finished.
The Secret to a Fluffy Filling
If you want a lighter filling, replace half the heavy cream with milk. This reduces the fat content while still maintaining a creamy consistency. It’s a subtle tweak that makes the dish feel less heavy without sacrificing flavor.
Creative Twists and Variations
This recipe is a playground. Here are some of my favorite ways to switch things up:
Herb‑Infused Surprise
Swap out the dried thyme for fresh rosemary and sage. The fresh herbs bring a bright, aromatic quality that pairs wonderfully with the chicken. This variation is perfect for spring when fresh herbs are at their peak.
Mushroom‑Rich Delight
Increase the button mushrooms to 8 ounces and add a handful of sliced shiitake. The earthy flavors deepen, turning the dish into a hearty, vegetarian-friendly option. Pair it with a side of garlic bread for an extra indulgent meal.
Citrus Zest Twist
Add the zest of one lemon to the sauce. The citrus brightens the dish and cuts through the richness, creating a more balanced flavor profile. This version works well for a summer dinner party.
Cheese‑Lover’s Edition
Fold in half a cup of shredded Gruyère or cheddar before baking. The cheese melts into the sauce, adding a gooey, savory layer that elevates the entire pie. It’s a crowd‑pleaser for family gatherings.
Low‑Carb Alternative
Replace the flour with a tablespoon of xanthan gum to thicken the sauce. This keeps the dish low in carbs while maintaining a silky texture. Pair it with a side of roasted cauliflower for a complete low‑carb meal.
Storing and Bringing It Back to Life
Fridge Storage
Store leftovers in an airtight container in the refrigerator for up to 3 days. The crust will stay firm, and the filling will stay moist. When ready to serve, reheat in a preheated oven at 350°F (175°C) for 10 minutes to revive the crispness.
Freezer Friendly
Wrap the pie tightly in aluminum foil and place it in the freezer for up to 2 months. Thaw overnight in the refrigerator before reheating. The pie retains its flavor and texture, making it a convenient week‑night dinner.
Best Reheating Method
Add a splash of water to the bottom of the baking dish before reheating to keep the filling from drying out. Cover with foil and bake at 350°F (175°C) for 20 minutes, then remove the foil to crisp the crust. This method restores the dish’s original mouthfeel and aroma.