Brining chicken is an easy yet effective technique that ensures the chicken remains both juicy and tender. No matter how you’re preparing it, whether grilling, roasting, or using another method, brining is definitely worth trying. This guide covers the basics of brining chicken, walking you through the process, the ideal brine ratio, and step-by-step tips for tasty results.
Table of Contents
Key Takeaways
- Brining is a technique that involves soaking chicken in a saltwater solution, which enables the meat to retain moisture and absorb flavor.
- Brining can produce juicier, more flavorful chicken, making it an excellent choice for grilling, roasting, or any other cooking method.
- Successful brining requires the right salt-to-water ratio and sufficient soaking time for the chicken.
- Using herbs, spices, and other ingredients in the brine lets you create unique flavor profiles.
- Food safety dictates that you store and handle brined chicken correctly.
What is Brining Chicken?
Brining chicken is an easy and effective trick that could change the way you prepare and enjoy this versatile protein. It involves soaking the chicken in a salted water mixture before cooking. This method helps preserve moisture and flavor, leading to chicken that is incredibly juicy and full of flavor.
Understanding the Process
It’s interesting to learn how brining works to enhance flavor and juiciness. When you submerge chicken in a saltwater brine, the salt breaks down the protein composition. This enables the meat to absorb extra moisture, creating a juicier and more tender texture. You could also add some herbs, spices, and aromatics to the brine itself, infusing your chicken with those tasty flavors.
Benefits of Brined Chicken
Incorporating brining into your chicken preparation routine can offer a host of benefits, including:
- Improved Tenderness: The salt in the brine breaks down tough muscle fibers, making the chicken tender and easy to chew.
- Enhanced Flavor: The brine allows the chicken to absorb various seasonings, elevating the dish’s taste.
- Reduced Cooking Time: Brined chicken cooks faster because the brine helps retain moisture throughout the cooking process.
- Improved Juiciness: The brine ensures that the chicken stays moist and juicy, even when cooked at high temperatures.
By understanding the benefits of brined chicken, you can discover a range of tasty and juicy poultry dishes. These meals are guaranteed to wow your loved ones.

Essential Brining Ingredients
To make the perfect brine recipe, you need water, salt, and sugar. These three are the base of a tasty and effective brine. They make your chicken juicy, tender, and very appetizing.
Let’s look at each ingredient’s role and how to get the right mix:
- Water – The essential liquid component of the brine. It allows the chicken to soak while enhancing its moisture and flavor.
- Salt – It adds flavor and pulls out extra moisture. This enhances the chicken’s tenderness and juiciness.
- Sugar – It adds a touch of sweetness. This balances the salt and helps the chicken’s skin caramelize when cooked.
You can also add more seasonings and aromatics to your brine. Think herbs, spices, citrus, or vinegar. This lets you make a brine that matches your taste.

Remember, the secret to a successful brine lies in finding the ideal mix of salt, sugar, and flavors. This mix elevates the chicken’s flavor and tenderness.
Knowing how each brine recipe ingredient works will help you make delicious, juicy, and flavorful brined chicken every time.
Brine Chicken
Achieving the Perfect Brine Ratio
Finding the right brine ratio is key for juicy, flavorful chicken. It’s all about balancing salt and water in your brine.
Begin by using 1/4 cup of salt per 1 cup of water. This combination brings the perfect balance of flavor and moisture.
But, you might need to tweak the ratio for bigger or more chicken. Larger pieces or bigger batches might need more salt for even flavor.
- For whole chickens or big bone-in breasts, try 1/3 cup salt per 1 cup water.
- Smaller pieces like boneless, skinless breasts or thighs can stick with 1/4 cup salt per 1 cup water.
- Brining a lot of chicken? You might need to add more salt to keep the ratio right.
The aim is to ensure the chicken tastes delicious without being too salty. Don’t hesitate to try out various amounts to find the amount that suits your taste best!
| Chicken Cut | Salt-to-Water Ratio |
| Whole Chicken or Large Bone-in Breasts | 1/3 cup salt per 1 cup water |
| Smaller Chicken Pieces (Boneless, Skinless Breasts or Thighs) | 1/4 cup salt per 1 cup water |
Preparing the Brine Solution
Making the perfect brine for your chicken is key. You need to dissolve the salt and sugar well. This makes sure your brine is tasty and consistent. Follow these tips to make a brine that will keep your chicken juicy and delicious.
Tips for Mixing the Brine
- Begin with the right how to make brine ratio. For every quart (4 cups) of water, mix in 1/4 cup of salt and 1/4 cup of sugar.
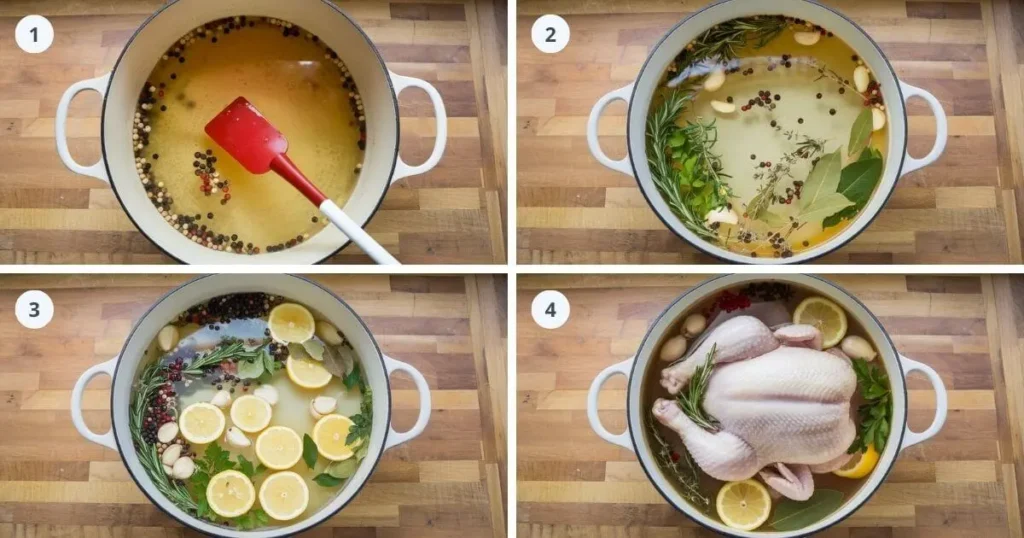
- Heat the brine solution until it simmers. Stir regularly until the salt and sugar are fully dissolved. This spreads the flavors evenly.
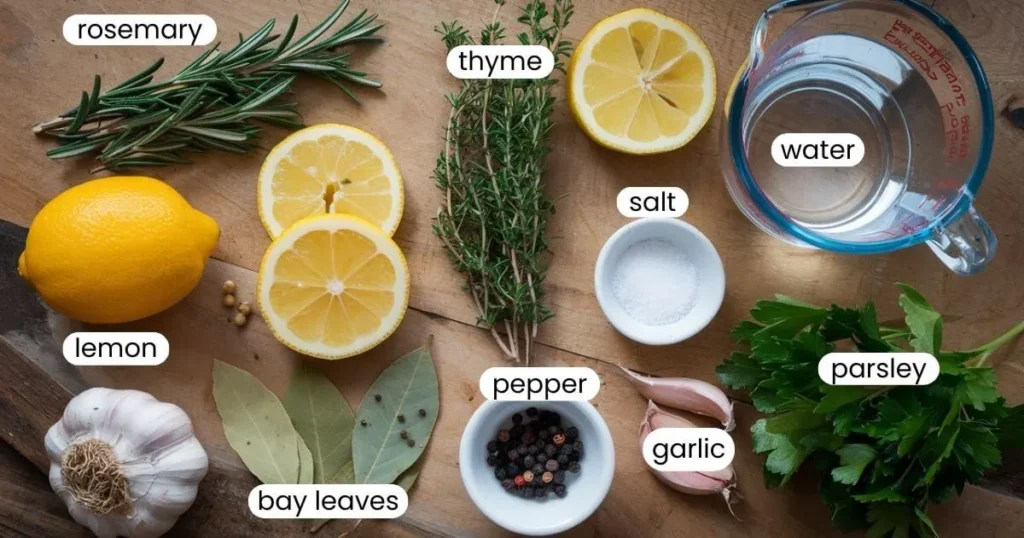
- Add herbs, spices, and aromatics to boost your brine’s taste. Garlic, peppercorns, bay leaves, and thyme are great choices.
- Let the brine come to room temperature. Then, it’s ready to use. Make certain that the chicken is entirely covered in the brine.
By using these simple tips, you will create a flavorful and consistent brine solution that will turn your chicken into a mouthwatering meal.
| Ingredient | Amount |
| Water | 4 cups (1 quart) |
| Salt | 1/4 cup |
| Sugar | 1/4 cup |
| Garlic (optional) | 2-3 cloves, minced |
| Peppercorns (optional) | 1 teaspoon |
| Bay leaves (optional) | 2 leaves |
| Thyme (optional) | 1 tablespoon, fresh or dried |

Brining Time and Temperature
Getting the right time to brine chicken is key. It keeps your chicken juicy, flavorful, and tasty. The brining duration and temperature greatly affect the results.
The ideal chicken brine time is 4 to 12 hours, based on the size and cut of the chicken. Smaller pieces, such as breasts or thighs, require 4 to 6 hours. Larger pieces, such as whole chickens, do better with 8-12 hours.
Keep the brine at a steady 35°F to 40°F (2°C to 4°C). This ensures the chicken soaks up the brine’s flavors without being overly salty. Never let the brine sit at ambient temperature, as this can encourage bacterial growth and create food safety issues.
| Chicken Cut | Brining Time | Brining Temperature |
| Chicken Breasts | 4-6 hours | 35°F to 40°F (2°C to 4°C) |
| Chicken Thighs | 4-6 hours | 35°F to 40°F (2°C to 4°C) |
| Whole Chicken | 8-12 hours | 35°F to 40°F (2°C to 4°C) |
By controlling how long to brine chicken and keeping the brine at the right temperature, you can make your chicken moist, flavorful, and tender. This results in a delicious final dish.
Brining Chicken: Step-by-Step Guide
Brining chicken is a simple yet powerful way to boost flavor and juiciness. It works for grilling, roasting, or baking. By following these chicken brining steps, your chicken will be perfectly seasoned and delicious every time.
Seasoning and Flavoring Options
Brining lets you tailor the flavor to your liking. The basic brine includes water, salt, and sugar. But you can add many seasonings and aromatics to enhance it. Here are some favorites:
- Herbs: Rosemary, thyme, sage, and parsley, whether fresh or dried, add earthy and fragrant notes when you brine chicken
- Spices: Try peppercorns, bay leaves, coriander seeds, or a bit of chili powder for a kick.
- Citrus: Lemon, lime, or orange slices infuse the brine with a vibrant, zesty taste.
- Garlic and Onions: Minced garlic and onions add richness and nuance to the seasoning.
Feel free to mix and explore different flavors to discover your favorite chicken brining combination. There are countless options!
Removing Chicken from the Brine
Once the brining is done, it’s time to remove the chicken from the brine. This step is crucial for preparing the meat for cooking. It helps keep the flavorful brine inside the chicken. Let’s look at how to drain and dry the chicken properly.
- Drain the Chicken: Start by carefully taking the chicken out of the brine. Let the extra liquid drip off. Place the chicken on a clean surface, like a wire rack or a baking sheet fitted with paper towels.
- Pat Dry: After draining, use paper towels or a clean, dry kitchen towel to gently pat the chicken dry. Handle it carefully to prevent harming the skin.
- Discard the Brine: Throw away the brine after removing the chicken. It’s important not to use it again because it might be contaminated.
By doing these steps, your chicken will be ready for cooking. It can be grilled, roasted, or prepared using various cooking methods. The meat will be moist and bursting with flavor.
| Step | Action |
| 1. Drain the Chicken | Gently remove the chicken from the brine solution and let any excess liquid run off. |
| 2. Pat Dry | Use paper towels or a clean, dry cloth to gently pat the surface of the meat, removing any remaining brine. |
| 3. Discard the Brine | After removing the chicken, discard the brine solution, as it should not be reused. |

Remember, the key to successfully removing chicken from the brine is to handle the meat gently and thoroughly dry the surface, ensuring that the flavorful brine is retained in the meat.
Cooking Brined Chicken
Brining your chicken before cooking lets you infuse it with layers of amazing flavors. You can cook it on the grill for a smoky flavor or roast it for a golden-brown look. Either way, your brined chicken will be delicious.
Grilling Brined Chicken
For grilling brined chicken, keeping the temperature right is key. Heat your grill to 400°F to 450°F. Place the chicken on the grates carefully, watching for hot spots.
Grill the chicken for 12 to 15 minutes on each side, turning only once. This way, it stays juicy and smoky.
Roasting Brined Chicken
To roast brined chicken, heat your oven to 400°F. Put the chicken pieces, skin-side up, either in a roasting pan or on a baking sheet. Roast for 35 to 45 minutes, basting now and then, until it’s 165°F inside.
The brining makes the skin crispy and the meat tender. Whether you grill or roast, how to cook brined chicken is about getting the timing and temperature right. With practice, you’ll make perfectly juicy brined chicken every time.

Storing Brined Chicken
Storing your brined chicken right is key to keeping it moist and tasty. Whether you’ve just brined it or are ready to cook, knowing how to store it is important. This way, you can enjoy your dish for as long as you want.
You have various options to store brined chicken. Let’s take a look at the best tips for keeping it fresh and flavorful:
Before Cooking
- Refrigerate the brined chicken: Put the chicken in an airtight container or a zip-top plastic bag. Store it in the fridge. This keeps the chicken moist and tender.
- Freeze for later use: If you can’t cook it right away, freeze it for up to 6 months. Wrap it in plastic wrap or a freezer-safe bag to avoid freezer burn.
After Cooking
- Refrigerate cooked brined chicken: Store leftover cooked chicken in an airtight container in the fridge. It remains juicy and full of flavor for up to 4 days.
- Freeze cooked brined chicken: Freeze cooked chicken for up to 3 months. Ensure it is securely wrapped to avoid freezer burn.
Keeping brined chicken away from air and temperature changes is crucial.By applying these tips, you can savor your brined chicken for days or weeks.
Troubleshooting Common Brining Issues
Brining chicken can be a game-changer, but it’s not without its challenges. If you’ve encountered some hiccups in your brining process, fear not – we’ve got you covered. Let’s take a look at some of the most common brining issues and how to tackle them head-on.
Over-Brining
Leaving your chicken in the brine for too long can result in an overly salty, tough, and dry end product. To avoid this, be mindful of the recommended brining time and temperature. As a general rule, don’t brine your chicken for more than 12 hours, and adjust the time as needed based on the size and thickness of the pieces.
Under-Brining
On the other hand, not brining your chicken long enough can lead to a lack of flavor and moisture. Make sure to follow the proper brining ratios and soak your chicken for the recommended duration. If you’re unsure, it’s better to err on the side of a longer brining time to ensure your chicken is properly seasoned and juicy.
Tough or Dry Chicken
Sometimes, even with proper brining, the chicken can turn out tough or dry. This may result from overcooking or applying excessive heat. When cooking brined chicken, be mindful of your temperature and cooking times. Use a meat thermometer to verify that the chicken is fully cooked without becoming overcooked.
By addressing these common brining issues, you’ll be well on your way to perfectly moist and flavorful chicken every time. Remember, the key to successful brining is striking the perfect combination of time, temperature, and technique.
Brine Recipe Variations
The classic brine recipe is a wonderful starting point, but feel free to modify it to suit your taste. Adding herbs and spices can take your chicken to the next level. Let’s explore some tasty brine recipe variations to enhance your chicken dishes.
Herb and Spice Brines
Herb-infused brines give chicken a fresh, fragrant taste. Mix in rosemary, thyme, and sage for a savory flavor. For a zesty twist, add citrus peels, garlic, and black peppercorns.
For a bolder flavor, try spices like cumin, smoked paprika, or chili powder. These spices add a rich taste to your chicken, great for grilling or roasting.
- Rosemary and thyme brine
- Garlic and lemon peel brine
- Cumin and smoked paprika brine
- Chili powder and black peppercorn brine
Creating a great brine is all about trying new flavors and adjusting them to your liking. With some creativity, you can transform simple chicken into a gourmet dish.
Conclusion
In conclusion, brining chicken is a simple yet effective way to turn ordinary chicken into a flavorful masterpiece. By following the step-by-step guide and tips in this article, you’ll learn to brine chicken with confidence. This will result in juicy, flavorful, and tender chicken every time.
Whether you’re grilling, roasting, or cooking chicken in another way, the brine will make your dish better. Start brining your chicken today and see the delicious difference it makes. Mastering the art of brining will unlock your poultry’s true potential.
With this knowledge, you’re on your journey to becoming a brine chicken expert. You’ll impress your family and friends with your mouthwatering dishes. Remember, the secret to successfully brining chicken is understanding the process and using the ideal ingredients.
Follow the proper techniques, and you’ll consistently make tender, flavorful, and juicy chicken. This will make it a staple in your cooking repertoire.
FAQ
What is brining chicken?
Brining chicken involves submerging it in a saltwater solution before cooking. This creates meat that is moist and bursting with flavor.
What are the advantages of brining chicken?
Brining chicken makes it tender, flavorful and cooks faster. It’s a great way to enhance your chicken’s taste.
Which ingredients should I use to make a brine?
A basic chicken brine needs water, salt, and sugar. You can add more seasonings and aromatics to taste.
How do I achieve the perfect brine ratio?
Finding the right brine ratio is key for juicy chicken. We’ll guide you on how to calculate it and adjust for different chicken sizes.
What steps should I follow to make the brine solution?
Preparing the brine solution is vital. We’ll show you how to dissolve salt and sugar and add herbs and spices for flavor.
How long should I brine the chicken, and what temperature is best for doing so?
The brining time and temperature affect the chicken’s quality. We’ll give you the best times and temperatures for different chicken sizes.
How do I brine chicken step-by-step?
We’ll guide you through brining chicken, from making the brine to soaking the meat. You can enhance the flavor even more by including herbs, spices, and citrus.
How can I properly remove the chicken from the brine?
After brining, it’s important to remove the chicken correctly. We’ll show you how to drain and pat the chicken dry for cooking.
How do I cook brined chicken?
With your chicken now brined, it’s time to start cooking it. We’ll share tips on grilling and roasting for perfect results.
How do I store brined chicken?
Storing brined chicken right keeps it moist and flavorful. We’ll teach you how to store it before and after cooking.
What are the usual issues that can occur when brining, and how do I troubleshoot them?
Brining chicken can present some difficulties, but don’t worry! We’ll cover common issues like over-brining and how to fix them, so your chicken always turns out perfectly.
What are some brine recipe variations?
You can customize your brine with many ingredients. We’ll explore different brine recipes, like herb-infused and spice-based, to make unique chicken dishes.

