I still remember the night I nearly turned my kitchen into a lemon‑scented battlefield. I was chasing a craving that had been haunting me for weeks, a craving for something bright, buttery, and utterly indulgent. The last thing I wanted was a bland, dry tart that would make me question my culinary instincts. Instead, I found myself whisking, folding, and measuring with a fervor that felt almost rebellious. The kitchen smelled like citrus and vanilla, the air thick with anticipation, and my heart beat faster than the timer on the stove. I dared myself to create a lemon tart that would outshine every other version I’d ever tasted, and the result was a buttery crust that crumbled like a delicate snowflake, a filling that sang with tartness, and a fresh cream that floated like a cloud on top. This isn’t just another dessert; it’s a revelation that will change how you think about lemon tarts forever. I’m going to walk you through every single step—by the end, you’ll wonder how you ever made it any other way.
What Makes This Version Stand Out
- Crust: The buttery, slightly sweet base is a game‑changer. It melts in your mouth and balances the tartness of the lemon filling, giving the tart a silky mouthfeel that feels like a secret handshake between flavors.
- Fresh Cream: Whipped to a light, airy consistency, it floats on top like a gentle cloud, adding a velvety texture that contrasts beautifully with the crisp crust.
- Zest‑Infused Lemon: The zest is not just for aroma; it delivers a punch of citrus that cuts through the richness of the butter, creating a harmony that’s hard to find in standard recipes.
- Egg‑Rich Filling: The eggs are folded in a way that keeps the custard silky and prevents it from curdling, giving the tart a smooth, glossy finish.
- Make‑Ahead Friendly: The tart can be assembled days in advance and refrigerated without losing its integrity, making it the perfect dessert for gatherings and last‑minute plans.
- Ingredient Quality: Using fresh, high‑quality butter and lemons is the secret sauce that elevates this recipe above the rest.
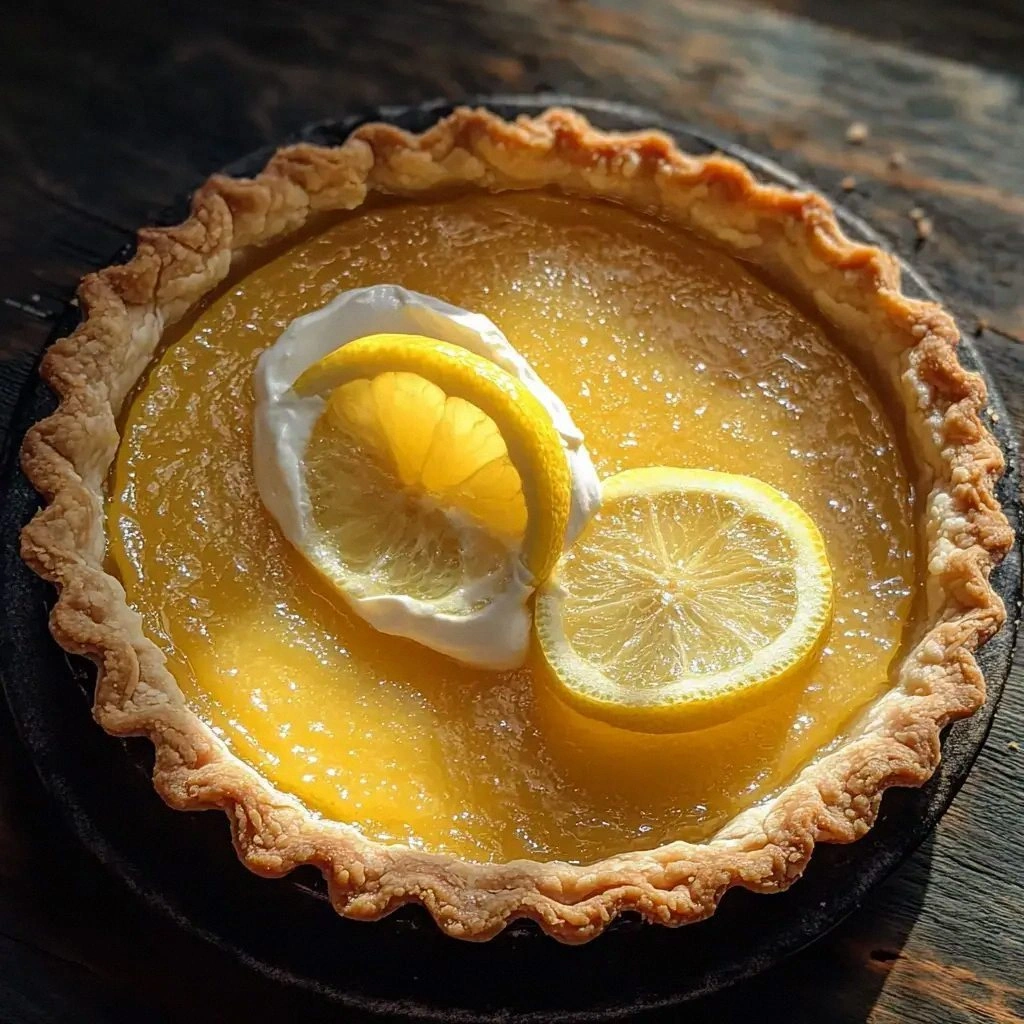
- Visual Appeal: The golden crust, glossy lemon custard, and fluffy cream create a dish that looks as good as it tastes—ideal for Instagram or a fancy dinner.
- Flavor Balance: Each component is measured to deliver a precise balance of sweet, tart, and buttery, ensuring no single flavor overwhelms the others.
Alright, let's break down exactly what goes into this masterpiece. But before you dive into the ingredient list, here’s a quick kitchen hack that will save you time and keep your crust from drying out.
Inside the Ingredient List
The Flavor Base
The crust is the foundation of the tart, and it’s where the flavor story starts. It’s a simple mixture of flour, powdered sugar, butter, a dash of salt, and a splash of cold water. Each element plays a role: the flour provides structure, the sugar adds a subtle sweetness, the butter delivers richness, and the water brings everything together without over‑hydrating the dough. If you skip the cold water, the crust may become dry and crumbly, lacking that tender bite that makes every bite a delight.
The Texture Crew
The filling’s texture is what sets this tart apart from the usual stiff, rubbery custards. We use a combination of eggs, cornstarch, and heavy cream to create a silky, glossy custard that coats the palate like a velvet blanket. The cornstarch thickens the mixture gently, preventing the eggs from scrambling. The heavy cream adds body and a subtle richness that balances the lemon’s sharpness. Skipping the cornstarch will leave you with a runny filling that won’t hold its shape on the tart plate.
The Unexpected Star
Freshly squeezed lemon juice and zest are the stars of this recipe, but did you know that lemon zest contains essential oils that enhance the overall flavor profile? The oils are packed with bright, aromatic compounds that give the tart its unmistakable citrus punch. If you only use bottled lemon juice, you’ll miss this depth of flavor; the zest adds a layer of complexity that turns a simple tart into a memorable experience. A good tip: zest before you juice to avoid losing the bright oils.
The Final Flourish
The fresh cream topping is the final flourish that elevates the tart from good to unforgettable. Whipped with a pinch of powdered sugar and vanilla, it adds a cloud‑like texture that contrasts with the dense filling. It also introduces a subtle vanilla undertone that complements the lemon’s acidity. If you’re looking for a low‑fat version, you can substitute half‑and‑half, but the richness of the full‑fat cream is what makes this topping stand out. The final touch is a sprinkle of lemon zest or fresh berries for a pop of color and flavor.
Everything's prepped? Good. Let's get into the real action. The real magic happens when you combine these ingredients with patience and precision.
The Method — Step by Step
- Prepare the crust. In a large bowl, combine 1 ¼ cups all‑purpose flour, ¼ cup powdered sugar, and a pinch of salt. Cut in ½ cup cold, cubed unsalted butter with a pastry cutter until the mixture resembles coarse crumbs. Add 1 egg yolk and 2 Tbsp cold water, mixing until a dough forms. Chill the dough for 30 minutes to firm up, then roll it out on a lightly floured surface to fit a 9‑inch tart pan. Press the dough into the pan, trimming any excess. Prick the bottom with a fork, chill again for 10 minutes, and bake at 350 °F for 15 minutes or until golden. Let it cool completely on a wire rack.
- Make the lemon custard. In a medium saucepan, whisk together 1 cup granulated sugar, ¼ cup cornstarch, ¼ cup freshly squeezed lemon juice, and ¼ cup lemon zest. Stir in ¾ cup heavy cream and ¼ cup unsalted butter until the butter melts. Whisk 3 eggs and 1 tsp vanilla extract in a separate bowl, then temper the mixture by slowly adding a ladle of the hot cream mixture, whisking constantly. Pour the tempered mixture back into the saucepan, cooking over medium heat until it thickens and coats the back of a spoon. Remove from heat, strain through a fine sieve to eliminate lumps, and let cool slightly.
- Fill the crust. Spoon the warm custard into the cooled crust, smoothing the top with a spatula. Chill the tart in the refrigerator for at least 2 hours, or overnight, to set the custard firmly.
- Whip the fresh cream. In a chilled mixing bowl, combine 1 cup heavy cream, 2 Tbsp powdered sugar, 1 tsp vanilla extract, and a pinch of salt. Beat with an electric mixer on medium speed until soft peaks form, then continue whipping until stiff peaks appear. The cream should be airy and hold its shape, but not be over‑whipped.
- Top the tart. Spread the whipped cream over the chilled custard, smoothing it into a dome. Finish with a light dusting of lemon zest or a few fresh berries for a pop of color and extra citrus zing.
- Serve. Slice the tart with a hot, buttered knife for clean cuts. Each slice should reveal the golden crust, glossy custard, and cloud‑like cream in perfect harmony.
That’s it—you did it. But hold on, I’ve got a few more tricks that will take this tart to another level, making it even more unforgettable.
Insider Tricks for Flawless Results
The Temperature Rule Nobody Follows
The crust should never be baked at a temperature that’s too high; otherwise, it will brown too quickly and become tough. Keep it at 350 °F and watch for that golden hue. If you’re using a convection oven, reduce the temperature by 25 °F to avoid over‑browning.
Why Your Nose Knows Best
The first scent of citrus will tell you the custard is almost done. A faint, sweet aroma with a hint of lemon indicates the custard has thickened enough to coat the back of a spoon. If you’re unsure, run a finger through the custard; it should hold its shape without sliding.
The 5‑Minute Rest That Changes Everything
After you remove the tart from the oven, let it rest for 5 minutes before slicing. This short pause allows the custard to set fully and prevents it from spilling out of the crust when you cut the first slice.
Keep the Crust Moist
If you plan to store the tart for later, brush the crust with a thin layer of melted butter before chilling. This keeps the crust from drying out and preserves its flaky texture.
Finish With a Dusting of Powdered Sugar
Just before serving, dust the top with a light sprinkle of powdered sugar. It adds a subtle sweetness and gives the tart an elegant, finished look that’s perfect for impressing guests.
Serve With Fresh Berries
A handful of fresh berries—strawberries, blueberries, or raspberries—adds a burst of color and a complementary flavor that enhances the lemon’s brightness.
Creative Twists and Variations
This recipe is a playground. Here are some of my favorite ways to switch things up:
Lemon‑Lavender Tart
Add 1 tsp dried culinary lavender to the custard for a floral twist. The lavender’s subtle aroma pairs beautifully with the lemon, creating a sophisticated flavor profile that’s perfect for a spring gathering.
Chocolate‑Covered Lemon Tart
Dip the finished tart in melted dark chocolate and chill until set. The chocolate adds a rich, bittersweet contrast to the citrusy filling, turning the dessert into an indulgent treat.
Almond‑Infused Crust
Replace ¼ cup of the flour with ground almonds for a nutty, gluten‑free crust. The almonds add a delightful crunch and a subtle, buttery flavor that complements the lemon.
Raspberry‑Lemon Tart
Layer fresh raspberries between the crust and custard before adding the cream. The berries add a sweet‑tart burst that enhances the lemon’s brightness and gives the tart a pop of color.
Ginger‑Lemon Tart
Grate a small piece of fresh ginger into the custard for a spicy kick. Ginger’s warmth balances the tartness of the lemon, creating a complex flavor that’s both refreshing and comforting.
Mini Lemon Tarts
Use a muffin tin to create individual mini tarts. Each bite is a perfect bite‑sized treat, ideal for parties or dessert stations. The mini size also makes them easier to transport.
Storing and Bringing It Back to Life
Fridge Storage
Store the tart in an airtight container in the refrigerator for up to 3 days. The custard will firm up, and the fresh cream will stay fluffy if you keep it chilled.
Freezer Friendly
For longer storage, freeze the tart for up to 2 weeks. Wrap it tightly in plastic wrap, then place it in a freezer bag. Thaw overnight in the refrigerator before serving.
Best Reheating Method
To revive the tart, gently warm it in the oven at 300 °F for 10 minutes. Add a splash of water to the custard before reheating; the water steams the custard back to a silky, glossy finish. Let it cool for a few minutes before topping with fresh cream again.