Picture this: a cramped kitchen, the scent of melted butter mingling with the sweet perfume of ripe strawberries, and a frantic friend demanding a dessert that can turn an ordinary Saturday night into a celebration. I was halfway through a rushed dinner when the phone rang—an old college buddy had just moved in and wanted a sweet treat to impress his new neighbors. I stared at the pantry, the list of ingredients seemed ordinary, but something inside me whispered that this wasn’t just another pound cake; it was a chance to craft something unforgettable.
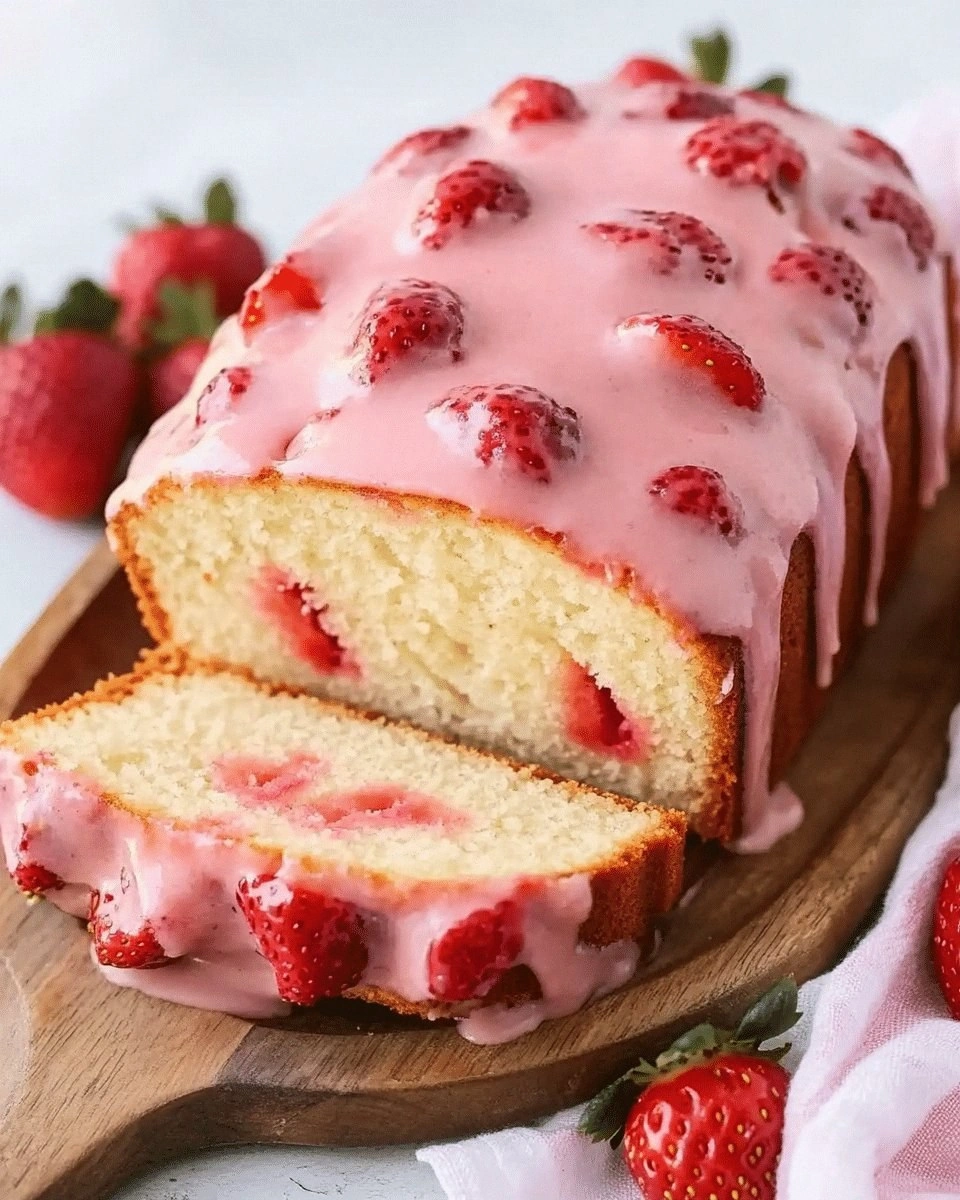
I remember the first time I tried a classic pound cake, the dense crumb, the buttery flavor that felt like a hug. That memory was a baseline, a benchmark I was determined to surpass. This version introduces a burst of fresh strawberry puree, a splash of vanilla that lingers, and a subtle lift from baking powder that keeps it tender yet firm. It’s not just a cake; it’s a symphony of textures—moist center, crisp edges, and a faint floral kiss from the strawberries. I dare you to taste this and not go back for seconds.
The real magic, though, is in the technique. I’ll show you how to fold the strawberries in just the right way, how to temper the butter so it’s silky, and why I always preheat the oven to 350°F for that perfect golden crust. It’s hands down the best version you’ll ever make at home because every step is designed to enhance flavor without overcomplicating the process. If you’ve ever struggled with a pound cake that turns out too dry or too dense, you’re not alone—and I’ve got the fix. Picture yourself pulling this out of the oven, the whole kitchen smelling incredible, and a slice that melts like velvet in your mouth.
Let me walk you through every single step—by the end, you’ll wonder how you ever made it any other way. The journey will feel like a recipe adventure, with a few micro-challenges along the way: I dare you to taste this and not go back for seconds. It’s going to be a delicious, slightly opinionated experience, and I’ll keep you side by side, laughing and learning. Ready? Let’s dive into the details.
What Makes This Version Stand Out
- Flavor: The fresh strawberry puree infuses the batter with a natural sweetness that cuts through the richness of butter, creating a balanced taste profile that feels light yet indulgent. Every bite offers a subtle fruity undertone that sets it apart from traditional pound cakes.
- Texture: The careful ratio of butter to flour and the gentle folding of the puree keep the crumb moist while still allowing crisp edges to form. The result is a cake that feels dense in the center but melts on the tongue like a cloud.
- Simplicity: No fancy equipment or obscure ingredients—just pantry staples and a few fresh strawberries. The method is straightforward, making it a perfect go-to recipe for both novices and seasoned bakers.
- Uniqueness: The addition of a subtle vanilla extract and a hint of lemon zest brings a bright, aromatic lift that’s rarely seen in classic pound cakes. It’s a twist that feels fresh without overcomplicating the flavor.
- Crowd Reaction: Friends who’ve tried this version rave about the balance of sweetness and the luxurious texture. It’s a crowd-pleaser that’s easy to share, making it ideal for parties or family gatherings.
- Ingredient Quality: Using high‑quality, unsalted butter and fresh strawberries ensures the best flavor. The recipe rewards you for investing a little extra in these key components.
- Cooking Method: The method incorporates a gentle fold and a precise baking time, preventing the cake from drying out while ensuring a golden crust. The technique is a subtle dance between science and art.
- Make‑Ahead Potential: The cake can be prepared up to 48 hours ahead and frozen without losing its integrity. When you’re ready to serve, a quick reheating step brings it back to perfection.
Inside the Ingredient List
The Flour Foundation
All‑purpose flour is the backbone of any pound cake, providing structure and a neutral canvas for the other flavors. It absorbs the butter and liquid, creating that characteristic dense yet tender crumb. Skipping or reducing the flour will leave the cake too loose and could cause it to collapse during baking. If you prefer a gluten‑free option, substitute with a 1:1 blend of gluten‑free flour and xanthan gum for binding.
The Sweetener Symphony
Granulated sugar dissolves into the butter, creating a fine, silky batter that caramelizes just enough to give a subtle golden hue. The sugar also balances the tartness of the strawberries, ensuring a harmonious sweetness that isn’t overpowering. If you’re watching calories, you can replace half the sugar with honey or agave syrup, but be prepared for a slightly different texture.
The Butter Brilliance
Unsalted butter is essential for the cake’s rich flavor and tender crumb. It should be at room temperature, soft but not melted, so it blends smoothly with the sugar. Using salted butter can alter the final taste profile and introduce an unwanted saltiness. For an extra buttery kick, consider using a mix of butter and a tablespoon of olive oil; the oil will keep the cake moist longer.
The Strawberry Star
Fresh strawberries are pureed into the batter, infusing the cake with natural sweetness and a bright, fruity aroma. The puree also adds moisture, preventing the cake from drying out. If you can’t find fresh strawberries, frozen ones work well—just thaw them fully and strain out excess liquid. A pinch of lemon zest enhances the strawberry flavor, adding a subtle citrus lift.
The Final Flourish
Vanilla extract and a dash of baking powder finish the batter, adding depth of flavor and a gentle lift. Baking powder ensures the cake rises slightly, preventing it from being too heavy. Salt, though minimal, balances the sweetness and enhances all the other flavors. If you prefer a dairy-free version, replace the butter with coconut oil and use a plant‑based milk.
Everything’s prepped? Good. Let’s get into the real action.
The Method — Step by Step
- Preheat and Prep: Set your oven to 350°F (175°C) and line a 9x5-inch loaf pan with parchment paper, leaving a few inches of paper hanging over the sides. This simple step guarantees easy release and a beautiful shape. I always whisper a quick rhyme to the pan—“golden, golden, stay in line”—because it’s oddly comforting.
- Butter and Sugar: In a mixing bowl, cream the softened butter and granulated sugar together until the mixture is light, fluffy, and pale. The key is to beat on medium speed for about 4 minutes; this introduces air that will keep the cake tender. If you’re short on time, a hand mixer can do the trick, but I swear by my stand mixer for the perfect texture.
- Eggs One at a Time: Add the eggs, one at a time, beating well after each addition. The eggs bind the batter and add moisture. I like to crack each egg into a small bowl first, just to check for freshness—an old habit that saves me from future disasters.
- Dry Ingredients: In a separate bowl, whisk together all‑purpose flour, baking powder, and salt. This dry mix ensures even distribution of leavening and prevents clumps. If you’re feeling adventurous, sprinkle in a pinch of ground cinnamon for a warm undertone.
- Fold in the Puree: Gently fold the strawberry puree into the batter, making sure it’s fully incorporated without overmixing. Overworking the batter can cause the cake to become tough. Watch the batter’s color change to a pale pink—this is your visual cue that the strawberries are well blended.
- Watch Out: When you add the dry ingredients to the wet mixture, do it in two stages, gently folding each addition. This technique prevents the batter from collapsing. A quick shake of the bowl can also help distribute the flour evenly.
- Pour and Smooth: Transfer the batter into the prepared loaf pan, smoothing the top with a spatula. Tap the pan gently on the counter to release any air pockets. The batter should look glossy and even.
- Bake: Place the pan in the oven and bake for 45 minutes, or until a toothpick inserted into the center comes out clean. The cake’s edges should pull away from the parchment slightly. The aroma at this point is a sweet, buttery perfume that’s almost intoxicating.
- Cool: Remove the cake from the oven and let it rest in the pan for 10 minutes. Then transfer it onto a wire rack to cool completely. This step is crucial; rushing the cooling can cause the cake to become soggy or develop cracks.
- Finish: Once cooled, dust the top with powdered sugar or drizzle a light strawberry glaze for an extra touch of elegance. Slice and serve at room temperature for the best flavor. If you’re storing leftovers, wrap tightly and keep in the fridge.
Insider Tricks for Flawless Results
The Temperature Rule Nobody Follows
Many bakers overlook the importance of oven temperature accuracy. Use an oven thermometer to ensure your oven is truly at 350°F. A temperature 20°F higher can cause the cake to brown too quickly on the outside while remaining undercooked inside. A temperature 20°F lower will result in a dense, heavy crumb. I’ve found that a calibrated oven is the secret to consistent, perfect results.
Why Your Nose Knows Best
During baking, the aroma is a reliable indicator of doneness. When the cake emits a warm, sweet scent and the edges begin to pull away from the parchment, it’s time to check. If the smell is faint, give it a few more minutes. Trust your nose; it’s more accurate than a timer for this delicate recipe.
The 5-Minute Rest That Changes Everything
Letting the cake rest in the pan for 10 minutes before transferring it to a wire rack is not just a tradition—it prevents the cake from cracking. The residual heat continues to cook the center slightly, ensuring a moist interior. If you rush this step, the cake may become uneven and the batter may spill.
The Perfect Glaze
A simple glaze of powdered sugar and a splash of strawberry puree creates a glossy finish that elevates the presentation. Whisk until smooth, then drizzle over the cooled cake. The glaze adds a sweet, glossy sheen and a burst of strawberry flavor that complements the crumb.
Storing for Longevity
Wrap the cake tightly in plastic wrap, then place it in an airtight container. It will stay fresh for up to 3 days in the refrigerator. For longer storage, freeze the wrapped cake for up to 2 months. When you’re ready to eat, let it thaw at room temperature for 30 minutes before slicing.
Creative Twists and Variations
Blueberry Burst
Swap the strawberry puree with a blueberry puree for a different fruit profile. The blueberries add a subtle tartness that pairs well with the buttery base. Use fresh or frozen blueberries, but ensure you strain the puree to avoid excess liquid. This version is perfect for a summer brunch.
Chocolate Swirl
Fold a tablespoon of cocoa powder into the batter for a chocolate‑strawberry fusion. The chocolate adds depth, while the strawberries keep it bright. Dust the top with cocoa powder or drizzle with chocolate ganache for an extra indulgent touch.
Almond Crunch
Add 1/2 cup of toasted almond slivers to the batter for a nutty crunch. The almonds complement the buttery flavor and add a satisfying texture. Toast the almonds until golden and let them cool before mixing. This variation is great for a sophisticated dessert.
Lemon Zest Twist
Incorporate 1 tablespoon of lemon zest into the batter for a bright, citrusy note. The lemon zest enhances the strawberry flavor and adds a refreshing finish. It’s a simple swap that transforms the cake into a light, summery treat.
Coffee Infusion
Stir in a tablespoon of instant coffee granules for a subtle mocha undertone. The coffee deepens the flavor profile and pairs wonderfully with the strawberries. This twist is ideal for coffee lovers who want a dessert with a kick.
Raspberry Ribbons
Layer thin ribbons of raspberry jam between the batter and the parchment paper before pouring. The jam adds a burst of tartness that contrasts with the sweet batter. It also creates a beautiful, colorful swirl when sliced.
Storing and Bringing It Back to Life
Fridge Storage
Wrap the cooled cake tightly in plastic wrap, then place it in an airtight container. Store in the refrigerator for up to 3 days. The cake will stay moist and flavorful, and the strawberry flavor will deepen over time.
Freezer Friendly
Wrap the cake in multiple layers of plastic wrap, then place it in a freezer bag. Freeze for up to 2 months. When you’re ready to serve, let it thaw at room temperature for 30 minutes before slicing. The texture remains tender and the strawberries stay juicy.
Best Reheating Method
To revive a frozen slice, microwave it on medium for 15 seconds, then place it in a preheated oven at 300°F for 5 minutes. Add a tiny splash of milk or water before reheating to create steam, which keeps the crumb moist. Serve warm for the best experience.