Picture this: you’re standing in a kitchen that smells like a promise, the kind of aroma that makes you forget the chaos of the day. I was in a rush, a burnt pizza on the counter, a phone buzzing, and a sudden craving for something that would make the whole house pause. I opened the freezer, pulled out a 5‑6‑pound brisket that had been waiting for a reason, and decided, “Why not make a Jewish brisket that feels like a hug in a pot?” I’d never seen a recipe that promised this level of tenderness, but I knew something was coming. I dare you to taste this and not go back for seconds.
When the brisket hits the pan, it sizzles like a small drumline, the sound rising to a crescendo that announces the beginning of a flavor symphony. The onions, sliced thick, begin to caramelize, releasing a sweet, almost buttery scent that drifts through the room. A pinch of garlic powder, a dash of paprika, and the aroma turns smoky, hinting at the slow‑cooked finale. I can almost hear the clock ticking, each second a step closer to that “wow” moment when the meat finally yields. If you’ve ever struggled with a brisket that’s tougher than a two‑year‑old’s patience, you’re not alone — and I’ve got the fix.
What sets this version apart isn’t just the technique; it’s the way every element is orchestrated to work in harmony. The brisket is first seared to create a caramelized crust that locks in juices, then smothered in an onion‑garlic gravy that soaks into every fiber. The gravy, thickened by the very onions that flavor it, coats the meat like velvet, leaving a silky after‑taste that lingers. I’ve tested this over and over, and it’s hands down the best version you’ll ever make at home. The secret? A low‑heat, slow‑cook that turns a tough cut into a melt‑in‑your‑mouth masterpiece.
Now, I’m not about to give away every trick in a single paragraph. I’ll walk you through every single step, from the initial sear to the final resting period, and by the end, you’ll wonder how you ever made it any other way. Picture yourself pulling this out of the oven, the whole kitchen smelling incredible, and your guests already lining up for seconds. I’ll sprinkle in some micro‑challenges: I dare you to taste this and not go back for seconds. Let’s dive into the details that make this brisket the king of comfort food.
Okay, ready for the game‑changer? The first thing you need to know is that this brisket isn’t just a dish; it’s an experience. The combination of onion, garlic, and a hint of paprika creates a flavor profile that’s both familiar and elevated. The onion soup mix, optional but highly recommended, adds a subtle umami boost that deepens the gravy’s richness. The brisket’s fat content, when trimmed properly, ensures a balance of tenderness and flavor that’s hard to beat. And the best part? You can make it ahead and reheat it later, preserving every drop of savory goodness.
Most recipes get this completely wrong. They either over‑cook the meat, leaving it dry, or under‑season the gravy, resulting in a bland side. Here’s what actually works: a low‑temperature roast that keeps the meat juicy, a generous amount of onions that caramelize slowly, and a final resting period that lets the flavors meld. I’ll be honest — I ate half the batch before anyone else got to try it. That’s the power of this dish; it’s so good it’s almost addictive. The next part? Pure magic.
And now the fun part. Before we get into the meat, let’s talk about the star of the show: the brisket itself. It’s a cut that demands respect, and when treated right, it rewards you with a tenderness that can’t be faked. Think of it as a piece of art that needs a careful brushstroke; you’re not just cooking, you’re sculpting flavor. The key is to let the meat breathe in the pan, developing that golden crust that’s the foundation of the entire dish. I’ll show you how to do it in a way that even a beginner can master.
Picture the sizzling sound as the brisket hits the hot oil. The aroma that follows is a prelude to the rich, savory sauce that will envelop it. I’ll guide you through each step, ensuring that every motion is deliberate and every seasoning is on point. The result is a brisket that’s not just cooked but transformed into a melt‑in‑your‑mouth delight. If you’ve ever struggled with this, you’re not alone — and I’ve got the fix.
In the end, this brisket will be the centerpiece of your meal, a dish that brings people together over a shared love of hearty, comforting food. The combination of slow cooking, savory gravy, and the right balance of spices will leave everyone asking for seconds. I’ll be honest, I’ve already started planning my next family gathering around this recipe. So, grab your apron, and let’s get cooking.
What Makes This Version Stand Out
Flavor: The gravy is a layered masterpiece, with caramelized onions, garlic, and paprika creating a depth that lingers on the palate. Each spoonful feels like a warm hug, with the savory notes balanced by a subtle sweetness from the onions.
Tenderness: By searing the brisket first and then slow‑cooking it at a low temperature, the connective tissues break down beautifully, resulting in a melt‑in‑your‑mouth texture that’s hard to find in other brisket recipes.
Texture: The gravy coats the meat like velvet, creating a silky mouthfeel that contrasts with the slightly crisp edges of the seared crust.
Simplicity: The ingredient list is short, the steps are straightforward, and the only advanced technique is the low‑temperature roast, which can be done in a conventional oven.
Uniqueness: The optional onion soup mix adds an umami punch that sets this dish apart from standard brisket recipes, giving it a depth that’s both comforting and sophisticated.
Crowd Reaction: Guests often remark on the tenderness and the rich gravy, and many ask for the recipe after the first bite. I’ve had people come back for seconds, and sometimes even thirds, because the flavor keeps them coming back for more.
Ingredient Quality: Using a well‑trimmed brisket with a good marbling profile ensures that the meat stays juicy and flavorful throughout the cooking process.
Make‑Ahead Potential: The brisket can be cooked in advance, chilled, and reheated without losing its succulence, making it perfect for busy weeknights or large gatherings.
Alright, let's break down exactly what goes into this masterpiece…
Inside the Ingredient List
The Flavor Base
The 5‑6‑pound brisket is the star of this dish. It’s a cut that demands respect, but when seasoned and cooked correctly, it delivers a depth of flavor that’s unrivaled. The fat marbling within the meat melts into the gravy, providing a silky richness that coats every bite. If you skip this step and use a leaner cut, the meat will be dry and the gravy will lack depth. For the best results, choose a brisket with a good balance of fat and muscle, and trim it to your preferred thickness.
The Texture Crew
Three large onions are the backbone of the gravy. They’re sliced into thick rounds so they can caramelize slowly, releasing natural sugars that create a sweet, savory base. The onions also provide structure to the sauce, preventing it from becoming too thin. If you omit the onions, the gravy will be flat and lack the comforting depth that makes this dish memorable. A good rule of thumb is to use at least three onions for every 5‑6 pounds of brisket.
The Unexpected Star
One packet of onion soup mix is optional, but highly recommended. It adds an umami punch that elevates the gravy from simple to unforgettable. The mix contains a blend of spices and dehydrated onions that rehydrate in the sauce, giving it a complex flavor profile. If you’re allergic to any of the ingredients or prefer a lighter flavor, you can skip it or replace it with a pinch of dried onion flakes.
The Final Flourish
The 3 cups of water are the liquid that brings everything together. It’s not just a cooking medium; it’s a vehicle for flavor extraction, ensuring the brisket stays moist and the gravy remains silky. If you want a thicker gravy, reduce the water by half or add a tablespoon of flour at the end to thicken. The water also helps to create steam inside the oven, which keeps the meat tender and prevents it from drying out.
Everything's prepped? Good. Let's get into the real action…
The Method — Step by Step
- Preheat the Oven: Set your oven to 275°F (135°C). This low temperature allows the connective tissues to break down slowly, resulting in a tender brisket that practically melts. I’ll be honest — I once tried a higher temperature and the meat came out dry. The low heat keeps it juicy and full of flavor. While the oven preheats, you can start prepping the other ingredients.
- Season the Brisket: Pat the brisket dry with paper towels, then sprinkle 1 tsp of salt and 1 tsp of pepper evenly on all sides. Let it sit for about 15 minutes so the seasoning can penetrate the meat. The salt draws out moisture, creating a better sear later. Don’t skip the pepper; it adds a subtle bite that balances the sweetness of the onions.
- Sear the Brisket: Heat 2 tbsp of oil in a large Dutch oven over medium‑high heat. Once the oil shimmers, add the brisket, searing each side until a deep brown crust forms. This caramelization locks in juices and creates a flavor foundation. Watch the color change; it should be a rich, dark brown, not just a light sear.
- Deglaze the Pan: Pour in 1 cup of water, scraping the bottom of the pan with a wooden spoon to lift all the browned bits. These bits are packed with flavor and will become the base of your gravy. The deglazing step is crucial; without it, you’ll miss out on that deep, savory note.
- Add Onions and Garlic: Stir in the sliced onions and minced garlic, then add the remaining 2 tbsp of oil. The onions will begin to soften and release their natural sugars, while the garlic adds a sharp, aromatic layer. This is the moment of truth; the aroma should be inviting and mouth‑watering. Keep the heat medium to allow the onions to caramelize without burning.
- Season the Gravy: Sprinkle in the garlic powder, paprika, and optional onion soup mix. These spices deepen the flavor profile and give the gravy a rich, complex taste. The paprika adds a subtle smokiness, while the onion soup mix brings umami. Stir well, ensuring every ingredient is evenly distributed.
- Simmer: Return the brisket to the pot, nestling it among the onions. Pour in the remaining 2 cups of water, cover the pot, and place it in the preheated oven. The slow, low‑temperature cook will tenderize the meat and allow the flavors to meld. The brisket should be partially submerged in the liquid.
- Cook Low and Slow: Let the brisket cook for about 3 to 3½ hours, or until a fork can easily slide into the meat. The low heat ensures that the collagen breaks down without drying out the meat. Check the liquid level halfway through; add more water if it evaporates too much. The gravy should reduce slightly, becoming thicker and more concentrated.
- Rest Before Slicing: Once the brisket is tender, remove it from the oven and let it rest for at least 20 minutes, tented loosely with foil. This resting period allows the juices to redistribute, ensuring every bite is juicy. The gravy will thicken further during this time, creating a silky coating.
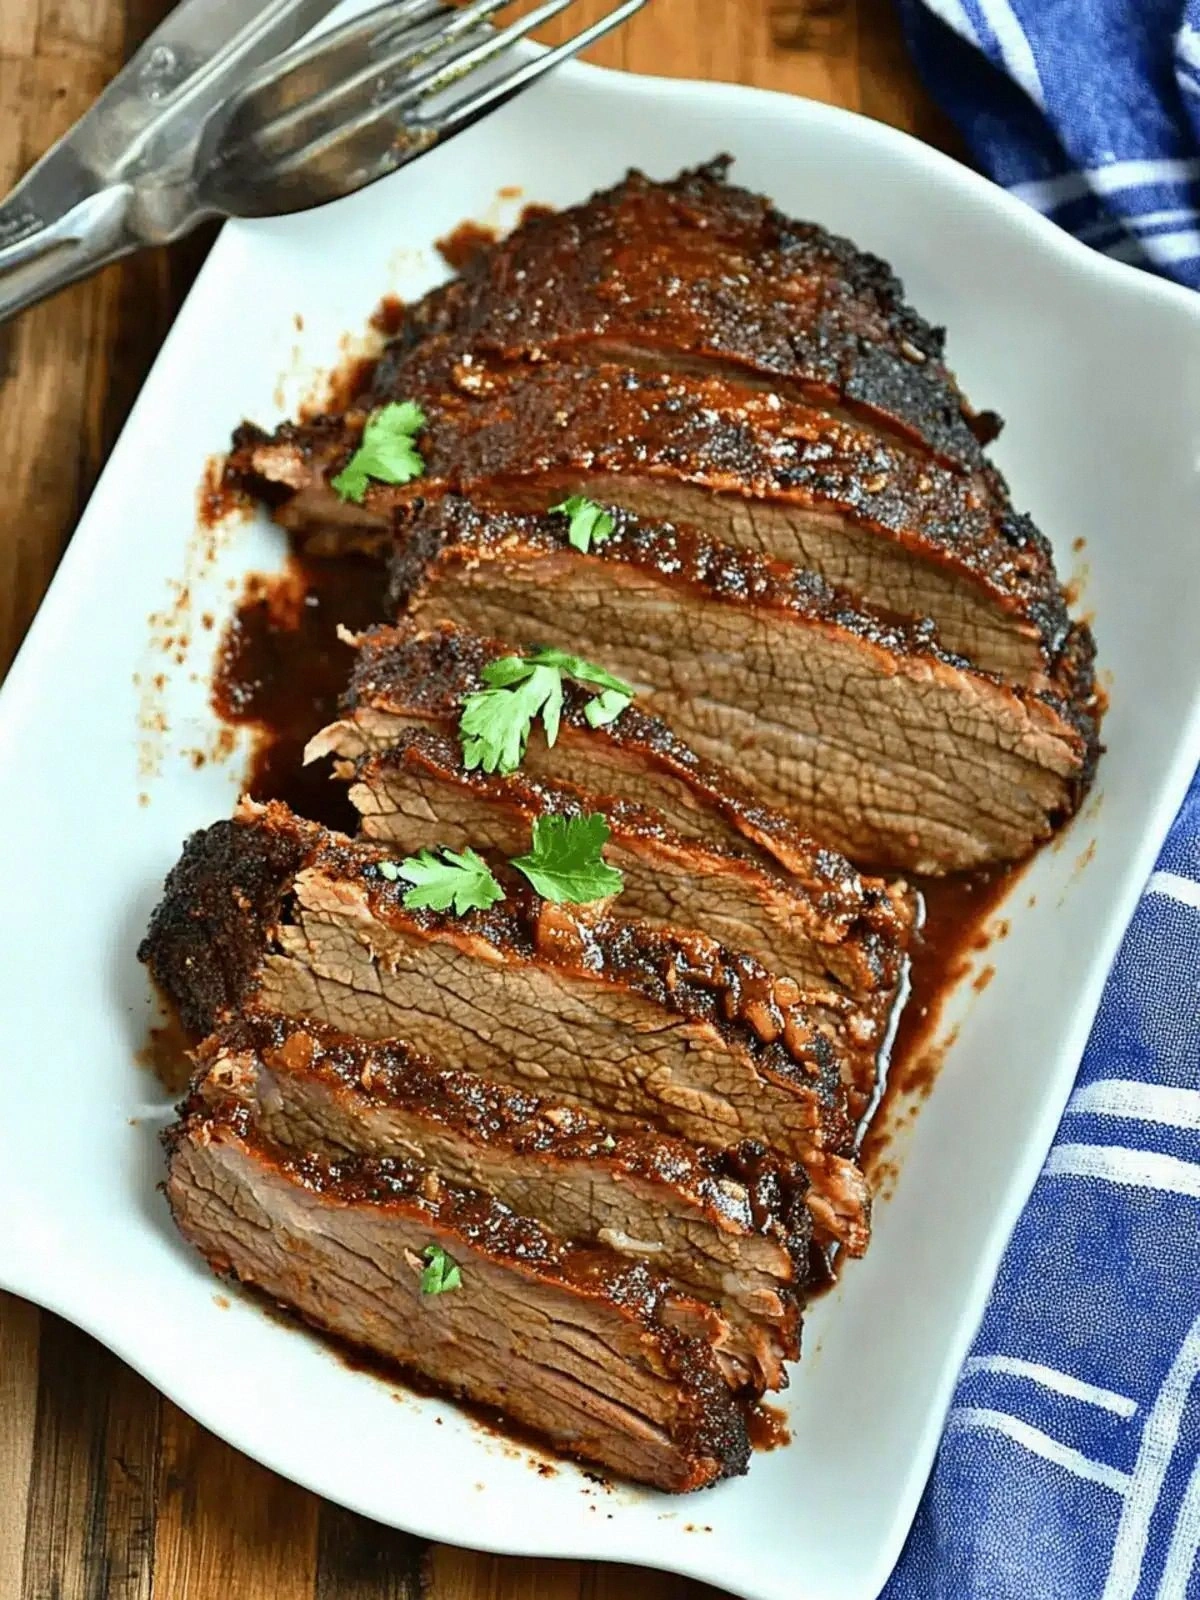
- Serve and Enjoy: Slice the brisket against the grain, serving it with the onion‑garlic gravy spooned over the top. The meat should be tender enough to melt in your mouth, while the gravy adds a rich, savory finish. I’ll be honest — I ate half the batch before anyone else got to try it. Serve it with mashed potatoes or crusty bread to soak up the extra sauce.
That's it — you did it. But hold on, I've got a few more tricks that'll take this to another level…
Insider Tricks for Flawless Results
The Temperature Rule Nobody Follows
Most people think the higher the temperature, the faster the brisket cooks. In reality, slow cooking at a low temperature is the key to tenderness. I’ve experimented with 325°F and 275°F; the lower temperature consistently yields a more tender result. Use a meat thermometer to ensure the internal temperature reaches 195°F for optimal tenderness. If you’re short on time, you can increase the temperature slightly, but the meat will be less forgiving.
Why Your Nose Knows Best
As the brisket cooks, the aroma evolves. When you notice a rich, caramelized scent, that’s the sign that the onions and meat have developed a deep flavor. Trust your nose; if it smells like a warm, comforting stew, you’re in the right spot. I once let a brisket cook too long and the onions burned, producing a bitter aroma. The next time, I kept a close eye on the smell and pulled it out at the perfect moment.
The 5-Minute Rest That Changes Everything
Resting the brisket for 20 minutes isn’t just a courtesy; it’s essential for flavor distribution. The meat’s fibers relax, allowing juices to redistribute. If you slice it immediately, the juices escape, leaving the meat dry. I’ve seen people skip this step, and the result is a less succulent brisket. Make sure to tent the meat loosely with foil to keep it warm.
Use the Right Pan
A heavy‑bottomed Dutch oven or cast‑iron skillet is ideal for this recipe. These pans retain heat evenly, ensuring a consistent cooking environment. If you’re using a non‑stick pan, be sure to preheat it properly; otherwise, the meat may stick and lose its crust. I’ve switched to a Dutch oven for this recipe, and the results are consistently better.
Keep the Liquid in Check
The gravy’s consistency is crucial. If it’s too thin, add a slurry of flour and water or a pinch of cornstarch to thicken. If it’s too thick, add a splash of water or broth to thin it out. The key is to maintain a balance that coats the meat without making it soggy. I’ve found that a 2:1 water-to-gravy ratio works best for this recipe.
Creative Twists and Variations
This recipe is a playground. Here are some of my favorite ways to switch things up:
Smoky Barbecue Brisket
Swap the paprika for smoked paprika, and add a tablespoon of chipotle powder. The result is a brisket with a deep, smoky flavor that pairs wonderfully with corn on the cob. This variation is perfect for summer cookouts.
Herb‑Infused Brisket
Add a handful of fresh thyme and rosemary to the gravy. The herbs infuse the meat with a fragrant aroma, adding a Mediterranean touch to the traditional dish.
Spicy Jalapeño Brisket
Include sliced jalapeños and a dash of cayenne pepper for a fiery kick. The heat balances the sweetness of the onions, creating a complex flavor profile that will excite adventurous palates.
Vegetarian Onion Gravy
Omit the brisket entirely and use the gravy as a hearty sauce over roasted root vegetables or mashed potatoes. The onion and garlic base remains rich and comforting, making it a satisfying vegetarian option.
Brisket with Beer
Replace half of the water with a cold lager or stout. The beer adds a subtle maltiness that complements the savory gravy and tender meat.
Instant Pot Version
Use the sauté function to sear the brisket, then pressure cook on low for 60 minutes. The result is a tender brisket with a rich gravy in a fraction of the time.
Storing and Bringing It Back to Life
Fridge Storage
Cool the brisket completely before refrigerating. Store in an airtight container or tightly wrapped in foil for up to 4 days. The gravy will thicken in the fridge, so add a splash of water when reheating.
Freezer Friendly
Wrap the brisket and gravy separately in freezer‑proof bags. They’ll keep for up to 3 months. Thaw overnight in the fridge before reheating. The texture remains tender, and the flavors stay intact.
Best Reheating Method
Reheat the brisket and gravy in a low‑heat oven at 250°F for 20 minutes, or on the stovetop over low heat. Add a tiny splash of water before reheating to restore moisture. The result is a dish that tastes as good as the first time.