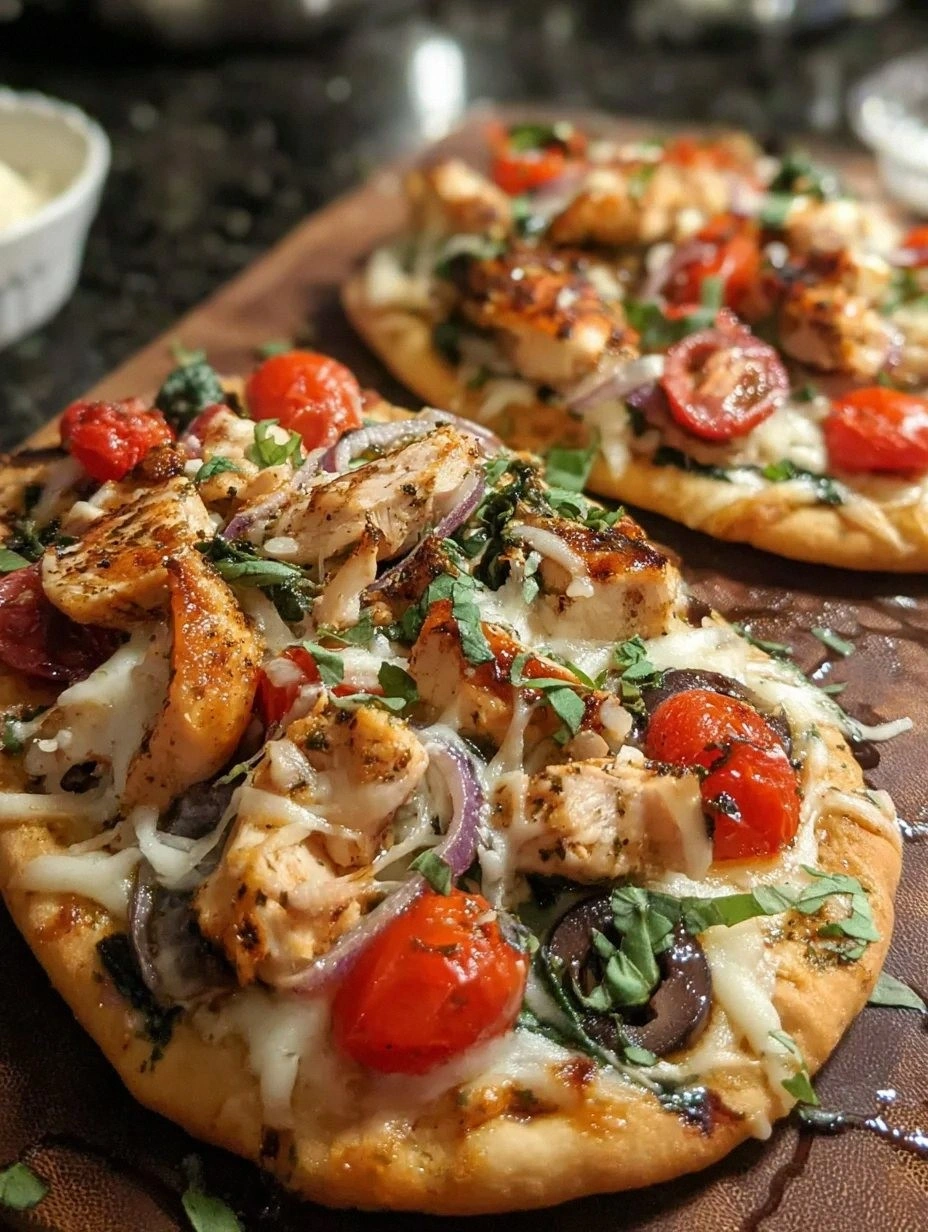
Picture this: it’s a rainy Tuesday, the kind that makes you stare at the clock and wonder if you’ll ever escape the monotony of reheated leftovers. I was halfway through a marathon of “quick dinner” videos when a sudden craving for something both comforting and daring hit me like a bolt of lightning. I rummaged through the pantry, grabbed a handful of pita breads, a couple of chicken breasts, and a jar of olives, and thought, “What if I turned these humble ingredients into a pizza that could out‑shine any delivery order?” That moment of culinary desperation birthed the most audacious twist on a classic Italian staple you’ll ever taste.
The kitchen instantly transformed into a sensory playground. The sizzle of olive oil meeting a hot skillet sang a crisp, buttery chorus, while the fragrant perfume of garlic and dried herbs swirled like a Tuscan breeze through an open window. My fingertips felt the warm, pliable pita dough as I brushed it with oil, and the aroma of melting mozzarella rose like a cloud of cheesy heaven. When the chicken hit the pan, it browned to a perfect caramelized crust that promised juicy, herb‑infused bites. The whole scene was a symphony of sights, smells, and textures that made my stomach rumble in anticipation.
Most recipes for “pita pizza” either skimp on flavor or overcomplicate the process, leaving you with soggy bases and bland toppings. I’ve tried them all – the ones that drown the pita in sauce, the ones that forget the crucial step of pre‑toasting, the ones that use pre‑shredded cheese that never melts right. This version stands out because it respects the pita’s delicate structure while loading it with bold, layered flavors that dance on the palate. The secret? A quick marination of the chicken in garlic‑herb oil, a strategic brush of oil on the pita before baking, and a finishing drizzle of balsamic glaze that adds a sweet‑tangy punch you never saw coming.
And here’s the kicker: I’m about to reveal a technique that most home cooks overlook – a brief high‑heat sear of the chicken before it joins the pizza party. This step locks in juices and creates a caramelized crust that makes every bite sing. I dare you to taste this and not go back for seconds. Let me walk you through every single step — by the end, you’ll wonder how you ever made it any other way.
What Makes This Version Stand Out
- Flavor Explosion: The marriage of garlic, dried herbs, and a splash of balsamic glaze creates a depth that rivals any restaurant‑style pizza, delivering a burst of Tuscan sunshine in every bite.
- Texture Harmony: The crisped edges of the pita contrast beautifully with the tender chicken and juicy cherry tomatoes, offering a satisfying crunch followed by a melt‑in‑your‑mouth softness.
- Simplicity Meets Sophistication: With just a handful of pantry staples and a 30‑minute prep, you get a gourmet‑level dish without the hassle of dough kneading or sauce simmering.
- Ingredient Quality Shines: Fresh chicken breasts soak up the herb‑infused oil, while high‑quality mozzarella and Parmesan melt into a golden, gooey blanket that’s pure indulgence.
- Crowd‑Pleaser Factor: These mini pizzas are perfect for families, game nights, or a quick solo dinner – everyone loves the handheld convenience and bold flavors.
- Make‑Ahead Magic: You can prep the chicken and chop the veggies ahead of time, making the final assembly a breeze even on the busiest weeknights.
- Versatile Base: Using pita breads means you get a soft, chewy foundation that’s already pre‑cooked, eliminating the dreaded soggy crust.
- Seasonal Flexibility: Whether it’s summer tomatoes or winter olives, the recipe adapts to whatever produce you have on hand, making it truly year‑round.
Inside the Ingredient List
The Flavor Base
Garlic is the undisputed hero here – freshly minced, it releases a pungent, almost buttery aroma that instantly elevates the chicken. Pair it with dried basil, oregano, and thyme, and you’ve got a herb trio that screams “Mediterranean market” with every bite. If you happen to have fresh herbs, feel free to swap them in; just double the amount because fresh herbs are less concentrated than their dried cousins.
The Texture Crew
Pita breads act as the perfect canvas: they’re soft enough to fold but sturdy enough to hold generous toppings without collapsing. The mozzarella provides that classic stringy stretch, while Parmesan adds a sharp, nutty edge that cuts through the richness. Cherry tomatoes contribute a burst of juiciness, and red onion offers a subtle sweetness that balances the savory chicken.
The Unexpected Star
Black olives are the surprise element that adds briny depth, turning an ordinary pizza into a sophisticated palate pleaser. Their salty pop contrasts with the sweet glaze of balsamic, creating a flavor duet you didn’t know you needed. Optional fresh basil leaves, added right before serving, give a fragrant lift that makes the dish feel like it was finished in a Tuscan kitchen.
The Final Flourish
Olive oil does double duty: it’s the medium for sautéing the chicken and the brush that gives the pita its golden sheen. Salt and pepper, while simple, are crucial for seasoning each layer evenly. A drizzle of balsamic glaze at the end isn’t just for show; it adds a tangy‑sweet glaze that ties together the herbaceous, cheesy, and savory elements into one harmonious bite.
Everything's prepped? Good. Let's get into the real action...
The Method — Step by Step
Start by gathering all your ingredients and giving the chicken breasts a quick pat dry. In a medium bowl, whisk together 2 tablespoons of olive oil, the minced garlic, dried basil, oregano, thyme, a generous pinch of salt, and a dash of black pepper. Toss the chicken in this aromatic mixture, making sure each piece is fully coated. Let it sit for at least 10 minutes – this is the moment where the flavors begin to marry, and trust me, it’s worth the wait.
While the chicken marinates, preheat your oven to 425°F (220°C). Meanwhile, slice the red onion thinly, halve the cherry tomatoes, and slice the black olives. Place these veggies in a bowl, drizzle with a splash of olive oil, and season lightly with salt and pepper. This quick toss ensures they’ll roast evenly and develop a sweet‑caramelized edge.
Heat a large skillet over medium‑high heat. Add a drizzle of olive oil, then lay the chicken breasts in the pan. Hear that satisfying sizzle? That’s the sound of flavor locking in. Cook for 4‑5 minutes per side, or until the exterior is a deep golden brown and the internal temperature hits 165°F (74°C). Remove the chicken and let it rest for a couple of minutes before slicing it into thin strips.
Kitchen Hack: Slice the chicken against the grain – this yields more tender pieces that shred easily on the pizza.While the chicken rests, brush each pita bread lightly on both sides with olive oil. Place them directly on the oven rack (or a pre‑heated pizza stone) for 2‑3 minutes, just until they start to puff and turn a light golden hue. This quick toast creates a barrier that keeps the toppings from soaking into the bread later.
Remove the toasted pitas and lay them on a baking sheet lined with parchment. Evenly distribute the shredded mozzarella across each pita, followed by a sprinkle of grated Parmesan. The cheese should form a smooth, even blanket – think of it as a snowy field waiting for the toppings to land.
Now comes the fun part: layering. Scatter the sliced chicken strips, roasted red onion, cherry tomatoes, and black olives over the cheese. Make sure each bite will get a balanced mix of protein, veg, and brine. If you love extra herbaceous notes, tuck a few fresh basil leaves among the toppings now.
Slide the assembled pitas back into the oven for 8‑10 minutes, or until the cheese is bubbling, lightly browned, and the edges of the pita are crisped to perfection. Keep an eye on them – you want a golden‑brown top, not a burnt one. The aroma at this stage should fill the kitchen like a warm Italian café on a bustling afternoon.
Watch Out: If you overload the pita with too many toppings, the base may become soggy. Stick to a moderate amount for the best crunch.Once the cheese has reached that perfect melt, pull the pitas out and let them rest for a minute – this allows the cheese to set just enough to hold together when you slice. Drizzle a thin stream of balsamic glaze over each pizza, creating a glossy, sweet‑tangy finish that adds visual appeal and flavor depth.
Slice each pita pizza into quarters or halves, depending on your appetite, and serve immediately. Pair with a crisp green salad or a glass of chilled white wine, and watch as your guests dive in, eyes widening with each bite. That moment when they say, “I didn’t know pita could be this good,” is pure culinary gold.
Kitchen Hack: For an extra crisp edge, finish the pita under the broiler for 1‑2 minutes after the cheese melts – just watch closely!
That's it — you did it. But hold on, I've got a few more tricks that'll take this to another level...
Insider Tricks for Flawless Results
The Temperature Rule Nobody Follows
Most home cooks bake at a moderate 350°F, but cranking the oven up to 425°F creates that coveted restaurant‑style char on the cheese and pita. The high heat locks in moisture, giving you a crispy edge while keeping the interior fluffy. I once tried a lower temperature and ended up with soggy pitas that fell apart – lesson learned: hot is happy.
Why Your Nose Knows Best
Before you even glance at the timer, trust your sense of smell. When the cheese starts to turn a light amber and you catch a nutty, toasted aroma, the pizza is ready to pull out. If you wait for the timer alone, you risk over‑cooking; your nose is a far more reliable gauge.
The 5‑Minute Rest That Changes Everything
After the pizza exits the oven, let it sit for exactly five minutes. This short rest allows the cheese to firm up just enough to hold its shape, preventing a gooey mess when you slice. It also lets the flavors meld, so each bite tastes more cohesive. Skipping this step is a common mistake that leads to sloppy slices.
Olive Oil Brush – Not Just for Flavor
Brushing the pita with olive oil before toasting isn’t just about taste; it creates a protective barrier that prevents the toppings from soaking into the bread. Think of it as a culinary raincoat. If you’re short on time, a quick spray bottle works just as well.
Cheese Ratio – The Golden Balance
Using a 3:1 ratio of mozzarella to Parmesan gives you that perfect melt (mozzarella) with a punch of sharpness (Parmesan). Too much Parmesan can make the pizza gritty, while too little leaves it bland. Adjust the ratio to your preference, but keep the balance for optimal texture.
Creative Twists and Variations
This recipe is a playground. Here are some of my favorite ways to switch things up:
Spicy Sriracha Drizzle
Add a thin line of sriracha mixed with a teaspoon of honey across the top after baking. The sweet‑heat contrast elevates the garlic chicken, perfect for those who love a little kick.
Mediterranean Veggie Overload
Swap the chicken for grilled zucchini, roasted red peppers, and artichoke hearts. The veggies soak up the herb oil beautifully, making a vegetarian version that still packs a punch.
Cheesy Bacon Bliss
Throw in crumbled cooked bacon and a handful of sharp cheddar along with the mozzarella. The smoky bacon adds crunch, while cheddar introduces a deeper, buttery flavor.
Greek‑Style Finish
Replace the balsamic glaze with a drizzle of tzatziki sauce and sprinkle feta cheese over the top. The tangy yogurt sauce pairs wonderfully with olives and red onion for a true Greek vibe.
Sweet & Savory Apple
Thinly slice a crisp apple, toss with a pinch of cinnamon, and add it as a topping before baking. The caramelized apple pieces create a delightful sweet‑savory contrast that’s unexpectedly delightful.
Herb‑Infused Olive Oil Splash
Before serving, drizzle a little herb‑infused olive oil (olive oil mixed with rosemary and thyme, gently warmed) over each slice. This adds an aromatic finish that makes the dish smell like a Tuscan garden.
Storing and Bringing It Back to Life
Fridge Storage
Allow the pizzas to cool completely, then wrap each pita tightly in plastic wrap or place them in an airtight container. They’ll stay fresh for up to 3 days. When you’re ready to eat, reheat in a preheated 375°F oven for 8‑10 minutes, uncovered, to revive the crispness.
Freezer Friendly
These pita pizzas freeze like a charm. After baking, let them cool, then wrap each individually in foil and place them in a freezer‑safe zip‑top bag. They’ll keep for up to 2 months. To reheat, skip the foil, bake directly on a parchment‑lined sheet at 400°F for 12‑15 minutes, or microwave for 60 seconds followed by a quick broil to crisp the edges.
Best Reheating Method
For the ultimate reheated crunch, sprinkle a tiny splash of water (about a teaspoon) over the pita before popping it in the oven. The steam helps the crust regain its softness while the top crisps up again. This trick works wonders for both fridge‑leftovers and frozen‑then‑thawed slices.