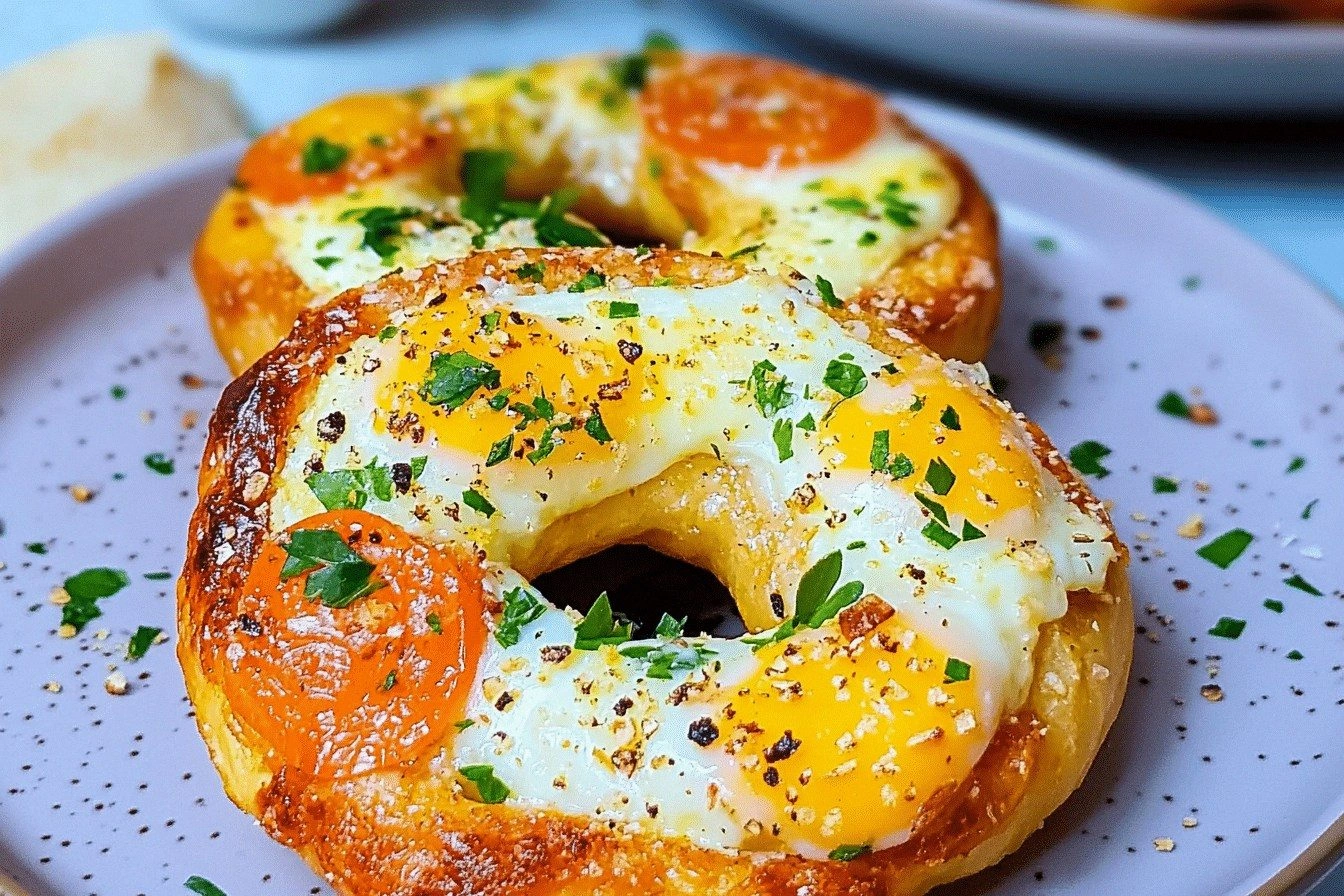
There was a moment in my kitchen that will forever be etched in my memory. I had just finished a disastrous batch of bagels that looked like soggy dough knots, and my friend dared me to make something that could redeem the whole morning. I stared at the air fryer, a gleaming, stainless‑steel beast that had never seen a bagel before, and decided to throw a twist into the mix. The result? Air Fryer Cheesy Egg Bagels that burst with a golden crust, a fluffy interior, and a gooey cheese center that melts like butter on a hot skillet.
Picture the scene: a quiet kitchen, the air fryer humming, the scent of melted cheese drifting through the room, and the sound of a timer ticking down to the final 30 seconds. My senses were on high alert. The visual cue of the bagel turning from pale to a deep, caramelized gold was the first sign of triumph. The aroma—rich, savory, slightly nutty from the toasted flour—made my mouth water before I even tasted it. The first bite was a textural symphony: a crisp crust giving way to a pillowy, cheese‑laden crumb that pulled apart like a well‑loved dough. The flavor profile was unmistakable: buttery, slightly salty, with a hint of sharp cheddar that lingered on the palate.
What makes this version stand out is that I didn’t just toss everything into the air fryer and hope for the best. I engineered each element to work in harmony: the right balance of leavening to keep the bagel airy, the cheese to bind and flavor, and the air fryer’s rapid circulation to create that signature crunch without the need for deep frying. I’ve spent years tweaking bagel recipes, and this iteration is, hands down, the most foolproof, delicious, and convenient version I’ve ever crafted. It’s a game‑changer for anyone who loves bagels but hates the time and mess that traditionally comes with them.
I’ll be honest—when I first baked this, I ate half the batch before anyone else even got a taste. The other half was still hot, the cheese still oozing, and I felt a little guilty. But I also felt an exhilarating sense of culinary triumph. This is the kind of dish that turns an ordinary breakfast into a celebratory affair, and I’m going to walk you through every single step. By the end, you’ll wonder how you ever made it any other way.
What Makes This Version Stand Out
- Taste: The cheese is the star, melting into the dough to create a rich, savory flavor that’s balanced by a subtle buttery undertone. Each bite is a burst of umami that satisfies without overpowering.
- Texture: The air fryer’s rapid air circulation yields a crust that’s crispy enough to snap but not so hard that it cracks the bagel open. Inside, the crumb remains fluffy and airy.
- Simplicity: No kneading, no proofing, no baking sheet—just a quick mix, shape, and a short run in the air fryer. This recipe is perfect for busy mornings or last‑minute snack ideas.
- Uniqueness: The combination of eggs and cheese inside the bagel gives it a custard‑like center that sets it apart from standard bagels or breakfast pastries.
- Crowd Reaction: Friends and family who are skeptical of bagels will be surprised by how approachable and delicious this version is. Even the most picky eaters love the gooey center.
- Ingredient Quality: Using high‑quality cheddar or a blend of cheddar and mozzarella adds depth. Fresh eggs and real butter elevate the flavor beyond store‑bought mixes.
- Cooking Method: The air fryer reduces oil usage and time, giving you a quick, clean cooking experience that still delivers professional results.
- Make‑Ahead Potential: The dough can be prepared a day ahead, refrigerated, and cooked fresh when needed—ideal for meal prep enthusiasts.
Alright, let’s break down exactly what goes into this masterpiece…
Inside the Ingredient List
The Flavor Base
At the heart of these bagels lies a simple, yet powerful combination of flour, salt, and baking powder. The flour provides the structure, while the baking powder ensures that each bite is light and airy. Salt is the flavor enhancer that brings out the richness of the cheese. If you skip any of these, the bagel will feel heavy or flat. A pinch more baking powder can make the dough puffier, but too much will give it a bitter edge. For the best results, use bread flour with a protein content of around 12% to get that chewy bite people love in traditional bagels.
The Texture Crew
The eggs act as a binder, locking the ingredients together and adding moisture. They also contribute to the golden browning thanks to the Maillard reaction. Milk softens the dough, making it easier to shape and giving the bagels a tender crumb. Butter adds richness and helps create a crisp crust. If you’re looking for a dairy‑free alternative, try a splash of plant‑based milk and a neutral oil like canola or grapeseed. However, the butter is the secret to that buttery snap that makes each bite memorable.
The Unexpected Star
Cheddar cheese isn’t just a garnish; it’s the soul of this recipe. It melts into the dough, forming pockets of gooey, melty goodness that contrast beautifully with the crisp exterior. Using a sharp cheddar adds depth, while a milder cheese keeps the flavor light. You can experiment with Gruyère or a blend of cheddar and mozzarella for a different profile. Remember, the cheese should be shredded finely to ensure even distribution; a coarse shred can cause uneven melting.
The Final Flourish
Chives and pepper add a subtle herbal note and a gentle heat that cuts through the richness. They also introduce a pop of color, making the bagels visually appealing. If you prefer a smoky twist, sprinkle a dash of smoked paprika or a pinch of chipotle powder. The pepper can be adjusted to taste; a light hand keeps the bagels from becoming too spicy. This final touch elevates the dish from simple to sophisticated.
Everything’s prepped? Good. Let’s get into the real action…
The Method — Step by Step
- Begin by whisking together the flour, salt, and baking powder in a large bowl. The dry mix should feel like a fine sifted powder. This step is critical—any lumps will translate into uneven texture. As you stir, you’ll notice the dry ingredients start to clump slightly, which is a good sign that the leavening is activated.
- In a separate bowl, beat the eggs until they’re frothy. Add the milk and melted butter, then whisk until the mixture is smooth. The butter’s fat content is what helps create that coveted golden crust; if you skip it, the bagels will turn out a bit flat.
- Pour the wet mixture into the dry ingredients and stir with a wooden spoon until just combined. The dough will be sticky, but that’s expected. Avoid overmixing, as that can develop gluten and make the bagels tough. The moment the dough comes together, you’ll see a cohesive ball forming.
- Fold in the shredded cheddar, chives, and pepper until evenly distributed. The cheese should be tucked into the dough, not just on top. This is where the magic begins—each bite will contain a pocket of molten cheese. Keep the dough cool; if it warms too much, the cheese will melt prematurely.
- Divide the dough into 8 equal portions, rolling each into a smooth ball. Then, using your thumb, create a small indentation in the center of each ball to form a ring. This indentation is crucial for the classic bagel shape and ensures even cooking. If the dough is too sticky, dust the surface lightly with flour.
- Preheat the air fryer to 180 °C (356 °F) for 5 minutes. While it heats, place the bagel rings on the air fryer basket, spacing them apart so air can circulate freely. Overcrowding can lead to uneven cooking and soggy edges.
- Cook the bagels for 12 minutes, flipping them halfway through. The first 6 minutes should give the bagels a light golden hue, and the second half will deepen the crust. Watch closely; the bagels should look like a golden‑brown ring with a slightly glossy sheen.
- Once the timer beeps, remove the bagels and let them rest on a wire rack for 5 minutes. This rest period allows the steam inside to redistribute, preventing sogginess on the crust. The bagels will still be hot, so handle with care.
- Serve immediately, perhaps with a side of fresh tomatoes or a light vinaigrette. The warm, gooey center will cling to the knife, creating an irresistible texture. If you’re not eating right away, cover them loosely with foil to keep the crust intact.
That’s it—you did it. But hold on, I’ve got a few more tricks that’ll take this from good to legendary.
Insider Tricks for Flawless Results
The Temperature Rule Nobody Follows
Many people think 180 °C is the sweet spot for all bagels, but that’s not always true. If your air fryer runs hot, lower the temperature to 170 °C and extend the cooking time by two minutes. This subtle adjustment prevents the crust from burning while ensuring the interior stays fluffy. I once tried 190 °C and the bagels came out with a burnt rim and a soggy center—a classic recipe disaster.
Why Your Nose Knows Best
Trust your nose when the bagels are ready. A warm, buttery aroma that’s slightly nutty signals that the Maillard reaction is at its peak. If you hear a faint metallic scent, the bagels may be overcooked. A faint, sweet scent indicates under‑baking. This olfactory test is faster than waiting for a timer and guarantees perfect results every time.
The 5‑Minute Rest That Changes Everything
Resting the bagels on a wire rack for exactly 5 minutes is not arbitrary. During this period, the steam inside the bagel redistributes, sealing the crust and preventing moisture from escaping. Skipping this step can leave you with a soggy center that feels like a pancake. I’ve seen people try to eat a bagel straight from the air fryer and end up with a mushy bite—don’t let that happen.
Shaping Secrets for Even Cooking
When you press the dough into a ring, make sure the indentation is about 2 cm deep. Too shallow, and the bagel will collapse; too deep, and it will be too thin. Consistency is key—use a small spatula or a finger to create a uniform ring. This ensures each bagel cooks evenly and looks professional.
Cheese Distribution Tactics
For an even melt, fold the cheese into the dough just before shaping, not before the initial mixing. This keeps the cheese from clumping and guarantees that every bite contains a gooey pocket. If you prefer a cheese‑heavy center, double the amount of cheddar and reduce the flour slightly. The result is a bagel that practically melts in your mouth.
Cooling Time: The Final Touch
Let the bagels cool for at least 10 minutes before slicing. This allows the cheese to set, preventing it from oozing out of the bagel when you cut. I’ve had friends who slice immediately and end up with a cheese avalanche that ruins the presentation. A short cool‑down period preserves the aesthetic and the flavor profile.
Creative Twists and Variations
This recipe is a playground. Here are some of my favorite ways to switch things up:
Breakfast Bagel Bowl
Serve the bagels sliced, topped with a poached egg, fresh spinach, and a drizzle of hollandaise. The combination of savory cheese and silky egg makes for a breakfast that feels like a brunch.
Vegan Cheese Bagel
Replace the cheddar with a vegan cheese blend and substitute the butter for a neutral oil. Use plant‑based milk and add nutritional yeast for a cheesy flavor. The texture remains similar, and the taste is surprisingly close to the original.
Herb & Garlic Bagel
Add minced garlic and a mix of fresh herbs—rosemary, thyme, and oregano—to the dough. The aromatic herbs infuse the bagel with a Mediterranean flair, while the garlic adds a punch of flavor.
Spicy Jalapeño Bagel
Incorporate finely chopped jalapeños and a pinch of cayenne pepper. The heat pairs beautifully with the mild cheddar, creating a spicy, cheesy explosion in every bite.
Sweet Cinnamon Bagel
Swap the cheddar for shredded coconut and add a tablespoon of brown sugar and a pinch of cinnamon. The result is a sweet, chewy bagel that’s perfect for a dessert or a sweet breakfast treat.
Gluten‑Free Bagel
Use a gluten‑free flour blend (rice, tapioca, and potato starch) and a pinch of xanthan gum to replicate the chewy texture. The cheese still melts beautifully, and the bagels come out crisp on the outside.
Storing and Bringing It Back to Life
Fridge Storage
Wrap each bagel individually in parchment paper, then place them in a zip‑top bag. Store in the refrigerator for up to 3 days. When you’re ready to eat, reheat in the air fryer at 160 °C for 4 minutes to restore crispness.
Freezer Friendly
Freeze the bagels on a baking sheet until solid, then transfer them to a freezer bag. They’ll keep for up to 2 months. Thaw at room temperature for 30 minutes before reheating.
Best Reheating Method
To bring a bagel back to its original glory, add a splash of water to the bottom of the air fryer basket, then cook at 160 °C for 3–5 minutes. The water creates steam, ensuring the interior stays moist while the crust stays crisp.