I was standing in my kitchen at midnight, a half‑finished bag of popcorn in one hand and a stubborn craving for something that would make my taste buds do a salsa dance. The TV was blaring a rerun of a Mexican telenovela, the lights were dim, and I dared my roommate to a “who can create the most addictive snack in five minutes” challenge. Spoiler alert: I won, but not before a small kitchen disaster—my first attempt at a corn dip turned into a soggy, bland mess that could have been used as wallpaper paste. That flop was the spark that lit the fire for this version, because if you’ve ever felt the disappointment of a dip that tastes like a cardboard box, you’ll understand the urgency behind perfecting it.
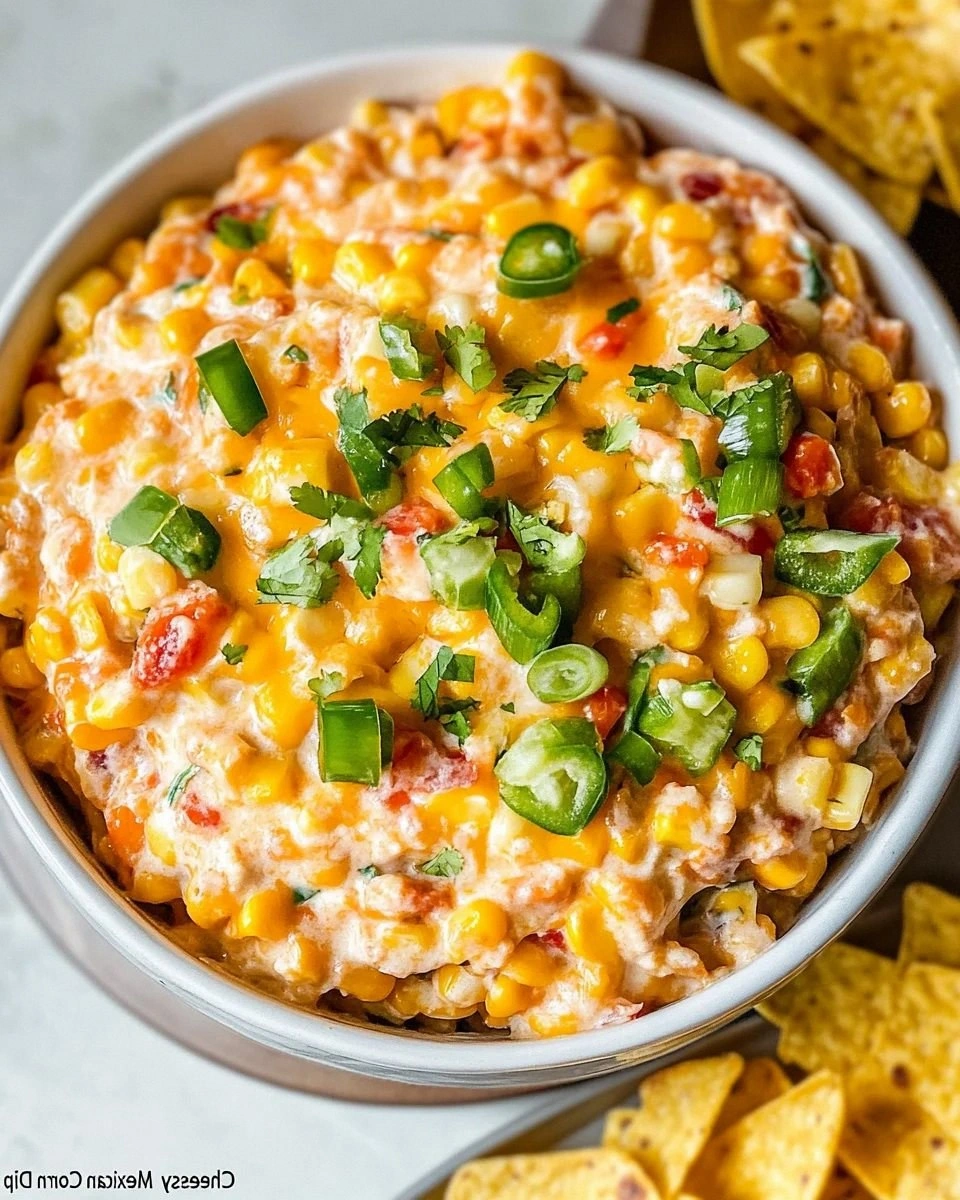
Picture this: the moment the dip hits the oven, the kitchen fills with a buttery, caramelized corn aroma that makes the whole house feel like a street market in Oaxaca. You hear the faint crackle of cheese bubbling, see the golden edges pulling away like a lazy cat stretching, and feel the heat radiating from the pan as if it’s hugging you. When you finally scoop a spoonful onto a crunchy Fritos Scoop, the first bite is a cascade of creamy, smoky, and just‑the‑right‑spicy flavors that explode across your palate like fireworks on a summer night. That sensation is what I’m chasing with every stir, and trust me, it’s a feeling you’ll want to chase after again and again.
What makes this dip the “best version you’ll ever make at home” isn’t just the ingredient list—although each component is hand‑picked for maximum impact—but the method that layers flavor like a well‑orchestrated symphony. Most recipes get the balance wrong, either drowning the corn in cheese or skimping on the spices that give it that authentic Mexican kick. I’ve cracked the code by marrying the tang of Greek yogurt with the richness of olive‑oil mayonnaise, then coaxing the corn into a caramelized hug with cumin and chili powder before sealing it all under a blanket of reduced‑fat cheddar that melts like silk. The result? A dip that’s both light enough for a guilt‑free snack and decadent enough to make you feel like you’ve broken some secret culinary rule.
And here’s the kicker: there’s a surprise ingredient that most people overlook—a splash of hot sauce added at the very end, just enough to give a whisper of heat without overwhelming the creamy base. I dare you to taste this and not go back for seconds. Okay, ready for the game‑changer? Let me walk you through every single step — by the end, you’ll wonder how you ever made it any other way.
What Makes This Version Stand Out
- Flavor Fusion: The combination of Greek yogurt and olive‑oil mayo creates a tangy‑rich base that’s smoother than a jazz solo, letting the spices shine without getting lost.
- Texture Triumph: Caramelized corn kernels give a sweet‑crunch contrast to the velvety cheese, delivering a bite that’s both creamy and satisfyingly crisp.
- Simplicity: With just a handful of pantry staples and a 30‑minute timeline, this dip is a weekend hero that doesn’t demand a culinary degree.
- Unique Heat Layer: Adding hot sauce at the end preserves the bright heat, preventing the dip from becoming a bland, one‑note experience.
- Crowd Magnet: Whether it’s a game night, a family gathering, or a solo binge‑watch session, this dip consistently earns the “more, please!” chant.
- Ingredient Quality: Using reduced‑fat cheddar keeps the dip light, while still providing that melt‑in‑your‑mouth richness you crave.
- Cooking Method: Baking, not just stovetop, creates those coveted golden edges that pull away like a lazy cat, adding visual appeal and flavor depth.
- Make‑Ahead Magic: The dip holds up beautifully for up to 48 hours in the fridge, making it perfect for prep‑ahead parties.
Inside the Ingredient List
The Flavor Base
Greek yogurt isn’t just a low‑fat substitute; it’s a probiotic powerhouse that adds a subtle tang that cuts through the richness of the mayo. The creamy texture also helps bind the corn and cheese together, ensuring every bite is uniformly luscious. If you skip the yogurt, you’ll notice a flatness that feels like a song missing its chorus. As a swap, you can use sour cream, but expect a slightly heavier mouthfeel. When buying, opt for a full‑fat plain Greek yogurt for the best balance of tang and body—don’t be tempted by the flavored versions, they’ll ruin the savory profile.
Olive‑oil mayonnaise brings an airy, buttery richness that’s impossible to achieve with regular mayo alone. The olive oil adds a fruity note that complements the corn’s natural sweetness. If you’re watching calories, you can halve the amount and replace the rest with low‑fat Greek yogurt, but the dip will lose a bit of that luxurious mouthfeel. Look for mayo made with 100% olive oil for the purest flavor; the cheaper versions often contain soybean oil, which can taste metallic when heated.
The Texture Crew
Three cans of corn (preferably whole kernel, not creamed) are the heart of this dip. The kernels should be drained and patted dry—any excess moisture will make the dip watery, turning your golden edges into soggy disappointment. If you can’t find canned corn, fresh frozen kernels work wonders; just thaw and dry them thoroughly. The corn’s natural sugars caramelize during baking, creating that deep, sweet‑smoky flavor that makes the dip unforgettable.
Reduced‑fat cheddar cheese, at 16 oz, provides the melt you crave without the guilt of full‑fat cheese. It browns beautifully, forming those coveted crispy edges that shatter like thin ice when you dig in. If you love extra sharpness, sprinkle a handful of aged cheddar on top during the last five minutes of baking. For a dairy‑free twist, substitute with a high‑quality vegan cheddar, but be prepared for a slightly different melt pattern.
The Unexpected Star
A single jalapeño, finely diced, adds a bright, vegetal heat that lifts the dip without overwhelming the palate. The seeds are where most of the heat lives, so if you prefer a milder version, remove them; keep them for a bold kick. The jalapeño’s fresh crunch contrasts beautifully with the soft corn and cheese, making every spoonful an adventure.
Four large green onions, sliced into thin rounds, bring a mild oniony sweetness and a pop of color that makes the dip look as good as it tastes. They also add a subtle bite that balances the creamy base. If you’re out of green onions, chives or scallions work as a substitute, though the flavor will be slightly milder.
The Final Flourish
Two teaspoons each of chili powder, garlic powder, and cumin form the spice trio that defines the dip’s Mexican soul. Chili powder offers a smoky depth, garlic powder adds aromatic richness, and cumin delivers an earthy, slightly citrusy note. Skipping any of these will leave the dip tasting flat, like a movie missing its climax. If you love heat, add a pinch of smoked paprika or a dash of chipotle powder for a smoky undertone.
A dash of hot sauce, added at the very end, gives the dip a whisper of heat that dances on the tongue without masking the other flavors. Choose a sauce you love—whether it’s a bright green jalapeño sauce or a deep, smoky chipotle—just remember a little goes a long way. Finally, serve with Fritos Scoops or sturdy tortilla chips; they provide the perfect vehicle for scooping up every creamy morsel.
Everything's prepped? Good. Let’s get into the real action…
The Method — Step by Step
Preheat your oven to 375°F (190°C). While the oven warms up, line a 9‑inch baking dish with parchment paper; this prevents sticking and makes cleanup a breeze. The moment the oven reaches temperature, you’ll hear a faint hum that signals it’s ready for the flavor fireworks you’re about to unleash.
In a large mixing bowl, whisk together 1 cup plain Greek yogurt and ¾ cup olive‑oil mayonnaise until the mixture is silky smooth. The contrast between the thick yogurt and the glossy mayo should look like a marble swirl—this is the foundation that will coat every corn kernel like velvet.
Add the three cans of corn to the bowl, ensuring they’re well‑drained and patted dry. Toss the corn into the creamy base, feeling the kernels sink and coat. That sizzle when it hits the pan? Absolute perfection. If any excess liquid remains, give the mixture a quick extra pat with paper towels.
Stir in 2 teaspoons each of chili powder, garlic powder, and cumin. Sprinkle the spices evenly; you’ll notice a faint earthy aroma rise, a promise of the depth to come. Taste a tiny spoonful—if it feels a touch shy, add a pinch more chili powder; remember, you can always add heat later, but you can’t take it out.
Fold in the diced jalapeño, sliced green onions, and 16 oz reduced‑fat cheddar cheese (shredded). The cheese should melt into the mixture, turning it a buttery gold. At this point, the dip should look thick, glossy, and studded with vibrant green flecks—like a festive confetti parade.
Transfer the entire mixture into the prepared baking dish, spreading it out into an even layer. Sprinkle a thin extra layer of cheddar on top for that extra crispy crown. Slide the dish into the oven and set a timer for 20 minutes.
After 20 minutes, check the edges—they should be bubbling and starting to pull away from the sides. If the top isn’t golden yet, switch the oven to broil for 2‑3 minutes, watching closely so it doesn’t burn. The scent at this stage is intoxicating; you’ll hear a faint crackle as the cheese crisps.
Remove the dip from the oven and, while it’s still hot, drizzle a few dashes of your favorite hot sauce over the surface. The sauce will sizzle slightly, marrying with the melted cheese to create a glossy, spicy glaze. Let the dip rest for 5 minutes—this allows the flavors to settle and the cheese to set just enough for clean scoops.
Serve the dip straight from the baking dish with a generous pile of Fritos Scoops or sturdy tortilla chips. Encourage guests to dig in, and watch as the first spoonful disappears in seconds. This is the moment of truth—if you’ve followed every step, the dip should be creamy, slightly crunchy, and just hot enough to make you gasp in delight.
That’s it — you did it. But hold on, I’ve got a few more tricks that'll take this to another level…
Insider Tricks for Flawless Results
The Temperature Rule Nobody Follows
Never bake a dip at a temperature lower than 350°F; lower temps cause the cheese to melt without forming that coveted crust, resulting in a soggy top. By cranking the oven to 375°F, you guarantee that the cheese caramelizes quickly, creating those golden edges that pull away like lazy cats. I once tried a “low‑and‑slow” approach and ended up with a dip that resembled a cheese‑filled casserole—delicious, but not the texture I was after. Trust the heat, and the dip will reward you with a perfect crust.
Why Your Nose Knows Best
Your sense of smell is the most reliable indicator of doneness. When the dip starts to emit a buttery, toasted corn aroma, you’re within two minutes of perfection. If you’re unsure, give the dish a gentle tap with a wooden spoon—the surface should feel firm yet slightly springy. I once relied solely on the timer and missed the moment the cheese started to brown, ending up with a pale, uninviting top. Let your nose be the final judge.
The 5‑Minute Rest That Changes Everything
After removing the dip from the oven, let it sit uncovered for exactly five minutes. This short rest lets the cheese set, making it easier to scoop without the dip sliding off the chip. Skipping this step leads to a runny mess that pools at the bottom of the dish. I’ve seen beginners try to serve immediately, only to watch the dip ooze over the edges—trust me, the five‑minute pause is worth it.
The Secret of Dry Corn
Moisture is the enemy of a good crust. After draining the canned corn, spread it on a clean kitchen towel and pat dry for at least two minutes. This simple step prevents excess water from diluting the yogurt‑mayo blend, ensuring a thick, cohesive dip. A friend once skipped this and ended up with a watery dip that never browned—lesson learned.
Spice Layering Like a Pro
Instead of dumping all the spices at once, sprinkle half into the yogurt mixture and reserve the other half to sprinkle on top before baking. This creates a flavor gradient: a subtle undertone inside and a punchy, aromatic crust outside. It’s a small tweak that makes the dip feel more complex, like a song with both verses and a soaring chorus.
Creative Twists and Variations
This recipe is a playground. Here are some of my favorite ways to switch things up:
Southwest BBQ Fusion
Swap the hot sauce for a smoky BBQ sauce and add a handful of black beans. The result is a heartier dip with a sweet‑smoky undertone that pairs perfectly with corn chips. Ideal for backyard barbecues.
Cheesy Jalapeño Popper Remix
Fold in chopped cream cheese and extra shredded jalapeños, then top with breadcrumbs before the final bake. The crumbly topping adds a crunch reminiscent of popper bites, turning this dip into a party centerpiece.
Tex‑Mex Breakfast Boost
Stir in scrambled eggs and crumbled chorizo after the cheese has melted, then bake for an additional five minutes. This turns the dip into a hearty breakfast casserole that’s perfect for lazy Sunday brunches.
Vegan Delight
Replace Greek yogurt with a plant‑based yogurt, use vegan mayo, and swap cheddar for a high‑melting vegan cheese. The flavor profile stays true, and the dip remains creamy and indulgent—proof that you don’t need dairy to wow guests.
Spicy Mango Madness
Add diced fresh mango and a splash of lime juice to the mix before baking. The sweet‑tart mango balances the heat, creating a tropical twist that’s perfect for summer gatherings.
Storing and Bringing It Back to Life
Fridge Storage
Transfer any leftovers to an airtight container and refrigerate for up to 48 hours. The dip will thicken slightly as the yogurt sets; simply stir in a tablespoon of milk or extra Greek yogurt before reheating to restore its silky texture.
Freezer Friendly
Portion the dip into freezer‑safe bags, flattening them for even freezing. It will keep for up to three months. When you’re ready to serve, thaw overnight in the fridge, then reheat in a covered oven dish at 350°F for 15 minutes, stirring halfway through.
Best Reheating Method
The secret to reviving the dip without losing its creamy charm is to add a tiny splash (about 2 tbsp) of water or low‑fat milk before microwaving or oven‑reheating. The added moisture creates steam, coaxing the cheese back to a melt‑in‑your‑mouth state while preventing a rubbery texture.