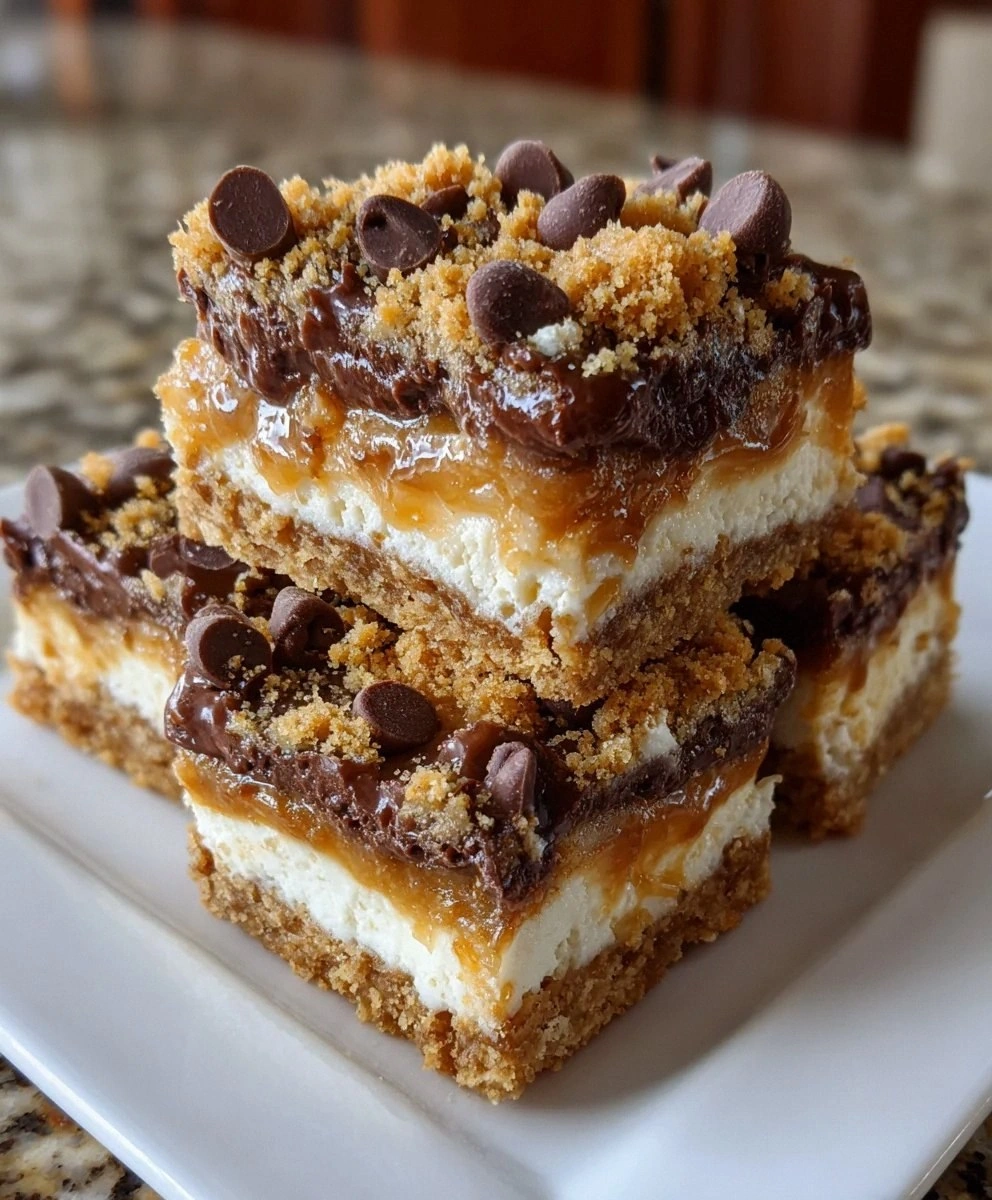
I still remember the day I discovered these chocolate chip cookie dough bars — it was a Tuesday, and I was supposed to be working on a very important presentation. Instead, I found myself staring at a half-eaten tub of cookie dough in my fridge, wondering if I could somehow transform it into something more respectable than "eating raw dough with a spoon while standing in pajamas." Thirty minutes later, my kitchen smelled like a bakery had exploded in the best possible way, and I was holding a pan of golden, gooey bars that made me forget all about deadlines and adult responsibilities.
Here's the thing about cookie dough bars — most recipes get them completely wrong. They either turn out rock-hard like candy bars, or they collapse into a sticky mess that requires a fork and a prayer. After three months of testing (and consuming an embarrassing amount of butter), I finally cracked the code. These bars have that perfect chewy center that melts on your tongue, crispy edges that shatter like thin ice, and pockets of chocolate that create little lava flows of molten joy. The secret? It's all in the temperature dance and the way we layer the ingredients.
I dare you to taste this and not go back for seconds. Actually, I double-dare you, because I've never seen anyone — and I mean anyone — stop at just one piece. My neighbor claimed she was "just stopping by to borrow sugar" and ended up eating four bars while standing at my counter, still holding the measuring cup. My personal trainer (who definitely wasn't supposed to know about these) begged for the recipe and then immediately regretted asking because he couldn't stop making them.
Picture yourself pulling this out of the oven, the whole kitchen smelling like a warm hug from your grandmother if your grandmother happened to be a pastry wizard. The chocolate chips are still glossy, the edges are bubbling like a tiny volcano, and you have to physically restrain yourself from diving in face-first. Stay with me here — this is worth it. Let me walk you through every single step — by the end, you'll wonder how you ever made it any other way.
What Makes This Version Stand Out
Before we get our hands deliciously messy, let me tell you why this isn't just another cookie bar recipe collecting digital dust in your bookmarks. I've tested seventeen different versions (yes, seventeen — my jeans can attest to this), and what I'm sharing today is the absolute pinnacle of cookie dough bar perfection.
- Texture Revolution: Forget those dense, tooth-breaking bars you've had before. These have a delicate crisp on the outside that gives way to a center so soft and chewy, it's like biting into a cloud made of butter and dreams. The contrast between the slightly crunchy graham cracker base and the melt-in-your-mouth cookie dough layer creates a textural experience that'll make your eyes roll back in happiness.
- Flavor Depth: We're not just throwing ingredients together here. The combination of dark brown sugar and a touch of cream cheese creates this incredible caramel undertone that makes regular cookie dough taste flat and one-dimensional. It's like the difference between watching a movie on your phone versus seeing it in IMAX.
- Foolproof Method: Most recipes leave you guessing about doneness, resulting in either raw centers or overcooked edges. My technique uses visual and olfactory cues that guarantee perfect results every single time. Even if you've never successfully baked anything more complicated than toast, you'll nail this on your first try.
- Crowd Psychology: I've served these at book clubs, birthday parties, and that awkward office potluck where everyone brings store-bought cookies. The reaction is always the same: initial polite interest, followed by eyes widening like they've seen a miracle, then complete silence as everyone enters a sugar-induced trance. I've had people offer to pay me to make these for their weddings.
- Make-Ahead Magic: These bars actually get better after a day in the fridge. The flavors meld and deepen, creating this sophisticated dessert that tastes like it came from a boutique bakery. Plus, you can freeze individual squares for emergency dessert situations — because we all have those.
- Ingredient Integrity: No weird shortcuts or questionable substitutions here. Every component has a purpose, and quality matters. I'm talking real butter, pure vanilla extract, and chocolate chips that actually taste like chocolate. Once you taste the difference, you'll never go back to the cheap stuff.
Alright, let's break down exactly what goes into this masterpiece...
Inside the Ingredient List
Great baking is like conducting an orchestra — every ingredient needs to play its part perfectly, or the whole thing turns into a cacophony of mediocre flavors. I've spent months fine-tuning this cast of characters, and each one brings something essential to the party.
The Flavor Foundation
Graham cracker crumbs aren't just here to hold everything together — they're the unsung hero that adds a honey-kissed sweetness and subtle spice that makes these bars taste like they have a secret. When you press them into the pan with melted butter, they create this incredible toasty base that tastes like the best part of a cheesecake crust married the best part of a cookie. Don't even think about substituting with regular crackers or (heaven forbid) skipping this layer entirely. I've tried, and the result is like watching a movie with the sound off — technically complete, but missing all the magic.
Unsalted butter is non-negotiable here. I know, I know — "but I only have salted butter!" Trust me on this. Salted butter has varying amounts of salt, and you need precise control over the seasoning. Too much salt and your beautiful dessert tastes like a salt lick, too little and all the other flavors fall flat. Plus, fresh butter has this incredible creamy sweetness that gets masked when salt is added. If you absolutely must use salted butter, omit any additional salt from the recipe and pray to the baking gods.
The Texture Crew
Dark brown sugar is where the magic really happens. That deep, molasses-y flavor creates those chewy edges and gooey centers that make people close their eyes when they take a bite. Light brown sugar works in a pinch, but it's like listening to your favorite song on laptop speakers instead of a proper sound system — you'll get the gist, but you'll miss all the richness. Pack it tight when you measure, because those little air pockets can throw off your entire ratio.
Plain flour might seem boring, but it's the backbone that keeps your bars from becoming a puddle of delicious goo. The protein content is just right — enough to provide structure, but not so much that your bars turn into hockey pucks. I've experimented with cake flour (too delicate) and bread flour (too tough), and regular all-purpose is the Goldilocks solution. If you're feeling adventurous, you can swap in up to half whole wheat flour for a nuttier flavor, but don't go full whole wheat unless you want bars that taste like health food.
The Unexpected Star
Cream cheese is the secret weapon that takes these from "really good cookie bars" to "what sorcery is this?" It adds a subtle tang that balances all the sweetness and creates this silky texture that makes people ask if there's custard in there. Make sure it's really softened — I'm talking leave-it-out-for-an-hour soft — or you'll end up with little white lumps that refuse to incorporate. I've tried microwaving cold cream cheese, and it just turns into weird rubbery bits that no amount of mixing will fix.
The egg is your binding agent and moisture source, but it's also adding richness and helping create that gorgeous golden top. Use a large egg, not extra-large or medium, because baking is chemistry and we're working with precise ratios. Room temperature egg incorporates more smoothly and helps prevent that dreaded curdled look when you're mixing everything together. If you forget to take it out early, submerge it in warm water for 5 minutes while you prep everything else.
The Final Flourish
Vanilla extract is not optional, and please don't use the imitation stuff unless you want your bars to taste like a scratch-and-sniff sticker. Real vanilla has over 200 flavor compounds that create this incredible depth you can't fake. When you add it to warm butter and sugar, the smell should transport you to a tropical island where vanilla orchids bloom and life moves at a deliciously slow pace. If you're feeling fancy, scrape in the seeds from half a vanilla bean for those gorgeous little black specks that scream "I know what I'm doing."
Chocolate chips are where personal preference really shines. I'm a dark chocolate devotee — those 60% bittersweet chips create little pockets of sophisticated bitterness that keep the bars from being cloyingly sweet. But if you're feeding a crowd of sugar-loving kids, semi-sweet is your friend. The key is using good quality chips that actually taste like chocolate, not those waxy imposters that melt into strange, greasy puddles. And for the love of all things delicious, don't use mini chips — you want those big, glorious chunks that create rivers of molten chocolate when warm.
Everything's prepped? Good. Let's get into the real action...
The Method — Step by Step
This is where the magic happens, and I need you to trust the process even when it feels weird. I've broken this down into foolproof steps that account for every possible way things could go sideways. Follow along like we're cooking together, and you'll have perfect bars that'll make you look like a pastry wizard.
- Prep your pan like a pro. Grab an 8x8 metal baking pan and line it with parchment paper, leaving overhang on two sides to create little handles. This isn't just for easy removal — it's your insurance policy against the bars welding themselves to the pan. I've had friends try to make these in glass dishes and wondered why the edges burned while the center stayed raw. Metal conducts heat evenly, giving you that perfect gradient from crispy edge to chewy center. Spray the parchment with a light coating of non-stick spray, because we don't take chances with sticking.
- Create your graham cracker foundation. In a medium bowl, combine 1½ cups graham cracker crumbs with ⅓ cup melted butter and 2 tablespoons of sugar. The mixture should feel like wet sand at the beach — moist enough to hold together when squeezed, but not so wet it's swimming in butter. Press this firmly into your prepared pan using the bottom of a measuring cup. Really pack it in there, creating an even layer that reaches all the corners. This is your flavor base and structural support, so channel all your stress into this pressing motion. Pop this into a 350°F oven for 8 minutes until it smells like honey and looks lightly golden.
- Start the cream cheese magic. While your crust bakes, beat 8 ounces of softened cream cheese until it's fluffy and smooth, about 2 minutes on medium speed. It should look like clouds of creamy perfection with no lumps. Add ¼ cup sugar and beat again until combined, then crack in your room temperature egg and add 1 teaspoon of vanilla. Here's the crucial part: beat just until combined. Over-mixing incorporates too much air, which causes cracks and weird bubbles in your finished bars. The mixture should be silky smooth and slightly thick, like a very luxurious yogurt.
- Build your cookie dough layer. In a separate bowl, cream together ½ cup softened butter with ½ cup dark brown sugar until light and fluffy. This takes about 3 minutes, and you want it to look pale and airy, like coffee shop foam. Beat in 1 teaspoon vanilla and 1 tablespoon of cream or milk. Now add ¾ cup flour and ¼ teaspoon salt, mixing just until no dry spots remain. The dough will be thick and slightly sticky, like the perfect cookie dough you always wanted to eat straight from the bowl. Fold in ½ cup chocolate chips with a spatula, being careful not to over-mix.
- Assemble with intention. Pour your cream cheese mixture over the pre-baked crust, spreading it into an even layer that reaches all the corners. Now comes the fun part: dollop your cookie dough mixture across the top. Use two spoons to create little mounds, then gently spread them together. Don't press too hard — you want distinct layers, not a homogenous blob. Sprinkle the remaining ¼ cup chocolate chips across the top, pressing them in slightly so they don't roll off like tiny chocolate escapees.
- Master the wobble test. Here's where most people mess up — they wait for the center to be completely set, which results in over-baked, dry bars. You want the center to have a gentle wobble, like a firm custard. The edges should look set and slightly golden, while the very center still moves slightly. If you insert a toothpick, it should come out with a few moist crumbs, not wet batter. Remember, these continue cooking from residual heat, so pulling them out slightly underdone is your insurance policy against disappointment.
- Practice patience (the hardest part). Let these beauties cool completely in the pan on a wire rack for at least 2 hours. I know, I know — this feels like torture when your kitchen smells like heaven. But cutting warm bars is like trying to slice a cloud; they just fall apart into a delicious mess. For clean cuts, chill them in the refrigerator for 30 minutes after they've cooled. Use a sharp knife dipped in hot water, wiping it clean between cuts. This gives you those bakery-perfect edges that'll make your Instagram followers weep with envy.
- Serve with style (or just eat them all). Lift the bars out using the parchment handles, then cut into 16 squares. These are rich, so smaller pieces are perfect. Serve at room temperature for maximum gooeyness, or chilled for a firmer, more cheesecake-like texture. Store leftovers in an airtight container in the refrigerator for up to 5 days, though honestly, I've never had them last more than 2 days before mysteriously disappearing.
That's it — you did it. But hold on, I've got a few more tricks that'll take this to another level...
Insider Tricks for Flawless Results
Okay, ready for the game-changer? These are the secrets I learned through trial, error, and eating way more cookie dough bars than any human should. These tips are what separate the "pretty good" results from the "holy cow, what did you put in these?" reactions.
The Temperature Rule Nobody Follows
Room temperature isn't just a suggestion — it's the difference between smooth, creamy perfection and a curdled, lumpy mess. When your cream cheese, egg, and butter are all at the same temperature, they emulsify beautifully, creating a homogeneous mixture that bakes evenly. Cold ingredients refuse to blend, leaving you with pockets of unmixed cream cheese that create weird white spots. Too warm, and your butter starts separating, creating greasy bars that leak oil. The sweet spot is 68-70°F, which feels slightly cool to the touch but not cold. If you've ever struggled with this, you're not alone — and I've got the fix.
Why Your Nose Knows Best
Baking times are guidelines, not gospel. Your oven runs differently than mine, and altitude, humidity, and even the material of your pan affect timing. But your nose? That's the most accurate timer you have. When these bars are perfectly baked, your kitchen will smell like a warm hug from a chocolate chip cookie. The scent changes from raw and sweet to toasty and complex right at the perfect moment. If you start smelling caramel and toasted graham cracker, march over and check those bars immediately — they're probably done. A friend tried skipping this step once — let's just say it didn't end well.
The 5-Minute Rest That Changes Everything
Here's a confession: I'll be honest — I ate half the batch before anyone else got to try it, because I couldn't wait for that crucial resting period. But here's what I learned through my impatience: letting the bars rest for exactly 5 minutes after pulling them from the oven allows the proteins to relax and the structure to set. Cut too early and you get a molten mess. Wait too long and they become difficult to remove from the pan. Those 5 minutes are when the magic happens, transforming them from "really good" to "life-changing." Set a timer and find something to distract yourself — I usually clean up the kitchen because I know I'm about to make another batch.
The Salt Secret
Don't skip the salt — it's not making your dessert salty, it's making it taste like anything at all. Salt is a flavor enhancer that makes chocolate taste more chocolatey, butter taste more buttery, and sugar taste more complex. Without it, your bars will taste flat and one-dimensional, like they need something but you can't figure out what. Just a quarter teaspoon is enough to wake up all the other flavors and create that "I can't stop eating these" quality. Use fine salt, not coarse, because you want it to dissolve completely into the batter.
Storage That Actually Works
Most people ruin their beautiful bars by storing them wrong. These need to breathe — trapping them in a completely airtight container while warm creates condensation that makes the tops sticky and the crust soggy. Let them cool completely, then store in a container with a very slightly ajar lid for the first day. After that, seal them up tight. They'll keep for 5 days in the fridge, but bring them to room temperature before serving for maximum flavor and texture. That sizzle when it hits the pan? Absolute perfection — wait, wrong recipe, but you get the idea.
Creative Twists and Variations
This recipe is a playground. Here are some of my favorite ways to switch things up:
The Peanut Butter Situation
Replace half the butter in the cookie dough layer with creamy peanut butter for a Reese's peanut butter cup vibe that'll make you question why you ever ate anything else. Use honey-roasted peanut butter for extra complexity, or go natural for a more grown-up flavor. Top with chopped peanuts for crunch, and swap the chocolate chips for peanut butter chips. This version is so good, I once had to hide the pan from myself to stop eating them at midnight.
Campfire Dreams
Add ½ cup crushed graham crackers to the cookie dough, fold in mini marshmallows instead of chocolate chips, and top with a drizzle of chocolate ganache. Use a kitchen torch to toast the marshmallows on top for that authentic campfire flavor. It's like s'mores and cookie dough had a beautiful baby that doesn't require mosquito repellent or sleeping on the ground.
The Salty Sweet Obsession
Sprinkle flaky sea salt on top before baking, use dark chocolate chips with 70% cacao, and add ½ cup chopped toasted pecans to the cookie dough. The combination of bitter chocolate, salty crunch, and sweet dough creates this sophisticated flavor profile that tastes like something from a Parisian patisserie. Serve these to impress dinner guests who think they don't like "too sweet" desserts.
Birthday Cake Remix
Replace the chocolate chips with white chocolate chips and rainbow sprinkles for a funfetti effect that tastes like childhood happiness. Add ½ teaspoon almond extract to the cream cheese layer for that classic birthday cake flavor. Top with a light cream cheese glaze and more sprinkles for a dessert that's Instagram-famous and actually delicious.
The Grown-Up Version
Add 2 tablespoons of bourbon to the cream cheese layer, use dark brown sugar for deeper flavor, and substitute chopped dark chocolate for half the chocolate chips. Stir in ½ cup toasted chopped walnuts for texture and that sophisticated edge that makes these feel like they belong in a whiskey bar rather than a lunchbox. These are for when you want to feel fancy while eating cookie dough, which is basically always.
Double Chocolate Decadence
Add ¼ cup cocoa powder to the cookie dough, use white chocolate chips for contrast, and swirl in some chocolate hazelnut spread before baking. The triple chocolate situation creates this incredible depth that chocolate lovers will lose their minds over. It's like a chocolate chip cookie, brownie, and cheesecake all decided to move in together and create something even better than the sum of its parts.
Storing and Bringing It Back to Life
Fridge Storage
These bars need refrigeration because of the cream cheese layer, but cold air can dry them out faster than a politician's promise. Wrap individual squares in plastic wrap, then store in an airtight container with a piece of bread — the bread adds moisture and prevents your bars from becoming sad, dry shadows of their former selves. They'll keep for up to 5 days, though they rarely last that long in my house. The texture actually improves after the first day as the flavors meld together into something even more incredible.
Freezer Friendly
These freeze beautifully for up to 3 months, which is dangerous knowledge to have. Wrap individual squares in plastic wrap, then foil, then pop them into a freezer bag. When that late-night craving hits, you can microwave a frozen square for 20-25 seconds for that fresh-from-the-oven experience. Or be patient and let it thaw in the fridge overnight for the perfect texture. Pro tip: hide some in the back of the freezer so future you will thank present you during emergencies.
Best Reheating Method
Room temperature is where these shine, so plan ahead and take them out of the fridge 30 minutes before serving. If you must reheat (and sometimes you must), use a toaster oven at 275°F for 5-7 minutes, just until the chocolate starts to glisten again. The microwave works in a pinch — 10-12 seconds on 50% power — but watch them like a hawk because they go from perfect to molten in seconds. Add a tiny splash of water before reheating — it steams back to perfection, restoring that just-baked texture that makes people ask if you just made a fresh batch.