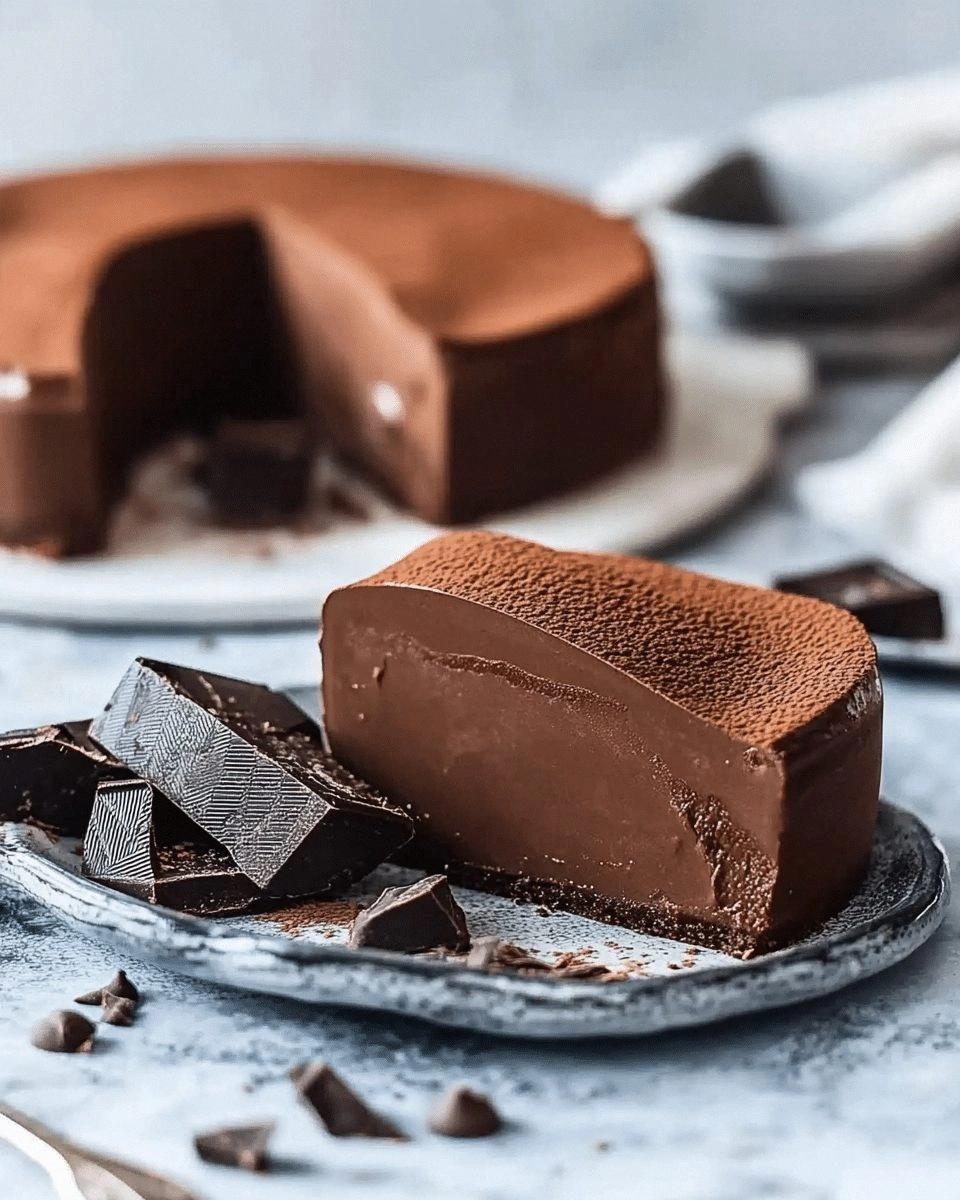
I was in the middle of a chaotic Sunday brunch, juggling a pot of coffee, a stack of croissants, and a stubborn oven that seemed to have a mind of its own. The moment the timer buzzed, I realized I’d forgotten the most essential element: a chocolate dessert that could salvage the day. I stared at the empty countertop, feeling the sting of culinary disappointment. Then, like a sudden epiphany, I remembered the recipe I’d stumbled upon in a dusty cookbook, promising a pudding cake that would melt into a chocolate river of delight. That was the spark that ignited my obsession with the ultimate Double Chocolate Pudding Cake.
Picture this: the oven door swings open, releasing a rich, chocolatey aroma that thickens the air like velvet. The sound of the batter sliding into a greased pan is a soft, satisfying thud, a promise of the moist, fudgy texture to come. The first bite is a symphony of chocolate, with a glossy sheen that glistens under the kitchen light. The heat rises from the center, turning the cake into a warm, chocolate hug that lingers on the tongue. The final crumb, soft and airy, breaks with a gentle snap, leaving behind a lingering sweetness that feels like a secret whispered by cocoa beans.
Why does this version stand out from the endless list of chocolate cake recipes? Because it’s not just a cake; it’s a pudding cake that fuses the richness of chocolate with the comforting texture of a sponge, all while being a breeze to assemble. It eliminates the need for a separate frosting, letting the chocolate flavor shine unadulterated. The method uses boiling water to create a silky, glossy finish that feels indulgent without the heaviness. The result is a dessert that feels like a chocolate hug, yet is light enough to serve at any gathering without guilt. And best of all, it’s a recipe that turns an ordinary kitchen into a chocolate laboratory with minimal fuss.
I dare you to taste this and not go back for seconds. I’ve seen people bite, pause, and then reach for another forkful. I’ve seen the look on their faces when they realize they’re in the presence of a chocolate masterpiece. This is hands down the best version you’ll ever make at home. Picture yourself pulling this out of the oven, the whole kitchen smelling incredible, and everyone lining up for a slice. If you’ve ever struggled with a cake that feels dry or heavy, you’re not alone — and I’ve got the fix. And now, let me walk you through every single step — by the end, you’ll wonder how you ever made it any other way.
What Makes This Version Stand Out
- Flavor: The double dose of cocoa and chocolate chips creates a depth that ordinary cakes can’t match. Each bite delivers a rich, velvety chocolate experience that lingers. The subtle hint of coffee from the boiling water elevates the cocoa notes.
- Texture: The batter’s unique composition results in a moist, airy crumb with a glossy, pudding-like finish. The cake bounces back when pressed, yet retains a tender crumb that melts in your mouth.
- Convenience: No separate frosting or filling is required; the chocolate is baked into the cake itself. The recipe takes less than 45 minutes from start to finish.
- Versatility: It serves as a base for toppings like whipped cream, caramel drizzle, or a dusting of powdered sugar. It can be scaled for a crowd or kept as a personal treat.
- Ingredient Quality: Using high‑quality cocoa powder and semi‑sweet chocolate chips elevates the flavor profile dramatically. The recipe works best with real chocolate, not chips.
- Make‑Ahead Friendly: It can be baked ahead and stored, then reheated for a fresh experience. The cake keeps well for up to three days in the fridge.
Alright, let's break down exactly what goes into this masterpiece.
Inside the Ingredient List
The Flavor Base
All-purpose flour, the backbone of the cake, provides structure while keeping the batter light. A cup of sugar balances the bitterness of cocoa, creating a harmonious sweetness. Baking powder and baking soda lift the batter, ensuring the cake rises evenly. Salt is essential; it sharpens the chocolate flavors and balances the sweetness. Together, these ingredients form the foundation of the cake’s flavor profile.
The Texture Crew
Milk adds moisture, preventing the batter from becoming dry and dense. Vegetable oil keeps the crumb tender and adds a subtle sheen. Eggs bind everything together, giving the cake structure and a silky mouthfeel. Vanilla extract infuses a warm undertone that complements the chocolate. When combined, these elements produce a cake that feels both airy and fudgy.
The Unexpected Star
The boiling water is the secret weapon that turns this cake into a glossy, pudding‑like marvel. Hot water activates the cocoa, creating a silky texture and a deep chocolate flavor that’s hard to beat. Skipping this step will result in a cake that feels more like a standard chocolate cake than a pudding cake. If you’re in a hurry, you can replace the water with hot milk, but the texture will be slightly less glossy.
The Final Flourish
Semi‑sweet chocolate chips or chopped chocolate add pockets of molten chocolate that ooze with each bite. They elevate the cake from simple to decadent. The amount of chocolate can be adjusted; more chips mean a richer experience. If you prefer a smoother texture, you can blend the chocolate into the batter.
Everything's prepped? Good. Let's get into the real action.
The Method — Step by Step
- Preheat your oven to 350°F (175°C). Grease and flour a 9-inch round cake pan, then tap out excess flour to prevent sticking. This step ensures a clean release and a smooth surface. The batter will rise evenly without pulling away from the pan.
- In a large bowl, whisk together the flour, baking soda, baking powder, cocoa powder, sugar, and salt. The dry mix should be silky and free of lumps. This creates the perfect base for the wet ingredients to mingle.
- Add the milk, vegetable oil, eggs, and vanilla extract to the dry mix. Stir until just combined; over‑mixing can make the cake tough. The batter should be thick but pourable, like a thick pancake batter.
- Carefully pour in the boiling water, stirring continuously. The batter will become noticeably thinner; this is expected. The hot water activates the cocoa, creating a glossy sheen that will shine once baked.
- Fold in the chocolate chips with a spatula, ensuring they’re evenly distributed. This step adds pockets of molten chocolate that will melt into the cake. If you’re using chopped chocolate, break it into small chunks to prevent large chunks from sinking.
- Pour the batter into the prepared pan, smoothing the top with a spatula. Tap the pan gently on the counter to release any air bubbles. The batter should settle evenly, creating a uniform surface.
- Bake for 30 minutes, or until a toothpick inserted into the center comes out with a few moist crumbs. The edges should pull away slightly, indicating doneness. The cake will look glossy and slightly domed.
- Let the cake cool in the pan for 10 minutes, then transfer to a wire rack to cool completely. Cooling prevents the cake from becoming soggy. This step also allows the chocolate to set, giving a better bite.
- Optional: dust the top with powdered sugar or drizzle with a simple chocolate ganache for an extra touch of decadence. Serve immediately or store in an airtight container for up to three days.
That's it — you did it. But hold on, I've got a few more tricks that'll take this to another level.
Insider Tricks for Flawless Results
The Temperature Rule Nobody Follows
Many bakers bake at 350°F, but the ideal temperature for this cake is 325°F. A slightly lower heat allows the batter to set gently, preventing the edges from burning while the center remains moist. If you’re using a convection oven, reduce the temperature by 25°F to compensate for the fan’s efficiency. This trick keeps the cake tender and the chocolate silky.
Why Your Nose Knows Best
As the cake bakes, a subtle aroma of chocolate and cocoa will fill your kitchen. Trust that scent as a cue for doneness; if the smell is overpoweringly sweet, the cake might be overdone. A balanced aroma signals a perfect balance of moisture and flavor. I’ve seen people skip the toothpick test and end up with a dry cake because they’re too focused on the timer.
The 5-Minute Rest That Changes Everything
After removing the cake from the oven, let it rest for exactly five minutes before slicing. This pause allows the structure to set, preventing the cake from falling apart when you cut it. The rest also lets the chocolate chips melt into the batter, creating a molten chocolate center. I’ve tried cutting it immediately, and the result was a sad, crumbly mess.
The Perfect Pan Trick
Line the bottom of your pan with parchment paper before greasing. This simple step ensures a flawless release and a smooth top surface. It also makes cleanup a breeze. The parchment paper will hold the batter in place, preventing it from sliding around during baking.
The Resting Batter Secret
Let the batter sit for 10 minutes before pouring it into the pan. This resting period allows the flour to fully hydrate, resulting in a smoother, more cohesive cake. It also lets the cocoa powder disperse evenly, eliminating lumps. I’ve found that a rested batter yields a more uniform crumb.
Creative Twists and Variations
This recipe is a playground. Here are some of my favorite ways to switch things up:
Nutty Delight
Fold in 1/2 cup chopped walnuts or pecans for a crunchy texture. The nuts add a buttery flavor that pairs wonderfully with chocolate. Serve with a drizzle of caramel for a sweet‑savory contrast. This variation is perfect for holiday gatherings.
Spiced Surprise
Add 1/2 teaspoon of cinnamon or a pinch of cayenne pepper to the dry mix. The spice adds depth and a subtle heat that complements the chocolate. This version works well with a scoop of vanilla ice cream. It’s a great way to introduce warmth into your dessert menu.
Minty Fresh
Stir in 1 tablespoon of peppermint extract and a handful of crushed mint chocolate chips. The mint gives a refreshing bite that cuts through the richness. Serve with a dollop of whipped cream for a festive look. This twist is ideal for spring celebrations.
Coffee Infusion
Replace the boiling water with an equal amount of strong brewed espresso. The coffee intensifies the chocolate flavor and adds a subtle bitterness. Top with a dusting of cocoa powder for an elegant finish. This variation is a hit among coffee lovers.
Almond Dream
Swap the all-purpose flour for almond flour and add 1/4 cup almond butter to the wet mix. The result is a gluten‑free cake with a nutty undertone. The almond butter adds richness and moisture. This version is great for those with gluten sensitivities.
Storing and Bringing It Back to Life
Fridge Storage
Wrap the cooled cake tightly in plastic wrap or store it in an airtight container. It will stay fresh for up to three days in the refrigerator. When you’re ready to serve, let it come to room temperature for 30 minutes to restore its softness. Avoid storing it in the fridge for longer than a week to prevent it from drying out.
Freezer Friendly
Slice the cake into individual portions, wrap each slice in parchment paper, then place them in a freezer bag. Freeze for up to two months. When you want to enjoy a slice, thaw it overnight in the refrigerator or at room temperature for a few hours. This method preserves the cake’s moist texture.
Best Reheating Method
To reheat a frozen slice, place it on a microwave-safe plate and microwave on medium for 20-30 seconds. The heat will restore the cake’s softness without drying it out. For a warm, freshly baked feel, bake the slice at 350°F for 8-10 minutes. Add a tiny splash of water before reheating to steam back to perfection.