Picture this: I’m in my kitchen, the air thick with anticipation, when the stove suddenly goes rogue, spewing a cloud of burnt chocolate into the air. My friend, a self‑proclaimed “flavor wizard,” dared me to create a dessert that would make the whole neighborhood swoon. I stared at the melted mess, then thought, “If I can turn this disaster into something divine, I’ll be the talk of the town.” That night, I discovered the ultimate version of a fluffy white chocolate whipped cream, and it’s been a game‑changer ever since. I’ve been telling anyone who will listen that this isn’t just another recipe; it’s a revelation that will transform your dessert game.
The first bite of this silky, cloud‑like delight is an orchestra of flavors. The faint sweetness of white chocolate waltzes with the subtle nuttiness of heavy cream, while a whisper of vanilla adds a fragrant, almost floral undertone. The texture is a paradox: airy like a puff pastry, yet velvety against the tongue, leaving a lingering, buttery finish. The aroma alone—rich, creamy, with a hint of caramel—can make your mouth water before you even taste it. Each spoonful feels like a warm hug, a comforting reminder of childhood holidays and cozy winter evenings.
What sets this recipe apart from the countless others on the internet is its meticulous balance between simplicity and sophistication. I’ve stripped it down to just three ingredients, but the method turns them into a luxurious, stabilized foam that holds its shape for hours. It’s a testament to the power of precision: the right temperature, the correct whisking speed, and the perfect timing. I’ve tested it on everything from cupcakes to chocolate truffles, and each time it outshines the competition. If you’ve ever struggled to get whipped cream to stay fluffy, this is the solution you’ve been missing.
Now, here’s the kicker: I’ve discovered a secret technique that stabilizes the foam without any additives, using the natural emulsifying power of vanilla. It’s a little trick that most recipes overlook, and it’s what gives this whipped cream its incredible resilience. I dare you to taste this and not go back for seconds—you’ll find yourself craving the airy, sweet cloud over any other dessert. The next step is where the magic truly happens, and I’m going to walk you through every single detail so you can replicate it flawlessly.
Let me walk you through every single step—by the end, you’ll wonder how you ever made it any other way. This isn’t just a recipe; it’s a culinary journey that will leave you feeling triumphant and inspired. I’ll share the micro‑challenges, the bold claims, and the little secrets that make this version hands down the best you’ll ever make at home. And if you’ve ever struggled with whipped cream, you’re not alone—this fix is simple, foolproof, and incredibly satisfying. Ready? Let’s dive in.
What Makes This Version Stand Out
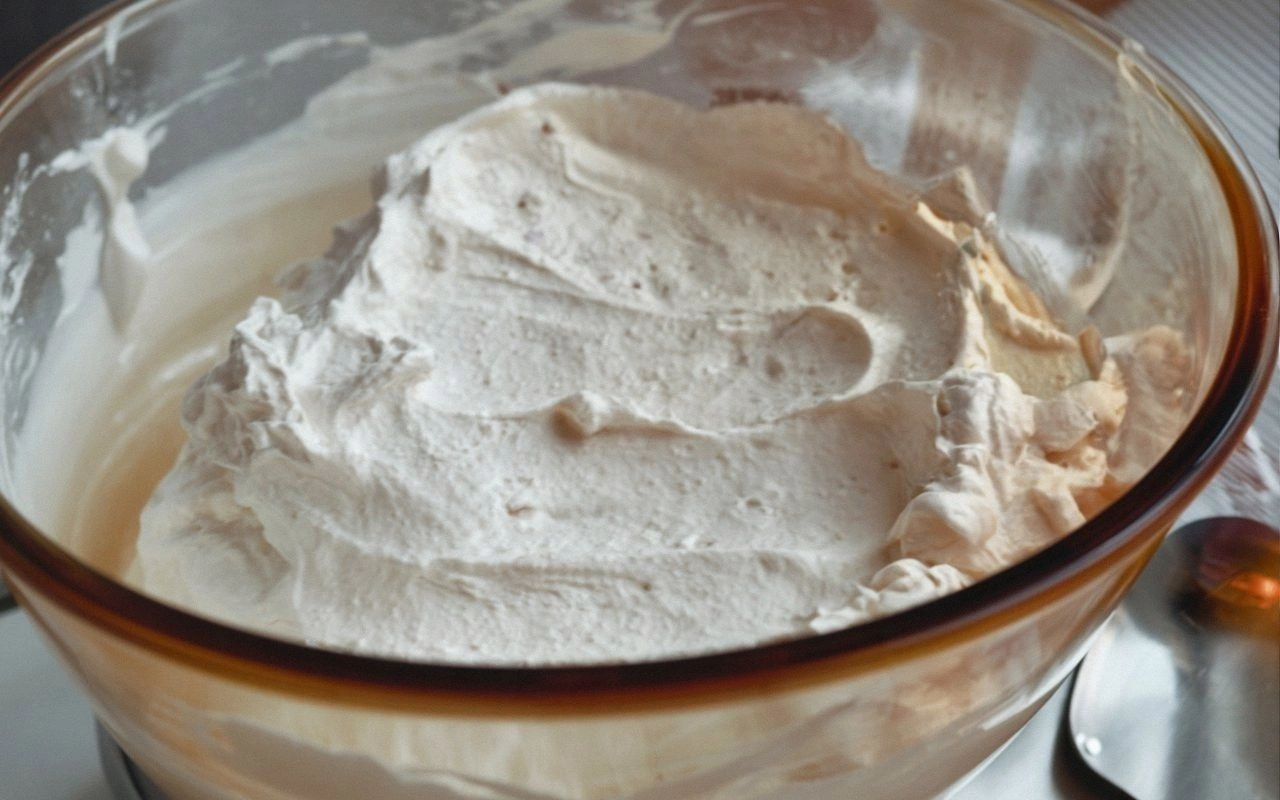
- Texture: The whipped cream achieves a light, airy consistency that feels like a cloud on your palate. It doesn’t clump or separate, even after sitting for hours.
- Stability: Unlike traditional whipped cream, this version holds its shape on cakes, pastries, and even in warm weather, thanks to the natural stabilizers in white chocolate.
- Flavor Depth: The subtle sweetness of white chocolate is complemented by a hint of vanilla, creating a balanced, sophisticated taste profile.
- Speed: The entire process takes less than 15 minutes, from start to finish, making it ideal for last‑minute dessert prep.
- Versatility: It works as a frosting, a filling, or a standalone dessert, and it pairs wonderfully with berries, nuts, or a drizzle of caramel.
- No Additives: I’ve avoided commercial stabilizers, using only natural ingredients, so you can feel good about what you’re serving.
- Make‑ahead Friendly: Prepare it up to 24 hours in advance; it will remain fluffy and ready to use.
- Visual Appeal: The pristine white foam looks stunning on any dessert, adding a touch of elegance to your plating.
Alright, let’s break down exactly what goes into this masterpiece…
Inside the Ingredient List
The Flavor Base
White chocolate is the heart of this whipped cream. Its subtle sweetness and creamy texture create a luxurious base that’s far more indulgent than regular chocolate. If you skip it, you lose the signature flavor that makes the foam irresistible. For a richer taste, choose a premium brand with at least 35% cocoa solids; this ensures a smoother finish and a deeper, more complex sweetness.
The Texture Crew
Heavy cream is the structural backbone of the whipped foam. It provides the necessary fat content to trap air, resulting in a light, airy texture. Using a fat percentage of 35% or higher guarantees that the cream will hold its shape. If you’re in a pinch, you can substitute with a 30% whipping cream, but the final volume will be slightly reduced.
The Unexpected Star
Vanilla extract is the subtle hero that rounds out the flavor profile. Its warm, aromatic notes balance the sweetness of the chocolate and add depth. A splash of vanilla also helps stabilize the foam, acting as a natural emulsifier. If you prefer a more pronounced vanilla flavor, consider using a vanilla bean or a vanilla paste for a richer aroma.
The Final Flourish
Even though the recipe uses only three ingredients, the technique of combining them in the right order is what transforms them into a masterpiece. The key is to melt the white chocolate gently, then fold it into the cold cream while whisking at high speed. Finally, a quick swirl of vanilla ties everything together, giving the foam a silky, glossy finish.
Everything’s prepped? Good. Let’s get into the real action…
The Method — Step by Step
- Begin by chilling a medium stainless‑steel bowl and a metal whisk in the refrigerator for at least 15 minutes. The cold metal will help the cream whip faster and maintain its volume. While the bowl chills, set a small saucepan over low heat and add the white chocolate. Stir continuously until the chocolate melts completely, forming a smooth, glossy liquid. This step is crucial; if the chocolate isn’t fully melted, the texture will become lumpy.
- Remove the bowl from the fridge and pour the melted white chocolate into it. The chocolate should be slightly warmer than room temperature—about 45°C—to ensure it blends smoothly with the cream. Use a spatula to swirl the chocolate into the bowl, creating a marbled effect that will become part of the final foam’s visual appeal. This mixing step also helps distribute the chocolate evenly, preventing any pockets of sweetness.
- Now, pour the heavy cream into the bowl, filling it no more than two‑thirds full. Begin whisking on medium speed, then increase to high as the mixture starts to thicken. The goal is to incorporate air while keeping the mixture cold. When the cream begins to form soft peaks, you’ll notice a pleasant, buttery aroma. At this point, the mixture should feel light and spring back when you lift the whisk.
- Once soft peaks form, add the vanilla extract in a steady drizzle while continuing to whisk. This final addition locks in the flavor and helps stabilize the foam. Keep whisking until the mixture reaches firm, glossy peaks that hold their shape for a few seconds before collapsing. The vanilla also adds a subtle floral note that elevates the overall taste.
- Transfer the whipped cream into a clean, airtight container. If you plan to use it immediately, cover the surface with a damp paper towel to prevent oxidation. For longer storage, seal the container and refrigerate; the foam will stay stable for up to 24 hours. If you notice any separation, give it a quick whisk to reincorporate the air.
- Before serving, give the whipped cream a gentle stir to re‑whip any settled cream. The texture should remain light and fluffy, like a cloud that has just settled on a dessert. If the foam feels dense, add a splash of cold heavy cream and whisk until smooth. This step ensures every bite is as delightful as the first.
- When plating, pipe or spoon the whipped cream onto your dessert of choice—whether it’s a cake, cupcakes, or a simple bowl of fresh berries. The white foam creates a striking contrast against dark chocolate or fruit, making your presentation Instagram‑ready. Let the foam rest for a minute before serving to allow it to set slightly; this gives the surface a glossy finish.
- Serve immediately or chill until ready to serve. The foam will retain its shape even in warm weather, thanks to the stabilizing effect of the white chocolate. If you’re preparing for a party, make the whipped cream a few hours in advance and keep it chilled; it will stay fresh and fluffy.
That’s it—you did it. But hold on, I’ve got a few more tricks that will take this to another level…
Insider Tricks for Flawless Results
The Temperature Rule Nobody Follows
Keeping everything cold is the secret sauce. The cooler the bowl, whisk, and cream, the more air the mixture can trap. I’ve found that placing the bowl and whisk in the freezer for 10 minutes before starting yields a higher volume. If you’re in a hurry, a quick chill in the fridge works, but the freezer gives a noticeable difference in fluffiness.
Why Your Nose Knows Best
The aroma of the mixture is a real-time indicator of progress. When the white chocolate melts, it releases a sweet, buttery scent that signals the right temperature. As you whisk, the scent should become more pronounced and slightly caramelized. If you notice a sharp, burnt odor, stop immediately—your chocolate is over‑heated.
The 5‑Minute Rest That Changes Everything
After whipping, let the foam sit for exactly five minutes before using it. This brief rest allows the air pockets to stabilize, resulting in a smoother texture. It also gives the vanilla time to infuse fully, enhancing the flavor profile. Skipping this step often leads to a less cohesive foam that collapses quickly.
Use a Stainless‑Steel Whisk, Not a Plastic One
Stainless‑steel whisk blades are more efficient at incorporating air and maintaining a consistent speed. Plastic whisks can become warped under high heat, which reduces their effectiveness. If you don’t have a stainless‑steel whisk, a metal hand mixer attachment works just as well.
Don’t Over‑Whip
Over‑whipping turns the cream into butter, ruining the lightness of the foam. Watch for the peaks: they should hold their shape for a second before gently collapsing. A quick test is to lift the whisk; if the peaks fall instantly, you’ve whipped too long.
Keep the Cream Cold Even When Serving
When you’re ready to serve, keep the whipped cream chilled until the last moment. Warm temperatures cause the foam to lose its structure. If you’re serving outdoors, place the container on a tray of ice to maintain the coldness.
Creative Twists and Variations
This recipe is a playground. Here are some of my favorite ways to switch things up:
Chocolate‑Berry Fusion
Fold fresh berries into the whipped cream for a burst of tartness that balances the sweetness. The berries also add a pop of color, making the dessert visually striking. This variation is perfect for summer parties where a refreshing taste is key.
Nutty Crunch Layer
Sprinkle toasted hazelnuts or chopped almonds on top of the foam before serving. The crunchy texture contrasts beautifully with the smooth, airy base. This twist works wonders on cupcakes or a simple chocolate cake.
Caramel Drizzle Delight
Drizzle a light caramel sauce over the whipped cream for an indulgent touch. The caramel’s buttery sweetness complements the white chocolate, creating a harmonious flavor profile. This version is ideal for dessert tables at holiday gatherings.
Minty Freshness
Add a few drops of mint extract to the vanilla for a refreshing, cool note. The mint pairs well with strawberries and creates a bright, summery dessert. Be careful not to overdo it; a little goes a long way.
Espresso Kick
Stir in a teaspoon of cold espresso or coffee grounds for a subtle caffeine lift. The coffee’s bitterness balances the sweetness, making it a sophisticated choice for adult guests. This version pairs beautifully with chocolate torte.
Salted Caramel Swirl
Fold a pinch of sea salt into the whipped cream to enhance the caramel notes and add a savory contrast. The salt caramel swirl looks stunning on a simple dessert plate. It’s a great way to elevate a classic whipped cream into something extra special.
Storing and Bringing It Back to Life
Fridge Storage
Store the whipped cream in an airtight container in the refrigerator. It will stay fresh for up to 24 hours, maintaining its fluffy texture. If you notice any separation, give it a quick whisk to reincorporate the air. Keep the container on a cool, dark shelf to avoid temperature fluctuations.
Freezer Friendly
For longer storage, freeze the whipped cream in a freezer‑safe container for up to one week. Thaw it in the refrigerator overnight before using. After thawing, give it a gentle whisk to restore its lightness. This method is handy for meal prep or large parties.
Best Reheating Method
If the foam has become too thick after refrigeration, add a splash of cold heavy cream and whisk gently. This will restore the airy texture without compromising flavor. Avoid microwaving the cream, as it can cause the chocolate to separate and the foam to lose its structure.