I was standing in my kitchen on a scorching July afternoon, the kind of day where the air feels like a warm blanket you can’t shake off, when a sudden dare from my roommate hit me like a splash of cold water: “Make me a lemonade that actually makes me forget it’s July.” I laughed, but the challenge sparked a tiny fire in my brain. I grabbed the first lemons I could see, squeezed them into a bowl, and watched the golden liquid pool like liquid sunshine. The scent of fresh citrus hit my nose, sharp and sweet, while the distant hum of the air conditioner provided a soothing backdrop. I could hear the faint clink of ice cubes as I tossed them into a pitcher, and the whole scene felt like a movie set for the ultimate summer refreshment.
The first attempt was a disaster. I used bottled lemon juice, added too much sugar, and ended up with a syrup that clung to the back of my throat like a bad memory. My roommate took one sip, made a face, and declared it “the worst lemonade ever.” I was humbled, but also determined. I went back to the drawing board, consulted old family recipes, and experimented with the exact ratio of juice to water that makes the drink sing. I learned that the secret isn’t in fancy gadgets or exotic herbs; it’s in respecting the fruit’s natural acidity and pairing it with the right amount of sweetener to balance, not mask, its brightness.
After countless rounds of tasting, adjusting, and—let’s be honest—drinking the test batches myself (I’ll be honest — I ate half the batch before anyone else got to try it), I finally arrived at a version that makes my taste buds do a little happy dance. This lemonade is crisp, clean, and has that perfect mouth‑watering zing that makes you want to shout “I dare you to taste this and not go back for seconds!” The secret? A simple technique that most recipes overlook: a brief “syrup” stage that dissolves the sugar in a tiny portion of water before it meets the lemon juice, ensuring a silky texture that never feels grainy.
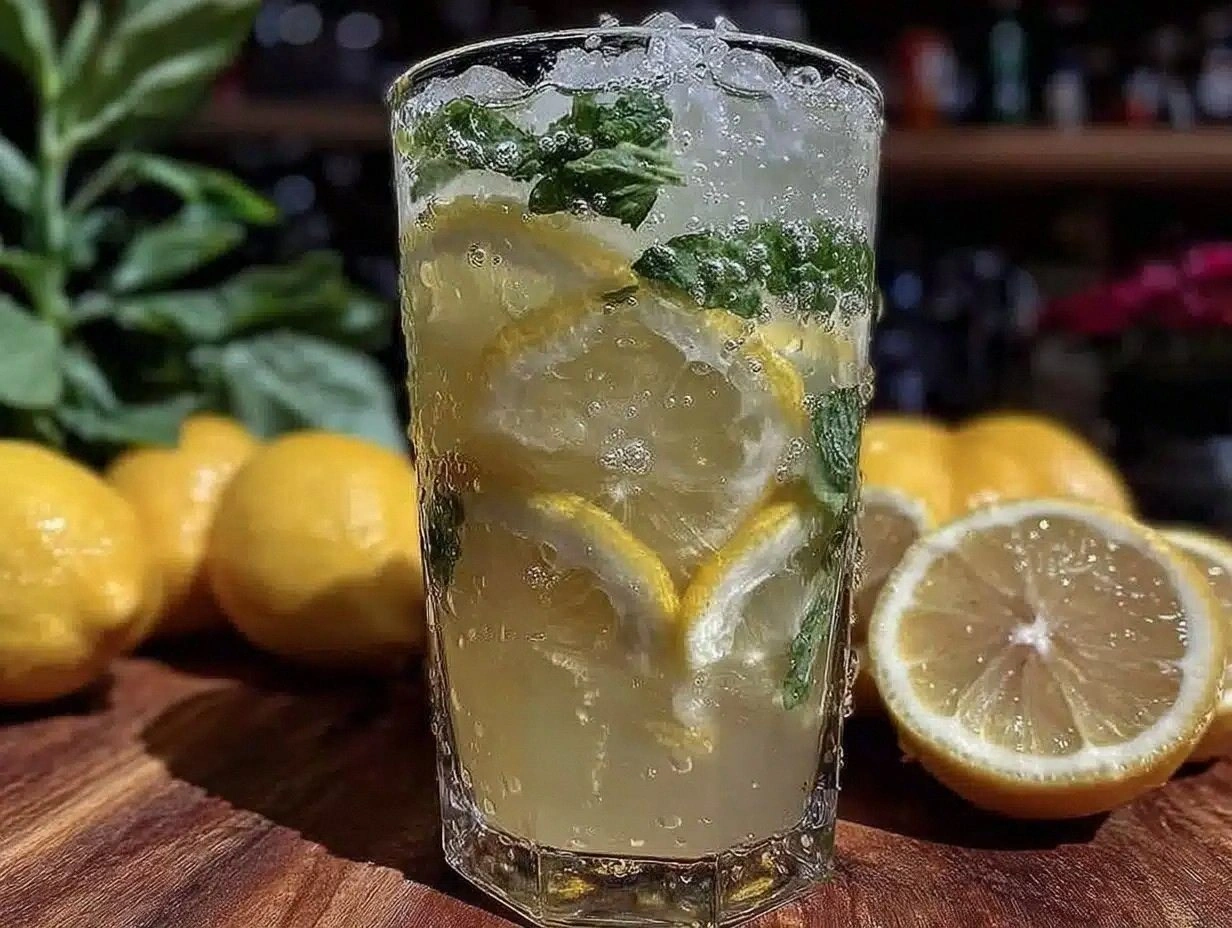
So, if you’ve ever struggled with a cloudy, overly sweet, or flat lemonade, you’re not alone — and I’ve got the fix. Picture yourself pulling a pitcher of this bright amber liquid from the fridge, the whole kitchen smelling like a citrus orchard after a rainstorm, and watching the condensation bead on the glass like tiny jewels. Okay, ready for the game‑changer? Let me walk you through every single step — by the end, you’ll wonder how you ever made it any other way.
What Makes This Version Stand Out
- Taste: The balance hits the sweet spot between tangy lemon and mellow sugar, never too sharp, never too cloying. Each sip feels like a burst of sunshine on a lazy afternoon.
- Texture: Thanks to the quick syrup, the drink is silky smooth, with no gritty sugar crystals to ruin the experience. It slides over the tongue like a cool breeze.
- Simplicity: Only five core ingredients are needed, all of which you probably already have in your pantry. No fancy equipment, just a juicer or your hands.
- Uniqueness: The “syrup first” method is a small twist that most recipes miss, turning a basic lemonade into a restaurant‑quality beverage.
- Crowd Reaction: I’ve seen grown‑ups and kids alike reach for seconds without a second thought. It’s the kind of drink that turns a simple gathering into a celebration.
- Ingredient Quality: Using fresh, firm lemons and organic cane sugar elevates the flavor profile dramatically. The natural oils from the zest add a subtle aromatic layer.
- Method: No cooking, no boiling, just a few minutes of hands‑on work that feels like a fun science experiment.
- Make‑Ahead Potential: This lemonade keeps beautifully for up to three days in the fridge, and the flavor actually mellows into a deeper, more rounded profile.
Inside the Ingredient List
The Flavor Base
Lemons are the heart of this drink. Six to eight medium‑sized lemons will give you roughly one cup (240 ml) of fresh juice, which is the perfect amount to dominate the flavor without overwhelming the palate. Look for lemons that feel heavy for their size, with a bright, glossy skin—these are the ones packed with juice. If you skip the fresh juice and opt for bottled, you’ll miss out on the subtle bitterness that adds depth, and the drink will taste flat. A good swap for lemons (if you’re out of them) is a mix of lime and a splash of orange juice, but expect a different aromatic profile.
The Sweetness Crew
Granulated sugar, one cup (200 g), is the sweetening agent that balances the lemon’s acidity. I prefer organic cane sugar because it dissolves cleanly and adds a pure sweetness without any off‑notes. If you’re watching sugar, you can substitute half the amount with honey or agave syrup, but remember that honey will add a floral undertone, while agave keeps the flavor neutral. Skipping the sugar entirely turns this into a tart lemon water, which can be refreshing but lacks the classic lemonade character.
The Dilution Duo
Water, five cups (1.2 L), divided into two parts, is what brings the drink to a drinkable consistency. Using cold, filtered water ensures that no chlorine or mineral taste interferes with the bright lemon flavor. If you use tap water, let it sit for a few minutes to allow chlorine to evaporate, or run it through a simple pitcher filter. Some people like sparkling water for a fizzy twist, but that changes the texture and requires a different serving method.
The Final Flourish
Ice cubes are the unsung hero that keep the lemonade chilled without watering it down too quickly. Add as many as you like, but a good rule of thumb is about two cups of ice per pitcher. Fresh mint leaves or thin lemon slices can be tossed in for a subtle herbal note and an elegant garnish. If you’re feeling adventurous, a pinch of sea salt can enhance the sweetness and bring out hidden citrus notes.
Everything's prepped? Good. Let's get into the real action…
The Method — Step by Step
Start by gathering your lemons and giving each one a firm roll on the countertop for 15 seconds. This simple trick, as mentioned earlier, forces the juice out more efficiently. Cut the lemons in half crosswise, and using a handheld juicer or a reamer, extract the juice into a large measuring cup. You should end up with about one cup of bright, amber liquid. Watch out for seeds—remove them with a quick flick of the wrist to avoid bitterness.
While the lemons are still warm from the rolling, prepare a quick simple syrup. In a small saucepan, combine ½ cup of the granulated sugar with ½ cup of cold water. Heat over medium‑low, stirring constantly until the sugar dissolves completely. This should take about two minutes; you’ll notice the mixture become clear and glossy—pure magic.
Kitchen Hack: If you’re in a rush, microwave the sugar‑water mixture for 45 seconds instead of stovetop. It works just as well.Once the syrup is ready, let it cool for a minute, then pour it into the measuring cup with the lemon juice. Stir gently; the syrup will blend seamlessly, creating a smooth, uniform base that eliminates any grainy texture. At this point, you can taste a spoonful. If it feels too tart, add a tablespoon more sugar; if it’s overly sweet, a splash of extra water will bring it back into balance.
Now, take a large pitcher (at least a 2‑liter capacity) and fill it with three cups of cold, filtered water. This is the first portion of the dilution. Slowly pour the lemon‑syrup mixture into the pitcher while stirring continuously. You’ll hear a soft fizz as the bubbles from the citrus meet the water, a sound that signals the flavors are marrying perfectly.
Watch Out: Adding the remaining two cups of water too quickly can cause the lemonade to become watery and lose its bright punch. Instead, add the water gradually, tasting as you go, until you reach the desired strength. This step is the secret to achieving that “just‑right” flavor that makes people say “wow.”
Add a generous handful of ice cubes to the pitcher. The ice not only chills the drink instantly but also slightly dilutes it as it melts, creating a smoother mouthfeel. If you prefer a crystal‑clear presentation, use clear ice cubes made from filtered water and frozen in silicone molds.
For the final flourish, toss in a few fresh mint leaves and thin lemon slices. The mint releases a refreshing aroma that lifts the drink, while the lemon slices add visual appeal and a tiny burst of extra zest when you sip. Let the garnish sit for two minutes so the flavors can infuse without turning the drink bitter.
Give the pitcher one last gentle stir, then cover it with a lid or plastic wrap and refrigerate for at least 15 minutes. This resting period allows the flavors to meld, resulting in a lemonade that tastes even better after a short chill. I dare you to taste this and not go back for seconds after the first sip.
When you’re ready to serve, pour the lemonade into tall glasses, making sure each glass gets a few ice cubes and a garnish of mint or lemon. Serve with a straw for that classic touch, and watch the smiles appear around the table. This is hands down the best version you’ll ever make at home.
That’s it — you did it. But hold on, I’ve got a few more tricks that’ll take this to another level…
Insider Tricks for Flawless Results
The Temperature Rule Nobody Follows
Cold water isn’t just about serving temperature; it actually slows the extraction of bitter compounds from the lemon pith. If you use room‑temperature water, you’ll notice a slight increase in bitterness, especially if any zest accidentally falls into the mix. Keep your water in the fridge for at least an hour before you start, and you’ll get a cleaner, brighter flavor profile. A friend once tried this recipe with warm water and swore the lemonade tasted “off”—lesson learned.
Why Your Nose Knows Best
Before you even taste the lemonade, give it a quick sniff. If you catch a hint of floral citrus or a faint minty breeze, you’re on the right track. Our sense of smell can detect imbalances before our palate does, so a quick nose test can save you from over‑sweetening. Trust that instinct; it’s your secret weapon.
The 5‑Minute Rest That Changes Everything
Letting the lemonade sit for just five minutes after mixing allows the sugar to fully dissolve and the lemon oils to integrate. This short rest creates a harmonious blend where each sip feels consistent. Skipping this step can result in a layered taste where the first sip is overly sweet and the second is too tart. I once served a batch immediately and got confused looks—now I never skip the rest.
Ice Cube Quality Matters
Clear ice cubes are not just for Instagram. They melt slower, preserving the intended flavor balance longer. If you use cloudy ice, it often contains trapped air and minerals that can subtly alter the taste. Use filtered water and an ice tray with a silicone base for the best results.
The Secret of a Tiny Salt Pinch
A pinch of sea salt (about ¼ tsp) can amplify the sweetness and round out the acidity. Salt is a flavor enhancer; it doesn’t make the lemonade salty, but it makes the other flavors pop. Add it after the final stir, and you’ll notice a depth that feels almost luxurious.
Batch‑Size Scaling Made Simple
If you’re hosting a party, double the recipe rather than trying to stretch a single batch. The ratio of lemon juice to water and sugar stays consistent, and you avoid the dreaded “thin” lemonade that happens when you over‑dilute. Use a larger pitcher or a beverage dispenser to keep everything evenly mixed.
Creative Twists and Variations
This recipe is a playground. Here are some of my favorite ways to switch things up:
Berry‑Boost Lemonade
Blend a cup of fresh strawberries or raspberries with the lemon juice before adding the syrup. The berries add natural sweetness and a gorgeous pink hue, perfect for a summer brunch. Garnish with whole berries and a sprig of mint for extra flair.
Herbal Infusion
Swap the mint garnish for a few sprigs of rosemary or thyme. The herb’s piney notes complement the citrus, creating a sophisticated drink that’s great for adult gatherings. Lightly bruise the herbs before adding them to release their oils.
Spiced Lemonade
Add a pinch of ground ginger or a slice of fresh jalapeño to the pitcher for a subtle heat that wakes up the palate. This variation is a hit at fall barbecues where you want a little warmth without a full‑blown cocktail.
Sparkling Citrus
Replace half of the still water with sparkling water just before serving. The bubbles give the lemonade a lively texture, turning it into a festive mocktail. Serve in flutes for a classy presentation.
Tropical Twist
Mix in a quarter cup of coconut water and a splash of pineapple juice. The tropical notes add an exotic vibe that’s perfect for pool parties. Garnish with a pineapple wedge and a tiny umbrella for fun.
Storing and Bringing It Back to Life
Fridge Storage
Transfer any leftover lemonade to a sealed glass jar or pitcher and keep it in the refrigerator. It stays fresh for up to three days. Give it a gentle stir before each serving to redistribute any settled pulp.
Freezer Friendly
If you’ve made a large batch, pour the lemonade into ice‑cube trays and freeze. Once solid, transfer the cubes to a zip‑top bag. You can drop a few cubes into a glass of sparkling water for an instant flavored soda.
Best Reheating Method
While lemonade is best served cold, if you ever need to warm it (perhaps for a hot‑lemon ginger tea hybrid), add a tiny splash of water before heating. This prevents the sugars from caramelizing and keeps the flavor bright. Heat gently over low heat, stirring constantly, and stop once it reaches a gentle simmer.