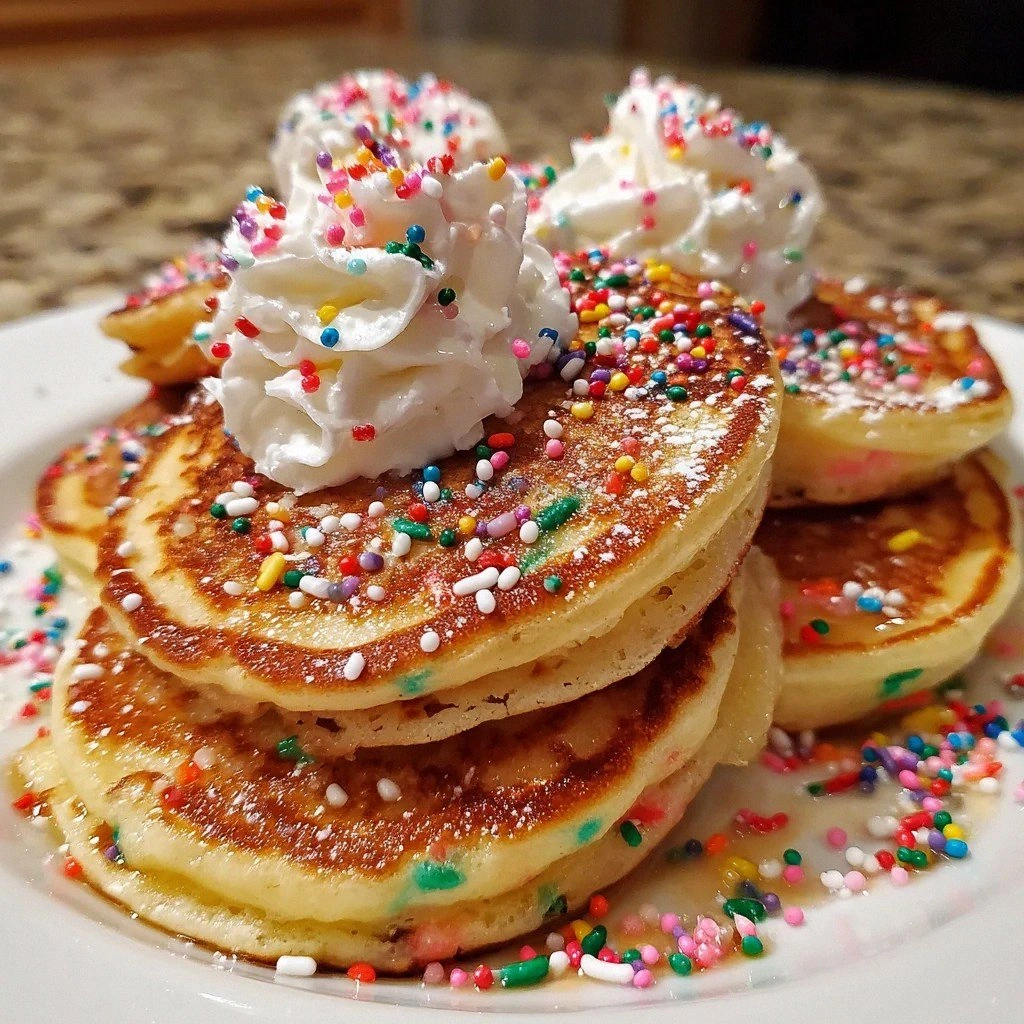
Picture this: It's 7:30 AM on a dreary Tuesday, my coffee maker is gurgling like it has something important to say, and I'm standing in my kitchen wearing mismatched socks, staring at a box of sad, plain pancake mix that tastes like cardboard had a baby with disappointment. My daughter shuffles in, takes one look at my face, and says, "Mom, you look like you need a party in your mouth." That tiny human was absolutely right. In that moment of breakfast desperation, I dumped half a container of rainbow sprinkles into that boring batter, whispered a prayer to the culinary gods, and created something that made us both do a little dance right there on the cold tile floor.
What emerged from that griddle wasn't just pancakes — they were edible confetti, little breakfast miracles that tasted like childhood birthday parties and Saturday morning cartoons rolled into a fluffy, golden package. The first bite was pure revelation: the tender crumb giving way to sweet bursts of vanilla, those colorful flecks melting into tiny pools of joy that made even my coffee taste better. My daughter's eyes went wide, and she declared these "magic happy cakes" before proceeding to inhale four of them faster than I've ever seen her eat anything, including ice cream.
Here's the thing about most funfetti pancake recipes floating around the internet — they're either dry as the Sahara, taste like straight sugar bombs, or they're so finicky you need a culinary degree and the patience of a saint to pull them off. I've tested them all, and let me save you the heartbreak. This version right here? It's the one that made my neighbor knock on my door at 9 AM asking what smelled so incredible, the one that converted my sprinkle-hating husband into a believer, the one that started a family tradition of Tuesday pancake parties that nobody dares skip.
The secret isn't just dumping candy into pancake batter and hoping for the best (trust me, I tried that road to disappointment). It's about understanding how each ingredient plays together, how the acid from vinegar dances with baking soda to create the fluffiest texture you've ever experienced, how the oil keeps everything tender even when you're juggling coffee, kids, and that persistent morning brain fog. Stay with me here — this is worth it. Let me walk you through every single step — by the end, you'll wonder how you ever made it any other way.
What Makes This Version Stand Out
Cloud-Like Texture: These aren't your dense, hockey-puck pancakes that sit in your stomach like a rock. The combination of vinegar and baking soda creates an explosive rise that results in pancakes so fluffy they practically float off the plate. When you cut into them with your fork, they compress like memory foam and spring back, releasing tiny vanilla-scented clouds into the air.
Sprinkle Distribution Perfection: Most recipes either have all the sprinkles clumped at the bottom or they dissolve into sad, streaky messes. This batter is engineered to suspend those colorful bits evenly throughout, so every single bite delivers that confetti explosion without any weird chemical aftertaste from cheap sprinkles bleeding their colors.
One-Bowl Wonder: Despite tasting like you spent hours in the kitchen, these come together faster than you can say "where's my coffee?" No separating eggs, no whipping whites, no fancy equipment required. Just one bowl, a whisk, and that griddle you bought three years ago that deserves some love.
Birthday Cake Flavor Without the Mix: Through careful balance of vanilla and sugar, these capture that nostalgic boxed cake taste but in a sophisticated, homemade way. It's like someone took your favorite birthday cake and transformed it into breakfast form, minus that artificial chemical tang that haunts your childhood memories.
Kid-Approved, Adult-Obsessed: I've served these at brunches where grown men in suits forgot their dignity and fought over the last pancake. Kids love the colors, adults appreciate the technique, and everyone leaves wondering why all breakfasts can't be this joyful. My daughter's teacher asked for the recipe after a class party, and now half the school sends me thank you notes.
Make-Ahead Magic: The batter holds beautifully in the fridge for up to three days, getting even better as the flavors meld. Weekend prep means weekday joy, and reheated leftovers taste like you just made them fresh. Most pancakes turn into sad, rubbery discs after an hour — these stay magnificent for days.
Inside the Ingredient List
The Flavor Foundation
All-purpose flour forms the backbone of our pancake dreams, but here's what most recipes miss — you need to measure it correctly. Scooping directly from the bag compacts it into a dense, floury brick that sucks up all the moisture and leaves you with tough, chewy pancakes. Instead, fluff it up with your whisk first, then spoon it into your measuring cup and level it off like you're performing surgery. This simple step transforms your texture from hockey puck to cloud nine, creating that tender crumb that practically melts on your tongue.
Granulated sugar isn't just here for sweetness — it's a texture magician that interferes with gluten development, keeping things tender even if you accidentally overmix a bit. The amount is precisely calibrated to enhance the vanilla without turning breakfast into dessert, striking that perfect balance where you can drown these in syrup without feeling like you're eating pure sugar. If you're tempted to reduce it, don't — the chemistry depends on this exact ratio, and trust me, I've tested the sad, bland results.
The Rise and Shine Crew
Baking powder and baking soda are the dynamic duo that create our lift, but they need to play together correctly. The baking powder provides most of the rise through its double-acting magic — first when it hits liquid, again when it hits heat. The baking soda needs that vinegar partner to activate, creating carbon dioxide bubbles that make these pancakes so fluffy they defy gravity. Get this ratio wrong and you're either eating dense discs or tasting bitter chemical residue — neither makes for a good morning.
Vinegar might seem like an odd breakfast ingredient, but it's the secret handshake that makes these pancakes legendary. The acid reacts with baking soda to create lift, but it also tenderizes the gluten in the flour, giving you that soft, pillowy texture. White vinegar keeps things neutral, but apple cider vinegar adds a subtle fruity note that plays beautifully with the vanilla. Don't worry — you won't taste it in the final product, but you'll definitely notice the difference in texture.
The Moisture Masters
Vegetable oil keeps these pancakes impossibly moist and tender, coating the flour proteins to prevent tough gluten formation. Unlike butter, it stays liquid at room temperature, so your leftovers don't turn into cardboard in the fridge. The neutral flavor lets the vanilla and sprinkles shine without competition, creating the perfect canvas for our confetti celebration. If you insist on butter, melt it first and let it cool slightly — but know you're trading some tenderness for that rich, buttery flavor.
Milk provides the liquid that brings everything together, but the fat content matters more than you'd think. Whole milk creates the richest, most luxurious texture, but 2% works in a pinch. The proteins in milk also contribute to browning, giving you those gorgeous golden edges that make everyone reach for their phone before they reach for syrup. Dairy-free? Almond milk works beautifully, adding a subtle nuttiness that complements the vanilla like they were born to be together.
The Star Attractions
Vanilla extract is where most recipes cheap out, but this is not the place for that imitation stuff that's been sitting in your cabinet since the Clinton administration. Real vanilla extract — the good stuff that costs more than a latte — transforms these from good pancakes into "why can't I stop eating these" pancakes. The aromatic compounds bloom in the heat, creating that bakery smell that drifts through your house and makes neighbors jealous. If you've only been using a teaspoon, prepare to have your mind blown by what happens when we double it.
Colorful sprinkles are obviously the headliners here, but not all confetti is created equal. Those cheap supermarket brands? They'll bleed into tie-dye nightmares and taste like wax. Spring for the good stuff — the artisanal rainbow jimmies that hold their color and actually taste like something. The way they melt slightly into the pancake creates little pockets of sweetness that burst like tiny candy surprises with every bite. And here's the kicker — the colors don't just make them pretty, they actually make them taste better through some weird psychological magic where your brain expects sweetness and delivers it.
The Method — Step by Step
- Start by creating your buttermilk magic — pour the milk into a large measuring cup and whisk in the vinegar. Let this sit for exactly five minutes while you gather everything else. You'll know it's ready when it looks slightly curdled and thickened, like it's transforming into something special right before your eyes. This isn't just science — it's alchemy that creates the tangy flavor and tender texture that separates legendary pancakes from mediocre ones. The proteins are rearranging themselves into something magnificent, so don't rush this step.
- In a bowl large enough to hold your hopes and dreams, whisk together the flour, sugar, baking powder, baking soda, and salt. Don't just casually stir — really aerate this mixture, lifting the whisk high to incorporate air. This dry blend is your foundation, and getting it right means the difference between flat disappointment and towering success. The way the baking powder mingles with the flour now determines how high these babies will rise later, so channel your inner whisk-wielding wizard. Think of this as creating tiny pockets where magic will happen.
- Make a well in the center of your dry ingredients — you're creating a little volcano crater where the wet ingredients will pool and eventually erupt into pancake perfection. This well prevents the flour from clumping when you add liquids, ensuring a smooth batter without those dreaded flour pockets that taste like paste. The well should be wide enough to hold all your wet ingredients but not so deep that you hit the bottom of the bowl. It's like creating a safe space where everything can come together without drama.
- Whisk the egg into your now-curdled milk mixture until it's completely incorporated and slightly frothy. This is where you add the vanilla and oil, creating a liquid symphony that smells like heaven decided to take a bath in your kitchen. The color should be a pale yellow, like morning sunshine captured in liquid form. Take a moment to appreciate this mixture — it's the foundation of everything wonderful that's about to happen. If you're tempted to taste it, go ahead — it should remind you of melted ice cream.
- Pour the wet ingredients into the well you created, and here's the crucial part: mix just until combined. I mean it — stop when you still see streaks of flour and lumps the size of peas. Overmixing develops gluten and creates tough, chewy pancakes that taste like you're eating a rubber band. The batter should look like thick, lumpy cake batter, not smooth like crepe batter. Those lumps will disappear as the flour hydrates, so resist your urge to keep whisking.
- Now comes the moment of truth — gently fold in your sprinkles using a spatula, not the whisk. The whisk will break them and create color bleeding that turns your batter into a muddy mess. Fold from the bottom up, turning the bowl as you go, like you're tucking those colorful bits into bed. They should be evenly distributed but not crushed — think of it as introducing them to the batter, not beating them into submission. Stop as soon as they're incorporated; any more mixing and you'll have tie-dye tragedy.
- Heat your griddle or large skillet over medium heat — this is where most people mess up. Too hot and the outside burns before the inside cooks, too cool and you get pale, tough pancakes that absorb syrup like a sponge. I test by flicking a drop of water onto the surface — it should dance and sizzle but not evaporate instantly. Lightly grease with just a whisper of oil on a paper towel; you want the pancakes to release easily but not fry in oil. The surface is ready when a tiny test pancake sizzles gently around the edges.
- Pour 1/4 cup batter for each pancake, resisting the urge to make them bigger — they puff up dramatically and need space to spread. Watch for bubbles to form on the surface, starting around the edges and moving inward. When the bubbles pop and leave tiny holes that don't fill in, and the edges look set and slightly dry, it's flip time. This usually takes 2-3 minutes, but trust your eyes more than the clock. Slide your spatula under with confidence and flip in one smooth motion — hesitation leads to broken, sad pancakes.
- Cook the second side for 1-2 minutes until golden brown and the center springs back when lightly pressed. The second side cooks faster, so don't walk away to refill your coffee. You're looking for that perfect golden color that makes everyone reach for their cameras before their forks. Remove to a warm plate and resist eating them directly off the griddle — they need a minute to set up properly. Repeat with remaining batter, adjusting heat as needed since the pan gets hotter as you go.
- Serve immediately while they're at their puffiest and most magnificent. Watch faces light up when you bring these to the table — it's like presenting edible happiness on a plate. The contrast between the golden exterior and the colorful confetti interior never fails to delight, and that first bite is pure magic. Don't be surprised if people start proposing marriage or asking to adopt you. These pancakes have powers beyond mere breakfast food.
That's it — you did it. But hold on, I've got a few more tricks that'll take this to another level...
Insider Tricks for Flawless Results
The Temperature Rule Nobody Follows
Room temperature ingredients aren't just chef snobbery — they're the difference between smooth batter and lumpy disasters. Cold milk makes the oil seize up into tiny beads that never incorporate properly, creating greasy pockets that ruin the texture. Take everything out of the fridge 30 minutes before you start, or be lazy like me and microwave the milk for 15 seconds until it feels lukewarm to your finger. Your batter will come together like silk instead of looking like cottage cheese had a bad day.
Why Your Nose Knows Best
The smell test is more reliable than any timer for knowing when to flip. When you start smelling vanilla and toasted flour, those pancakes are ready to turn. It's like your nose has a direct line to pancake perfection — trust it over any recipe timing. If you catch a whiff of something toasty and sweet, get ready with that spatula because you're 30 seconds away from golden perfection. A friend tried skipping this step once — let's just say it didn't end well for her smoke detector.
The 5-Minute Rest That Changes Everything
After mixing, let your batter rest for exactly five minutes while the griddle heats. This isn't downtime — it's when the flour fully hydrates and the gluten relaxes, creating more tender pancakes. The baking soda and vinegar are still doing their bubble dance, making the batter lighter and fluffier. Don't skip this step or you'll end up with dense discs that taste like you're chewing on a kitchen sponge. Set a timer and use these five minutes to heat your syrup or make coffee — multitasking at its finest.
The Flip Test That Prevents Disasters
Before committing to the full batch, make one test pancake. If it spreads too thin, your batter needs more flour — add one tablespoon at a time. If it doesn't spread at all, thin with milk one teaspoon at a time. This one pancake tells you everything about your batter consistency, heat level, and timing. Think of it as a breakfast reconnaissance mission that saves you from serving sad, misshapen pancakes to people you love. I've saved countless brunches with this technique, and my reputation as a pancake whisperer remains intact.
The Storage Secret for Leftover Magic
Leftover pancakes? Lucky you. Cool them completely on a wire rack, then layer between sheets of parchment paper in an airtight container. They'll stay fresh for three days in the fridge or two months in the freezer, retaining their fluffy texture like tiny breakfast miracles. Reheat in a toaster for 2-3 minutes until warm and slightly crisp on the edges — they'll taste freshly made, not like sad leftovers. The parchment prevents them from freezing into one solid pancake brick, which is definitely not the kind of breakfast surprise anyone wants.
Creative Twists and Variations
This recipe is a playground. Here are some of my favorite ways to switch things up:
Carnival Confetti
Swap regular sprinkles for neon carnival colors and add 1/2 teaspoon of butter extract along with the vanilla. The result tastes exactly like county fair funnel cake, minus the sticky fingers and overpriced tickets. Kids lose their minds over these, and adults get transported back to summers spent eating cotton candy until they felt sick. Top with whipped cream and extra sprinkles for a breakfast that doubles as dessert and therapy.
Chocolate Birthday Bash
Replace 1/4 cup of flour with cocoa powder and use chocolate sprinkles instead of rainbow ones. The chocolate flavor is subtle, like someone whispered "cake" into your pancake's ear. Add mini chocolate chips if you're feeling dangerous, creating little molten pockets of chocolate that ooze when you cut into them. Serve with chocolate syrup and watch people achieve a state of breakfast nirvana previously thought impossible.
Salted Caramel Celebration
Drizzle caramel sauce over the cooked pancakes and finish with a sprinkle of flaky sea salt. The salt amplifies the sweetness while the caramel adds depth that makes these taste like they came from a trendy brunch spot with a three-hour wait. The way the salt crystals crunch between your teeth while the caramel pools in the syrup grooves is textural poetry. People will ask if you hired a private chef, and you can modestly shrug while knowing you spent ten minutes in pajamas.
Lemon Zest Party
Add the zest of one lemon to the batter and use yellow and white sprinkles for a sunshine-bright breakfast that tastes like spring regardless of the weather outside. The lemon adds a sophisticated note that makes these appropriate for adult gatherings while still fun enough for kids. Serve with lemon curd instead of syrup for a breakfast that feels like you're eating sunshine on a cloud. The acidity cuts through the sweetness, creating perfect balance that keeps you coming back for more.
Coconut Beach Bash
Replace half the milk with coconut milk and use tropical-colored sprinkles. Add 1/4 cup of shredded coconut to the batter for texture that transports you to a beach where pancakes grow on palm trees. The coconut flavor is present but not overwhelming, like someone waved a coconut over the bowl instead of bludgeoning you with tropical flavor. Perfect for winter mornings when you need a vacation but can only afford breakfast.
Red Velvet Revelry
Add 1 tablespoon of cocoa powder and red food coloring to create red velvet pancakes that look like edible velvet paintings. Use white sprinkles for contrast, creating pancakes that belong in an art gallery instead of on your breakfast table. The cocoa adds depth without making them taste like chocolate cake, maintaining that mysterious red velvet flavor profile. Cream cheese glaze instead of syrup turns these into breakfast fit for royalty or that friend who Instagrams everything.
Storing and Bringing It Back to Life
Fridge Storage
Cool your pancakes completely on a wire rack before storing — this prevents condensation that creates soggy spots that taste like wet cardboard. Layer them between sheets of parchment paper in an airtight container, where they'll stay fresh for up to three days. The parchment prevents them from becoming a solid pancake brick, which is about as useful as a chocolate teapot. Store them in the back of the fridge where temperatures are most stable, not in the door where they'll experience temperature fluctuations that degrade their texture.
Freezer Friendly
These freeze like champions, retaining their fluffy texture for up to two months when properly stored. Freeze them in a single layer on a baking sheet for two hours, then transfer to freezer bags with parchment between layers. This flash-freezing prevents them from sticking together in one massive pancake clump that defrosts unevenly. Label the bag with the date and type — future you will thank present you when you're staring at a freezer full of mystery foods at 6 AM.
Best Reheating Method
Skip the microwave unless you enjoy rubbery disappointment. Instead, pop them in a toaster for 2-3 minutes until they're heated through and slightly crisp on the edges. The dry heat revives them to their former glory, creating that fresh-cooked texture that makes you question whether they're actually leftovers. For larger batches, heat them on a baking sheet in a 350°F oven for 8-10 minutes, covering with foil to prevent over-browning. Add a tiny splash of water to the pan before covering — it steams them back to perfection without making them soggy.