I’ll be honest — I ate half the batch before anyone else got to try it. It started on a rainy Tuesday when I was battling a stubborn, flavor‑less mayo that had been sitting in the fridge for weeks. I tossed a few garlic cloves into the mix, added a splash of lemon, and the whole kitchen erupted in a perfume that made my neighbor’s cat pause at the door. That accidental “oops” turned into a revelation: a garlic aioli that doesn’t just sit on the side, it steals the spotlight like a rock‑star stealing a mic. I dared my roommate to taste it and not go back for seconds, and he lost the bet within ten seconds. This version is hands down the best you’ll ever make at home because it balances creaminess, zing, and a whisper of herbaceous brightness that most store‑bought jars can’t even dream of.
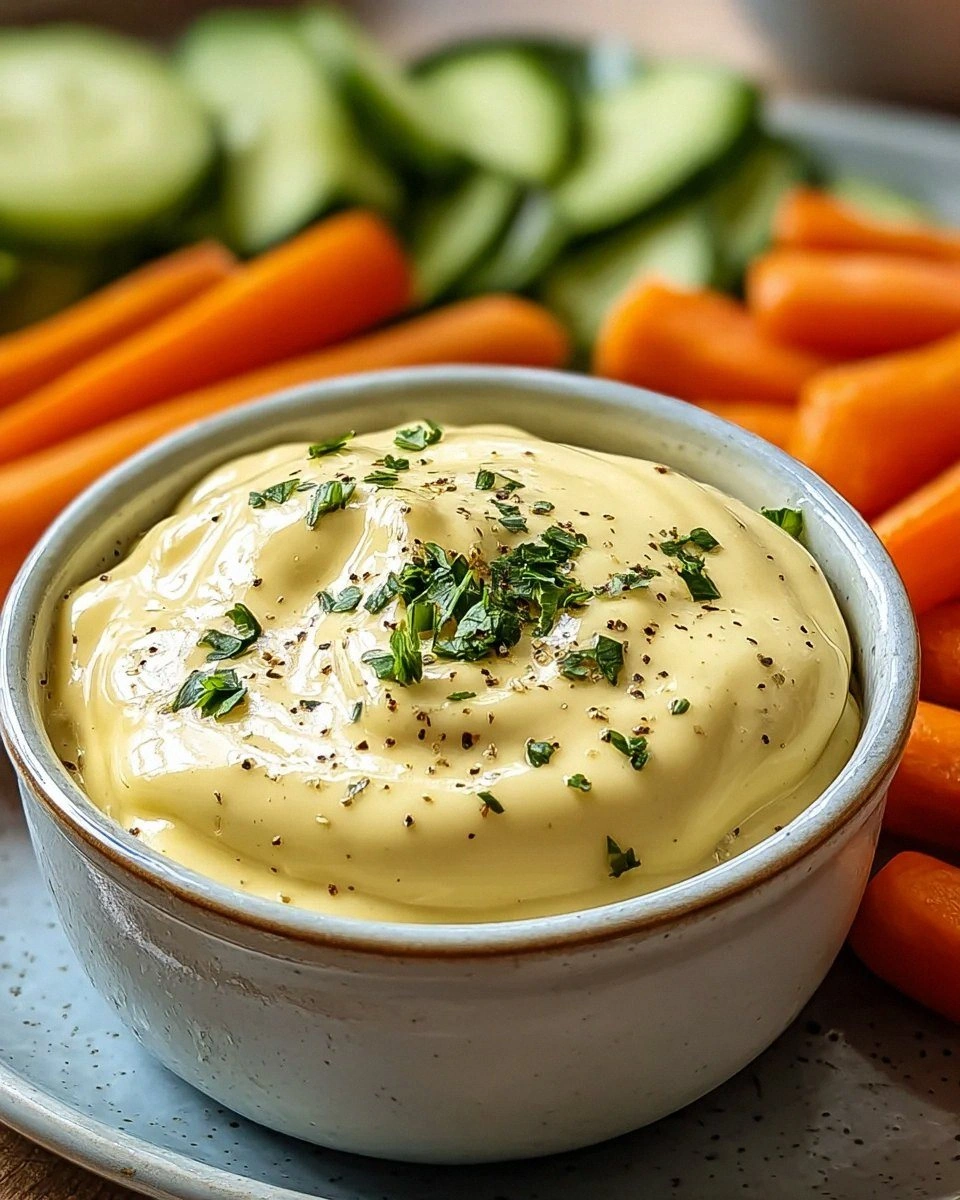
Picture yourself pulling a bowl of this aioli out of the fridge, the whole kitchen smelling like a Mediterranean market at sunrise. The aroma of fresh garlic mingles with citrusy lemon, while the olive oil adds a silk‑smooth finish that coats your palate like velvet. You’ll hear the faint crackle of a spoon scraping the bottom of the bowl, a sound that promises a perfect emulsion about to happen. When you finally dip that crusty baguette, you’ll feel the cool cream hugging the warm bread, and the first bite will unleash a flavor explosion that makes you wonder why you ever settled for bland spreads. If you’ve ever struggled with a runny, separated aioli, you’re not alone — and I’ve got the fix that turns that kitchen nightmare into a triumph.
Most recipes get this completely wrong by either over‑whipping the mayo and turning it airy, or dumping raw garlic that leaves a harsh bite. Here’s what actually works: a gentle whisk that incorporates garlic and lemon juice into the mayo, followed by a slow drizzle of high‑quality olive oil that binds everything together. The secret ingredient? A pinch of fresh herbs that add an aromatic lift without stealing the show. I’m about to walk you through every single step — by the end, you’ll wonder how you ever made it any other way. Okay, ready for the game‑changer?
What Makes This Version Stand Out
- Taste: The balance of sharp garlic, bright lemon, and mellow mayo creates a flavor profile that’s simultaneously bold and comforting, making it a universal crowd‑pleaser.
- Texture: A silky, spreadable consistency that clings to fries, sandwiches, and grilled veggies without turning gummy or separating.
- Simplicity: Fewer than seven ingredients, all pantry‑friendly, and a total prep time under fifteen minutes.
- Uniqueness: The optional fresh herb fold‑in adds a garden‑fresh pop that most store versions lack, turning a basic dip into a gourmet condiment.
- Crowd Reaction: Guests will swear you’ve hired a private chef the moment they taste the first spoonful.
- Ingredient Quality: Using extra‑virgin olive oil and freshly squeezed lemon juice elevates the entire experience, proving that quality trumps quantity.
- Make‑Ahead Potential: This aioli keeps its brilliance for up to a week in the fridge, so you can prep it ahead of a party and focus on the main dishes.
- Versatility: It works as a dip, a sandwich spread, a sauce for grilled fish, or even a swirl in mashed potatoes.
Inside the Ingredient List
The Flavor Base
Mayonnaise is the creamy backbone that gives the aioli its luscious texture. Using a high‑quality, egg‑based mayo ensures a thick, stable emulsion that won’t split when you add the oil. If you’re feeling adventurous, whip up a quick homemade mayo with egg yolk, mustard, and a splash of vinegar for an even fresher taste. Skipping mayo altogether would leave you with a watery, unappetizing mess that defeats the purpose of an aioli.
The Aroma Crew
Fresh garlic is the star that packs in the flavor. The more cloves you add, the more zing you get, but be careful not to overdo it unless you love a punchy bite. Mincing the garlic finely ensures it distributes evenly, preventing any raw, harsh pockets. If you’re allergic to raw garlic’s bite, try roasting the cloves first – the flavor mellows into a caramel‑sweet note that adds depth without the sting.
The Brightening Spark
Lemon juice is the splash of acidity that brightens up the aioli, cutting through the richness of the mayo and oil. Freshly squeezed juice offers a vibrant, fragrant citrus note that bottled juice can’t match. A common mistake is adding too much lemon, which can make the sauce thin; stick to two tablespoons for a balanced tang.
The Silky Finish
Olive oil, especially extra‑virgin, lends a rich, smooth finish that ties the flavors together. Drizzle it slowly while whisking to create a glossy, cohesive emulsion. If you use a low‑quality oil, you’ll notice a greasy aftertaste that drags the whole sauce down. For a twist, try a flavored oil like rosemary‑infused for an herbaceous undertone.
The Seasoning Duo
Salt and black pepper are essential for enhancing every other ingredient. A pinch of sea salt awakens the garlic, while freshly cracked black pepper adds a subtle warmth. Don’t be shy about tasting and adjusting; seasoning is the final brushstroke on your masterpiece. Skipping this step leaves the aioli flat, like a song without a chorus.
The Final Flourish (Optional)
Fresh herbs such as basil, parsley, or chives bring an aromatic lift that turns a simple dip into a garden‑fresh experience. Finely chop them and fold them in at the end to preserve their bright color and flavor. If you don’t have fresh herbs, a teaspoon of dried herb can work, but the result won’t have the same lively snap.
Everything's prepped? Good. Let’s get into the real action…
The Method — Step by Step
Gather all your ingredients and let them come to room temperature. Cold garlic or mayo can cause the emulsion to seize, so give the mayo a quick stir and let the lemon juice sit for a minute to warm up. This is the moment of truth: a smooth, homogenous base is the foundation for a flawless aioli. Feel the bowl in your hand; it should feel cool but not icy.
Finely mince the garlic cloves—four cloves for a moderate kick, six if you’re feeling daring. Sprinkle a pinch of sea salt over the minced garlic and use the flat side of your knife to mash it into a paste. This technique not only mellows the raw bite but also releases the allicin, the compound responsible for that unmistakable garlic aroma. Power transition: Now watch this part closely.
Kitchen Hack: If you’re short on time, use a garlic press, then add a pinch of salt and give it a quick roll with the flat of a knife to achieve the same paste texture.In a medium bowl, combine the mayonnaise and the garlic‑salt paste. Whisk gently until the mixture is uniform, taking care not to over‑beat, which can incorporate too much air and make the aioli fluffy instead of silky. The scent should already be intoxicating—sharp garlic softened by the creamy mayo. Pause and taste; this is your baseline before the lemon brightens things up.
Add the freshly squeezed lemon juice (about two tablespoons). Whisk again, watching the color lighten ever so slightly. The acid will thin the mayo just enough to welcome the oil without breaking the emulsion. If the mixture looks too thin, don’t panic—continue to the next step, the oil will bring it back together.
Begin a slow, steady drizzle of extra‑virgin olive oil while whisking continuously. The key is patience: a thin stream allows the oil to bind with the mayo, creating that glossy finish. You’ll notice the mixture thickening and becoming glossy, like a well‑polished marble surface. Watch the texture: it should coat the back of a spoon without sliding off.
Kitchen Hack: If the aioli starts to look grainy, stop adding oil, whisk for 30 seconds, then resume the drizzle—this rescues the emulsion.Season with a pinch of black pepper and, if needed, a tiny extra pinch of salt. Taste again; the flavor should be a harmonious dance of garlic, lemon, and oil, with a subtle peppery warmth. Remember, the aioli will mellow a bit after it rests, so err on the side of slightly stronger seasoning now.
Fold in the optional fresh herbs—two tablespoons of chopped parsley or basil work beautifully. This is the final flourish that adds a burst of green color and an aromatic lift.
Give the bowl a final gentle stir—no vigorous beating, just a lazy swirl to keep the texture silky.Watch Out: Adding herbs too early can cause them to wilt during whisking; always fold them in at the very end.Transfer the aioli to a clean airtight container and let it rest in the refrigerator for at least 30 minutes. This resting period allows the flavors to meld, turning the bright lemon into a mellow citrus undertone and letting the garlic fully integrate. While it chills, you can prepare the foods you plan to accompany it—fries, grilled veggies, or a crusty baguette.
Before serving, give the aioli a quick stir and taste once more. Adjust with a tiny drizzle of lemon or a pinch more salt if needed. Serve in a shallow bowl, drizzle a little extra olive oil on top for visual appeal, and watch the crowd dive in. That’s it — you did it. But hold on, I’ve got a few more tricks that'll take this to another level…
Insider Tricks for Flawless Results
The Temperature Rule Nobody Follows
Never whisk a cold mayo with a cold oil; the temperature shock can cause the emulsion to break. Let both the mayo and the oil sit out for 10‑15 minutes before you start. This simple step ensures the oil incorporates smoothly, giving you that glossy finish every time. I once tried to rush the process and ended up with a curdled mess—lesson learned.
Why Your Nose Knows Best
Your sense of smell is a more reliable indicator of flavor balance than taste alone. As you whisk in the lemon juice, inhale deeply; you should detect a bright citrus note that lifts the garlic without overpowering it. If the scent leans too sharp, add a splash more mayo to mellow it out. Trusting your nose saves you from over‑seasoning and keeps the aioli from tasting “lemon‑y”.
The 5‑Minute Rest That Changes Everything
After you finish whisking, let the aioli sit uncovered for five minutes, then cover it. This brief exposure to air allows the flavors to bloom, much like letting a wine breathe. The result is a deeper, more rounded taste that feels like you’ve let it marinate for hours. Skipping this rest leaves the sauce tasting flat, like a song without a bridge.
Oil Drizzle Discipline
Use a squeeze bottle or a small measuring cup to control the oil flow. A steady, thin stream gives you better control over texture than a wild pour. If you accidentally add too much oil at once, pause and whisk for a minute before continuing; the emulsion will catch up. This discipline is why professional chefs always look so calm while whisking.
Herb Timing Mastery
Fresh herbs should be the very last ingredient you add. Their delicate flavors evaporate quickly under vigorous whisking, so a gentle fold preserves their brightness. I once tossed the herbs in early and ended up with a dull, green‑ish aftertaste. The right timing keeps the aioli lively and colorful.
Creative Twists and Variations
This recipe is a playground. Here are some of my favorite ways to switch things up:
Smoky Chipotle Aioli
Swap half the fresh garlic for a teaspoon of chipotle in adobo sauce, and add a pinch of smoked paprika. The result is a smoky, slightly spicy dip perfect for grilled corn or fish tacos. Lovers of heat will thank you.
Herb‑Infused Green Goddess
Fold in a generous handful of fresh basil, mint, and chives, then drizzle a few drops of avocado oil for a buttery green hue. This version pairs beautifully with roasted asparagus or as a spread on veggie wraps.
Lemon‑Dill Deluxe
Add a tablespoon of finely chopped dill and increase the lemon juice by another tablespoon. The dill’s fresh, slightly sweet flavor makes this aioli a match made in heaven for salmon or poached potatoes.
Roasted Garlic & Sun‑Dried Tomato
Replace raw garlic with two cloves of roasted garlic, and stir in chopped sun‑dried tomatoes (oil‑packed). The sweet, caramelized garlic combined with tangy tomatoes creates a Mediterranean‑inspired dip for flatbreads.
Spicy Sriracha Fusion
Whisk in a tablespoon of Sriracha and a dash of honey for a sweet‑heat balance. This version shines as a burger topping, giving a creamy kick without overwhelming the patty.
Truffle‑Infused Luxury
Add a few drops of white truffle oil and a pinch of grated Parmesan. The earthy aroma elevates the aioli to a fine‑dining level, ideal for drizzling over mushroom risotto or steak fries.
Storing and Bringing It Back to Life
Fridge Storage
Transfer the aioli to a clean glass jar with a tight‑fitting lid and store it in the refrigerator for up to 7 days. The airtight seal prevents oxidation, keeping the bright color and flavor intact. Before each use, give it a quick stir; the oil may separate slightly, but it will re‑emulsify with a gentle whisk.
Freezer Friendly
If you need to keep it longer, portion the aioli into silicone ice‑cube trays and freeze. Once solid, pop the cubes into a zip‑top bag and store for up to 2 months. To revive, thaw in the fridge overnight, then whisk in a teaspoon of warm water to restore its silky texture.
Best Reheating Method
When you’re ready to serve a chilled batch, let it sit at room temperature for 10 minutes, then drizzle a tiny splash of water (about a teaspoon) and whisk gently. The added moisture creates a steam‑like effect, bringing the aioli back to its original creaminess without diluting the flavor. This trick works wonders for reviving aioli that’s been in the fridge for several days.