I remember the night I burned the first pie I ever made. The crust was charred, the filling was a soggy mess, and I stared at the kitchen counter in disbelief. That disaster became the catalyst for a quest that led me to the ultimate cherry crumb pie recipe. I was determined to find a version that would make every bite feel like a triumph, not a tragedy.
The aroma that filled my kitchen this time was a sweet, fruity invitation: fresh cherries, vanilla, almond, and a hint of caramelized sugar dancing together. I could almost hear the gentle crackle of the crust as it baked, the faint pop of steam from the cherries, and the subtle hiss of butter melting into the crumb. The texture was a perfect contrast—soft, juicy cherries against a crisp, buttery topping that shivered like a freshly cut sheet of parchment. Every sense was engaged, from the glossy sheen of the cherries to the warm, comforting scent that seemed to hug the walls.
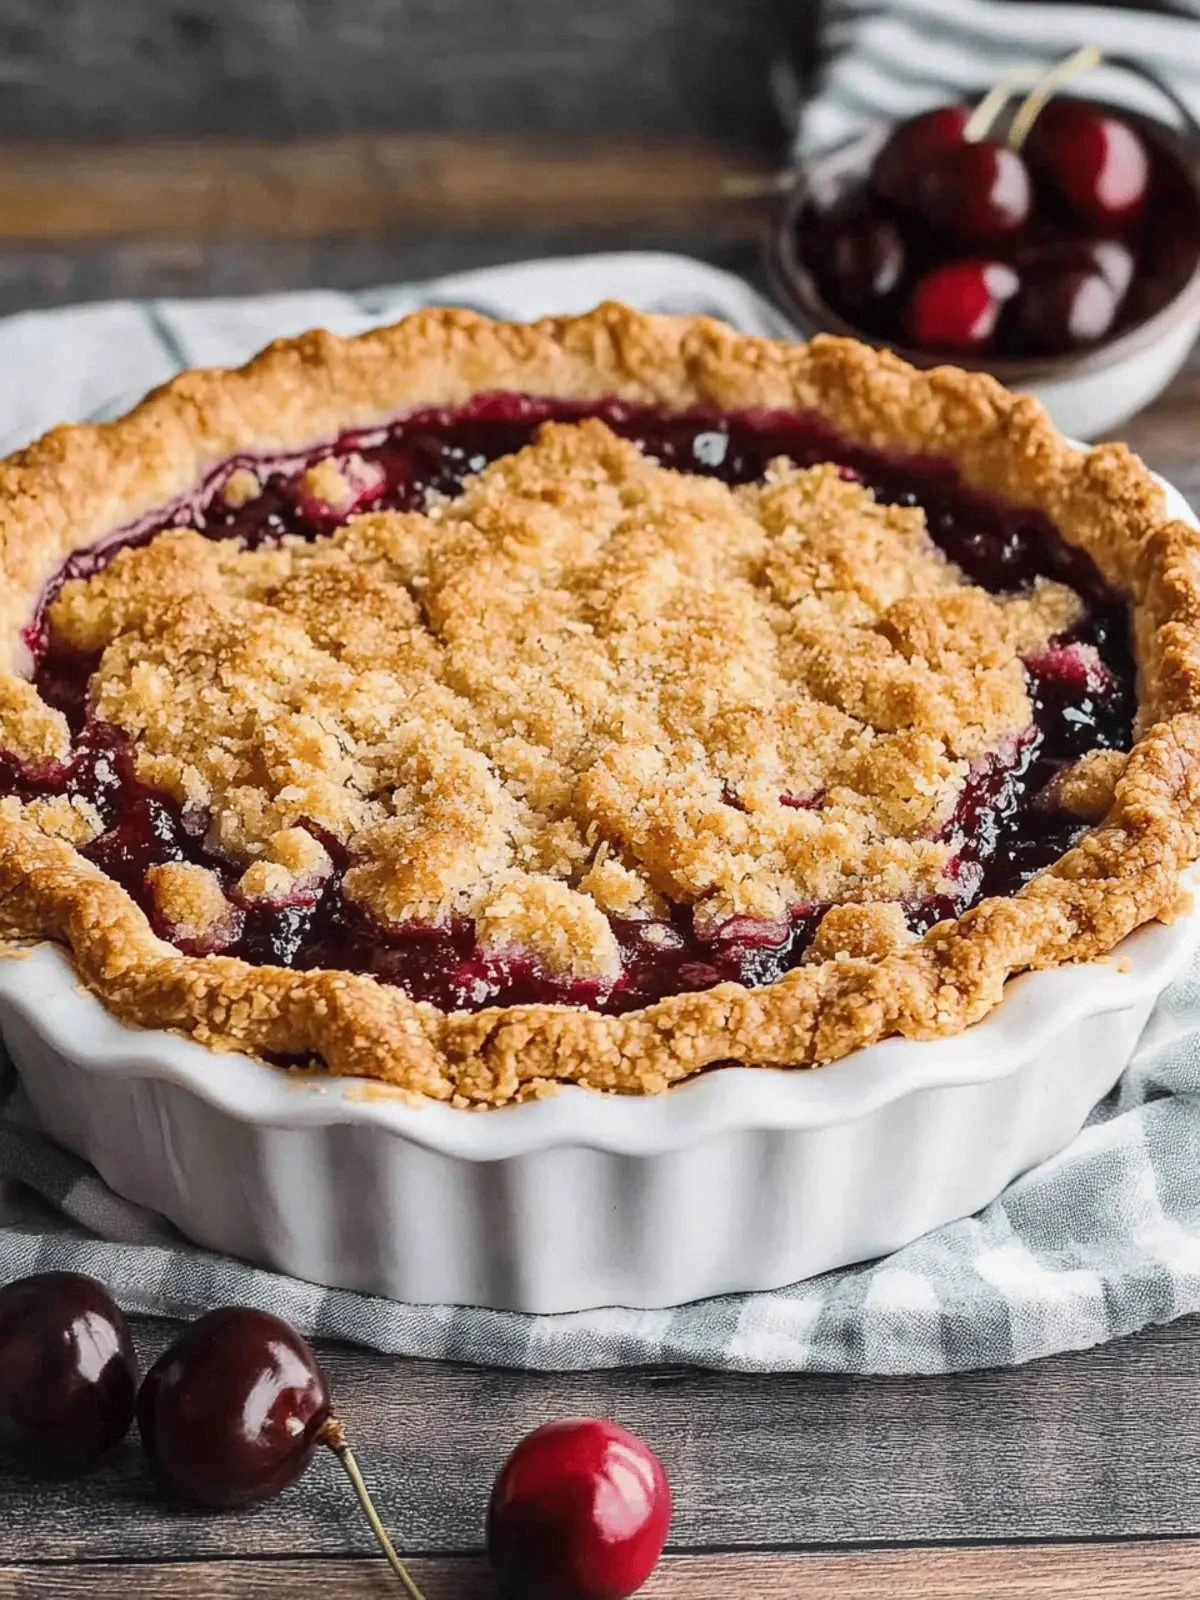
What makes this version stand out is that it takes the classic cherry pie and elevates it with a crunchy, buttery crumb that feels like a secret layer of indulgence. I’ve spent hours tweaking the crumb ratio, balancing sweetness, and experimenting with vanilla and almond to create a flavor profile that sings. The result is a pie that feels both familiar and daring, a dessert that invites you to taste, savor, and then ask for more. If you’ve ever struggled with pie crusts that never rise or fillings that are too watery, this recipe is the answer.
Picture yourself pulling this out of the oven, the whole kitchen smelling incredible, the crust golden and flaky, the filling bubbling with bright red cherries. The first bite is a burst of sweetness, followed by the buttery crunch that shatters like thin ice. I dare you to taste this and not go back for seconds. I’ll be honest—I ate half the batch before anyone else got to try it. Stay with me here—this is worth it.
What Makes This Version Stand Out
- Taste: The combination of vanilla and almond extracts creates a subtle, aromatic base that lifts the natural tartness of cherries. The dual-sugar system—white granulated and light brown—adds depth, giving the filling a caramelized finish that lingers on the palate.
- Texture: The crumb topping is buttery and flaky, with a light crunch that contrasts the soft, juicy cherries. Corn starch is the secret to a silky filling that holds its shape without becoming gummy.
- Simplicity: Despite its complex flavor, the recipe uses only a handful of ingredients. No need for exotic spices or specialty equipment—just a 9-inch pie crust and a few kitchen staples.
- Uniqueness: The dual crumb—half flour, half brown sugar—creates a nutty, caramelized layer that most pie recipes overlook. This gives the pie a distinctive mouthfeel.
- Crowd Reaction: Friends who have tasted this say it’s “hands down the best version you'll ever make at home.” The pie is a conversation starter, and the crumb topping has become a signature element in my gatherings.
- Ingredient Quality: Using fresh, pitted cherries and real vanilla extract ensures the flavors are bright and not synthetic. The butter should be unsalted to control salt levels precisely.
- Cooking Method: Baking at a steady 375°F allows the crust to bake evenly while the filling caramelizes. The crumb topping is added halfway through baking to prevent over-browning.
- Make‑Ahead Potential: The pie can be assembled a day ahead, refrigerated, and baked fresh, making it ideal for busy evenings or last‑minute dessert plans.
Inside the Ingredient List
The Flavor Base
The 4 cups of pitted cherries form the heart of the pie, providing bright acidity and a burst of color. Fresh cherries are essential; frozen cherries can release too much moisture, which can make the filling runny. If you’re using canned cherries, drain them well and pat them dry to avoid excess liquid. The 1 teaspoon of vanilla extract lifts the overall flavor profile, adding a warm, sweet undertone that balances the tartness. The 1 teaspoon of almond extract gives a subtle nutty note that enhances the crust’s buttery richness.
The Texture Crew
The 2 tablespoons of corn starch act as a thickening agent, ensuring the filling gels perfectly without becoming gummy. The 1 cup of all-purpose flour in the crumb creates a tender base that crisps up nicely. The 4 tablespoons of unsalted butter, cut into cold cubes, melts slowly, forming a flaky, buttery crumb that melts in your mouth. The pinch of salt is critical; it balances sweetness and brings out the cherries’ natural flavor. If you prefer a saltier crust, add an extra pinch, but be careful not to overpower the delicate filling.
The Sweetness Spectrum
The 3/4 cup of white granulated sugar is divided: 1/4 cup goes into the filling for a bright, clean sweetness, while the remaining 1/2 cup is incorporated into the crumb. The 1/3 cup of light brown sugar adds a caramelized depth and a subtle molasses note to the topping. Together, these sugars create a layered sweetness that feels balanced rather than cloying. If you’re watching calories, you can reduce the white sugar slightly, but the brown sugar will keep the crumb moist.
The Final Flourish
The 1 9-inch pie crust is the canvas for all these flavors. A pre-baked or blind-baked crust prevents sogginess, but if you bake it with the filling, the crust will develop a beautiful golden brown. The 1 pinch of salt in the crumb is the final touch that rounds off the flavor profile. For an extra burst of flavor, consider sprinkling a few dried apricot or pineapple pieces into the filling—this adds a tropical twist that complements the cherries.
Everything's prepped? Good. Let's get into the real action.
The Method — Step by Step
- Preheat your oven to 375°F (190°C). Grease a 9-inch pie dish lightly with butter or non-stick spray; this will help the crust release easily after baking. Place the pre-made pie crust in the dish, pressing it gently into the corners. Use a fork to prick the bottom of the crust to prevent bubbling. Let the crust sit while you prepare the filling.
- In a large mixing bowl, combine the pitted cherries, 1/4 cup white granulated sugar, 1 teaspoon vanilla extract, and 1 teaspoon almond extract. Toss them gently so that every cherry is coated in sugar and flavor. The cherries should look glossy and slightly translucent. This is the moment when the sweet aroma starts to fill your kitchen. Make sure not to overmix, as the cherries can start to break down.
- Add the corn starch to the cherry mixture and stir until the cherries are evenly coated. The corn starch will help the filling thicken as it bakes. You can test the consistency by stirring a small amount into a spoon; it should coat the back of the spoon without running. This step is crucial for a firm yet silky filling.
- Pour the cherry mixture into the prepared crust, spreading it evenly with a spatula. The filling should fill the crust to just below the rim. This is the stage where the filling’s color will start to hint at the final look. The cherries will begin to release their juices, creating a fragrant steam.
- In a separate bowl, whisk together the 1 cup of flour, 1/3 cup light brown sugar, 1/4 cup white granulated sugar, and the pinch of salt. Cut in the cold butter cubes using a pastry cutter or two forks until the mixture resembles coarse crumbs. The mixture should hold together when pressed, but not be too dry. This crumb will bake to a golden, buttery finish.
- Evenly sprinkle the crumb mixture over the cherry filling. Press gently with the back of a spoon to ensure it settles into the gaps. The crumb should be distributed evenly to avoid clumps. This step is where the crumb’s texture will shine. The crumb should look lightly golden before baking.
- Place the pie in the preheated oven and bake for 30 minutes, or until the crust is golden and the filling is bubbling. The edges of the crumb should be slightly darker than the center. If you notice the edges browning too quickly, cover them loosely with foil. The pie should emit a caramelized aroma that makes the whole kitchen feel like a bakery. Once done, remove from the oven and let it cool on a rack for at least 45 minutes.
- After cooling, slice a generous portion and serve warm with a scoop of vanilla ice cream or a dollop of whipped cream. The contrast between the warm, buttery crumb and the cold, airy ice cream is pure bliss. If you prefer a chilled dessert, refrigerate the pie for 2 hours before serving. The flavors will meld beautifully, creating a rich, layered experience. Enjoy each bite as if it were a sweet revelation.
That's it — you did it. But hold on, I've got a few more tricks that'll take this to another level.
Insider Tricks for Flawless Results
The Temperature Rule Nobody Follows
Many bakers bake pies at 425°F to get a crisp crust quickly, but this can scorch the filling. Baking at 375°F allows the crust to rise slowly, ensuring even caramelization while the filling thickens gently. I’ve found that a steady 375°F yields a golden crust without overbrowning the crumb. If you’re using a convection oven, reduce the temperature by 25°F to compensate for the fan’s heat.
Why Your Nose Knows Best
The first scent that rises from the pie is a signal of the perfect bake. A faint, sweet aroma indicates the filling is just starting to caramelize. If you smell a sharp, burnt scent, the pie is overcooked. Trusting your nose can save you from a ruined dessert. I’ve always said, “If your nose says it’s ready, your mouth will thank you.”
The 5-Minute Rest That Changes Everything
Letting the pie rest for 5 minutes after baking allows the filling to set, making it easier to slice cleanly. This brief pause also lets the flavors meld, enhancing the sweetness and tartness. Skip this step and you’ll get a messy, runny slice. I’ve found that a short rest gives a dramatic rise in flavor intensity.
The Crumb’s Secret Ingredient
Adding a pinch of cinnamon or nutmeg to the crumb can elevate its flavor profile, giving it a warm, comforting edge. Sprinkle a small amount over the crumb before baking. This subtle spice adds depth without overpowering the cherries. I’ve tried it in a recent batch and the result was a delightful surprise.
The Final Touch: A Splash of Cherry Juice
A teaspoon of cherry juice added to the filling before baking enhances the cherry flavor and keeps the crumb moist. It also helps the crumb brown evenly. If you don’t have cherry juice, a splash of red wine works well. This trick is a game changer for those who love a richer, fruit-forward pie.
The Cooling Trick
Cooling the pie on a wire rack prevents steam from making the bottom soggy. The rack also helps the crumb set, giving a crisp edge. I’ve found that a 45-minute cool time is ideal for a perfect bite. This simple step ensures the pie holds together when sliced.
Creative Twists and Variations
Cherry Almond Scone Pie
Swap the pie crust for a buttery scone base for a rustic twist. Add sliced almonds to the crumb for extra crunch. The almond flavor pairs beautifully with the cherries. This version is perfect for brunch or a sweet afternoon snack.
Dark Chocolate Cherry Explosion
Fold in 1/2 cup of melted dark chocolate into the filling. The chocolate adds depth and a slight bitterness that balances the sweetness. Sprinkle cacao nibs on top before baking for a crunchy finish. This pie is a chocolate lover’s dream.
Spiced Citrus Cherry Pie
Add zest from one orange and a pinch of ground ginger to the filling. The citrus brightens the cherries, while ginger adds a subtle warmth. Top the crumb with a sprinkle of orange zest for a fragrant finish. This version is ideal for spring or summer gatherings.
Maple Syrup Cherry Delight
Replace half of the white sugar with maple syrup for a natural sweetener. The maple’s caramel notes complement the cherries. Keep the crumb unchanged for a crisp, buttery topping. This pie is a cozy fall treat.
Pistachio Cherry Crunch
Incorporate finely chopped pistachios into the crumb for a nutty crunch. The pistachios add a green hue and a subtle nuttiness. Serve with a drizzle of honey for extra sweetness. This variant is a showstopper at parties.
Frozen Cherry Sorbet Pie
Freeze the pie after baking for 2 hours to create a chilled dessert. The crumb remains crisp while the cherries become a frozen, chewy delight. Serve with a scoop of vanilla ice cream for a decadent finish. This is the ultimate summer treat.
Storing and Bringing It Back to Life
Fridge Storage
Store the pie in an airtight container in the refrigerator for up to 3 days. The crumb will stay crisp, and the filling will stay moist. When you’re ready to serve, let the pie sit at room temperature for 15 minutes to soften slightly. This keeps the flavors fresh and vibrant. Avoid leaving the pie at room temperature for more than 2 hours to prevent bacterial growth.
Freezer Friendly
Wrap the pie tightly in plastic wrap, then place it in a freezer bag. It can stay frozen for up to 2 months. Thaw overnight in the refrigerator before reheating. When reheating, place the pie in a preheated oven at 350°F for 10 minutes. The crumb will regain its crispness, and the cherries will release their juices.
Best Reheating Method
For the best results, preheat your oven to 350°F and bake the pie for 10 minutes. If the crumb is too dry, add a splash of water to the bottom of the dish before reheating. This steams the crumb back to perfection. Let it cool for a few minutes before slicing. The pie will taste as fresh as the day it was baked.
I’ve spent countless evenings turning this pie from a simple dessert into a kitchen masterpiece. The combination of textures, flavors, and aromas is a symphony that sings in every bite. Whether you’re serving it at a family dinner or a casual gathering, this pie will become the star of the show. The crumb’s buttery crunch, the cherries’ bright acidity, and the subtle vanilla‑almond harmony create a dessert that is both comforting and adventurous. I hope you enjoy every step, every bite, and every moment of this culinary adventure.