I still remember the first time I brought this Jalapeño Popper Cheese Ball to a game-day potluck. I walked in cradling this golden sphere like it was the Stanley Cup, and within minutes, people were circling the snack table like vultures. One guy actually asked me if I was a professional caterer. Nope — just a girl who accidentally discovered the holy grail of party food when my original plan for stuffed jalapeños exploded in the oven and I had to MacGyver something together with the survivors.
That kitchen catastrophe turned into the most requested recipe of my adult life. The smoky bacon, the creamy cheese, that gentle heat that sneaks up on you like a plot twist — it's everything you love about jalapeño poppers, but in a form that won't burn your fingerprints off when you're trying to eat and hold a drink at the same party. Plus, there's something wildly satisfying about slicing into a perfectly round cheese ball and watching it slowly surrender to your cracker like it's been waiting for this moment its entire life.
I've spent the last three years perfecting this recipe, testing it on unsuspecting dinner guests, bringing it to office parties, and even smuggling it into movie theaters. I've tried every variation under the sun — smoked gouda instead of cheddar, candied jalapeños for the sweet-heat rebels, even a vegetarian version that made my bacon-loving brother admit it was "surprisingly decent." But this version? This is the one that makes people cancel their dinner plans and hover around the appetizer table like they're guarding state secrets.
Today, I'm sharing every single trick I've learned, from the temperature of your cream cheese (room temp is non-negotiable, people) to the secret ingredient that makes the coating stick like it has abandonment issues. By the time we're done, you'll be able to whip this up with your eyes closed, and your friends will start referring to you as "the one who brings that cheese ball" in hushed, reverent tones. Let me walk you through every single step — by the end, you'll wonder how you ever made it any other way.
What Makes This Version Stand Out
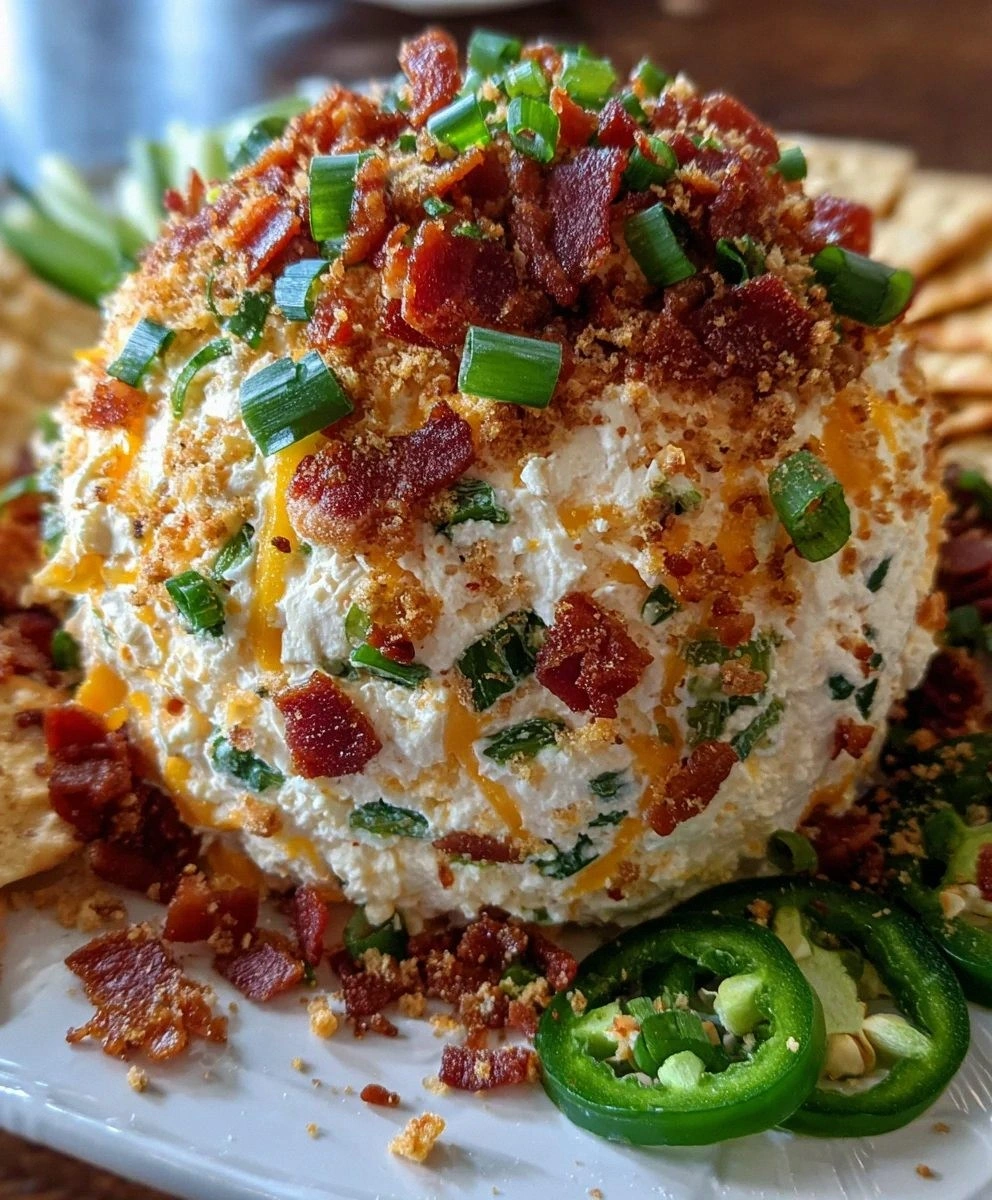
Bacon-to-Cheese Ratio: Most recipes skimp on the bacon like it's made of gold. This version packs in crispy bacon bits that actually stay crispy, not those soggy disappointments that taste like regret. The trick is cooking the bacon until it's just shy of burnt, then letting it cool completely before mixing. Trust me, your taste buds will throw a parade.
Heat Control: Here's where most recipes get it completely wrong — they either blow your head off with heat or wimp out completely. This version uses fresh jalapeños with the seeds removed for that bright pepper flavor, plus a few seeds for controlled heat. You get the essence of jalapeño without feeling like you licked a campfire.
Texture That Dreams Are Made Of: We're not just throwing ingredients in a bowl and hoping for the best. The cream cheese gets whipped until it's lighter than your weekend plans, then folded with ingredients that add crunch, creaminess, and those little surprises that keep people coming back for "just one more bite" until it's gone.
Make-Ahead Magic: This cheese ball actually gets better if you make it 24 hours ahead. The flavors meld together like old friends at a reunion, creating this symphony of smoky, spicy, creamy perfection that will have you sneaking bites at 2 AM. I dare you to taste this and not go back for seconds — it's physically impossible.
Crowd Psychology: Picture yourself pulling this out of the fridge, rolling it in that gorgeous coating, and setting it on the table. Within minutes, you'll witness the fascinating phenomenon of adults reverting to caveman behavior around food. I've seen CEOs and college students equally powerless against its gravitational pull.
Ingredient Quality Flexibility: Whether you're using fancy artisanal cream cheese or the store brand that's been in your fridge since the Clinton administration, this recipe adapts. I'll show you exactly how to compensate for different quality levels so your cheese ball still tastes like you spent a fortune at Whole Foods.
The Conversation Starter: This isn't just food — it's social currency. Bring this to any gathering and suddenly you're the interesting person everyone wants to talk to about recipes, cooking shows, and their aunt's famous seven-layer dip. You'll never eat alone at a party again.
Inside the Ingredient List
The Flavor Base
Cream cheese isn't just the foundation of this recipe — it's the canvas where all our flavor artistry happens. But here's the thing: not all cream cheese is created equal. The cheap stuff works fine, but if you want that luxurious, cloud-like texture that makes people close their eyes when they taste it, splurge for the full-fat Philadelphia. I've done side-by-side taste tests (yes, I'm that person), and the difference is like comparing a thrift store sweater to cashmere. The premium stuff whips up lighter, blends smoother, and has this subtle tang that plays beautifully with the sharp cheddar and spicy jalapeños.
Speaking of sharp cheddar, this is where you absolutely cannot compromise. Mild cheddar disappears like a wallflower at prom — technically present but contributing nothing. Extra-sharp aged cheddar brings that bold, tangy punch that cuts through the richness of the cream cheese like a flavor ninja. I buy mine in blocks and shred it myself because pre-shredded cheese is coated with cellulose that makes it resist melting and creates a slightly gritty texture. Yes, I'm asking you to shred cheese by hand. Yes, your forearms will get a workout. Yes, it's worth every second when you taste the result.
The Texture Crew
Bacon is the drama queen of this recipe — it wants to be the star, but we need to keep it in supporting role territory. Cook it until it's crispy enough to shatter between your fingers, then let it cool completely before chopping. Warm bacon will melt into the cream cheese and create greasy pockets that separate like oil and water. The goal is little crispy bits that provide surprise explosions of smoky flavor, not bacon mush that makes everything taste like a diner breakfast. I cook mine in the oven on a wire rack at 400°F for 15-20 minutes — no flipping required, and the fat drips away leaving perfectly crisp strips.
Green onions are the unsung heroes here. They add that fresh, slightly sharp bite that prevents the whole thing from becoming a one-note dairy bomb. Use both the white and green parts, but slice them thin so they distribute evenly. Nobody wants to bite into a huge chunk of onion that clears their sinuses. The white parts have more punch, the green parts are milder and prettier — together they create a perfect balance that makes each bite interesting.
The Unexpected Star
Garlic powder is my secret weapon in this recipe. Fresh garlic would be too aggressive and overwhelming, but garlic powder? It melts into the background and creates this umami depth that makes people say "I can't quite put my finger on what's making this so addictive." It's like the bass line in a great song — you don't consciously notice it, but you'd miss it if it were gone. Just a whisper is all you need, enough to make the other ingredients taste more like themselves.
The Final Flourish
The coating is where this recipe transforms from good to unforgettable. Extra chopped bacon, jalapeños, and green onions create this gorgeous mosaic that looks like edible art. But here's the twist — I add a pinch of smoked paprika to the coating mix. It gives this subtle reddish hue and an extra layer of smoky complexity that makes people ask if you used special bacon. You didn't, but let them think you're a culinary genius. The coating isn't just for looks (though it is stunning) — it adds textural contrast and concentrated flavor hits that keep every bite exciting.
The Method — Step by Step
- Start with your cream cheese at room temperature — and I mean actually room temperature, not "I microwaved it for 30 seconds and now it's half-melted." Take it out of the fridge at least 2 hours before you start, or better yet, the night before. Cold cream cheese is like trying to mix concrete with a fork — technically possible but why would you do that to yourself? When it's properly softened, it should bend easily when you press it, not crack like a frozen lake. This is the foundation of everything, so don't rush it.
- Cook your bacon while the cream cheese is warming up. Lay the strips on a wire rack set over a baking sheet — this lets the fat drip away and air circulate underneath, giving you evenly crisp bacon without any sad, soggy spots. Slide it into a cold oven, then set to 400°F. Starting cold prevents the bacon from curling up like it's trying to escape. Twenty minutes later, you'll have perfect strips that shatter like thin ice when you bite them. Let them cool completely on paper towels — this is crucial for maximum crispiness.
- While the bacon's doing its thing, prep your jalapeños. Cut off the stems, slice them in half lengthwise, and use a small spoon to scrape out the white membranes and seeds. Keep a few seeds if you want extra heat, but remember — you can always add more heat later, but you can't take it away. Dice them into tiny pieces, about the size of a pea. You want little flavor bombs, not huge chunks that make someone feel like they're eating a salad.
- Slice your green onions thin, using both the white and green parts. The white parts are stronger and add more punch, while the green parts are milder and add color. Think of them as two different ingredients in one plant — use that to your advantage. If you're feeling fancy, save some of the darker green tops for garnish, sliced on the bias for that restaurant touch that makes people think you went to culinary school.
- Now for the mixing magic! In a large bowl, beat the cream cheese with an electric mixer on medium speed for about 2 minutes. You're not just mixing — you're incorporating air that makes it light and fluffy. It should look like clouds at this point, all pale and pillowy. Add the shredded cheddar, garlic powder, salt, and pepper, and mix just until combined. Over-mixing at this stage makes it dense and heavy, like your ex's emotional baggage.
- Fold in the bacon, jalapeños, and green onions with a spatula, not the mixer. This is where you channel your inner zen master — gentle, sweeping motions that distribute everything evenly without deflating all that air you just incorporated. The goal is a beautiful speckled mixture where every bite gets a perfect balance of all the good stuff. If you see big clumps of bacon or jalapeño, break them up with your spatula and keep folding.
- Here's where the magic happens — shaping time! Scoop your mixture onto a large piece of plastic wrap. Don't worry about making it perfect yet. Gather up the edges of the plastic wrap and twist them together, forming a rough ball shape. The plastic wrap helps you shape it without everything sticking to your hands like you're wearing cheese gloves. Once it's wrapped, you can roll it between your palms to smooth it out. Think of it like making a snowball, but instead of snow, it's pure deliciousness.
- Chill the wrapped ball in the fridge for at least 2 hours, or up to 24 hours. This is when all the flavors get to know each other, have a party, and decide to become best friends forever. The cold also firms it up so it holds its shape when you roll it in the coating. If you try to skip this step, you'll end up with a sad, floppy mess that collapses like a soufflé in an earthquake. Patience, young grasshopper — good things come to those who wait.
- While it's chilling, make your coating. Combine chopped bacon, jalapeños, green onions, and that pinch of smoked paprika in a shallow dish. The paprika is optional but trust me — it adds this gorgeous color and depth that makes people think you're a culinary wizard. Mix it all together so you get a beautiful confetti of flavors. This is your cheese ball's party outfit, so make it count.
- Time for the grand finale! Unwrap your chilled cheese ball and place it in the coating dish. Gently roll it around, pressing the coating into the surface so it sticks. You want every inch covered in this gorgeous mixture — it's like giving your cheese ball a glittery jacket made of deliciousness. Once it's fully coated, transfer it to a serving plate and let it sit for about 10 minutes to take the chill off slightly. This makes it easier to spread and brings out all those complex flavors.
That's it — you did it. But hold on, I've got a few more tricks that'll take this to another level...
Insider Tricks for Flawless Results
The Temperature Rule Nobody Follows
Here's the thing about temperature that most recipes gloss over: every ingredient needs to be at the right temp for maximum flavor impact. Your cream cheese should be room temperature, your bacon should be completely cooled, and your jalapeños should be cold from the fridge. Why? Cold jalapeños against warm cream cheese create tiny temperature pockets that keep the pepper flavor bright and fresh, while the warm cream cheese blends smoothly with the room-temperature cheddar. It's like a perfectly choreographed dance where everyone knows their role. Ignore this rule and you'll get a cheese ball where some bites taste like fresh cream cheese and others like pepper bombs.
Why Your Nose Knows Best
Before you serve, do the sniff test. A properly made cheese ball should smell like a party — smoky bacon, bright peppers, tangy cheese, all in perfect harmony. If you smell mostly cream cheese, it needs more seasoning. If the jalapeño smell punches you in the face, add more cheese to balance it out. Your nose knows what your tongue wants before your brain catches up. I've saved countless batches by trusting my nose over written recipes. A friend tried skipping this step once — let's just say it didn't end well, and she had to claim she "meant to make it mild" while everyone politely nibbled on crackers.
The 5-Minute Rest That Changes Everything
After you coat your cheese ball, let it rest at room temperature for exactly 5 minutes before serving. Not 10, not 2 — 5. This is the sweet spot where the cheese softens just enough to spread easily but doesn't get so warm that the coating slides off like a bad toupee. It's like tempering chocolate or resting steak — this tiny window makes the difference between good and legendary. Set a timer, pour yourself a drink, and get ready for the moment when you slice into it and everyone gasps at the perfect cross-section of colors and textures.
Creative Twists and Variations
This recipe is a playground. Here are some of my favorite ways to switch things up:
The Sweet Heat Rebel
Replace half the jalapeños with candied jalapeños for a sweet-spicy version that confuses and delights your taste buds. The sugar in the candied peppers creates this gorgeous caramelized edge when it hits the warm cheese on crackers. Add a tablespoon of honey to the mixture for extra sweetness that plays against the salty bacon like a perfectly balanced cocktail. This version disappears fastest at brunch gatherings where people claim they "don't usually like spicy food" before devouring half the plate.
The Everything Bagel Impersonator
Swap the bacon coating for everything bagel seasoning mixed with extra crispy bacon bits. The sesame seeds, poppy seeds, and dried garlic create this insane textural experience that makes every bite different. Use smoked gouda instead of cheddar for a deeper, more complex flavor that tastes like Sunday morning in New York. This version is breakfast-appropriate and has been known to cure hangovers better than any diner breakfast sandwich.
The Mediterranean Vacation
Replace the bacon with crispy prosciutto, swap cheddar for aged manchego, and add minced sun-dried tomatoes and fresh basil to the mix. The coating becomes a blend of crispy prosciutto, fresh basil chiffonade, and lemon zest. It tastes like summer in the Hamptons even when you're eating it in your living room in February. Fair warning: this version makes people speak with fake accents and plan imaginary vacations.
The Breakfast of Champions
Add everything bagel seasoning to the mixture itself, swap the jalapeños for diced roasted red peppers, and mix in some everything bagel pieces that you've toasted until crispy. The coating includes everything bagel seasoning mixed with the bacon. It tastes like your favorite breakfast sandwich but in party form. I've served this at 9 AM meetings and watched grown adults weep with joy.
The Fire-Eater's Dream
Keep the seeds from half the jalapeños, add a diced habanero to the mix, and roll the finished ball in a mixture of bacon and crushed spicy cheese puffs. This version is not for the faint of heart — it starts deceptively mild but builds to a crescendo that'll have you reaching for milk. Perfect for those friends who claim nothing is spicy enough. They'll respect you after this one.
The Vegetarian Plot Twist
Replace the bacon with crispy shiitake mushrooms that you've roasted until they achieve bacon-like texture and umami depth. Use smoked paprika and liquid smoke to recreate that smoky flavor. The coating becomes roasted mushroom bits mixed with toasted sesame seeds. Even my most devout carnivore friends request this version — it's that good. The mushrooms provide the same satisfying crunch and savory depth without any meat.
Storing and Bringing It Back to Life
Fridge Storage
Wrap your cheese ball tightly in plastic wrap, then slip it into a zip-top bag with as much air pressed out as possible. It'll keep for up to 5 days in the fridge, though I've never seen one last more than 2 days before disappearing mysteriously. The key is keeping it away from strong-smelling foods — cheese balls are like teenagers, they absorb everything around them. Store it in the back of the fridge where the temperature is most consistent. If you notice any condensation on the plastic wrap, replace it with fresh wrap to prevent sogginess.
Freezer Friendly
You can freeze this cheese ball for up to 2 months, but here's the trick: freeze it before coating. Wrap it tightly in plastic wrap, then foil, then place in a freezer bag. Thaw overnight in the fridge, then coat with fresh ingredients before serving. The texture won't be quite as perfect as fresh, but it's still miles better than anything store-bought. I've done this for holiday prep and nobody could tell the difference. Just remember to label it — frozen cheese balls look suspiciously similar to frozen cookie dough at 2 AM.
Best Reheating Method
Cheese balls don't need reheating, but if yours has been in the fridge and you want to serve it slightly softened, let it sit at room temperature for 15-20 minutes. If it gets too soft and the coating starts to slide, pop it back in the fridge for 5 minutes to firm up. For leftover cheese ball that's been sliced into, press plastic wrap directly against the cut surface to prevent it from drying out. Add a tiny splash of water before re-wrapping — it steams back to perfection and prevents that dreaded cheese skin from forming.