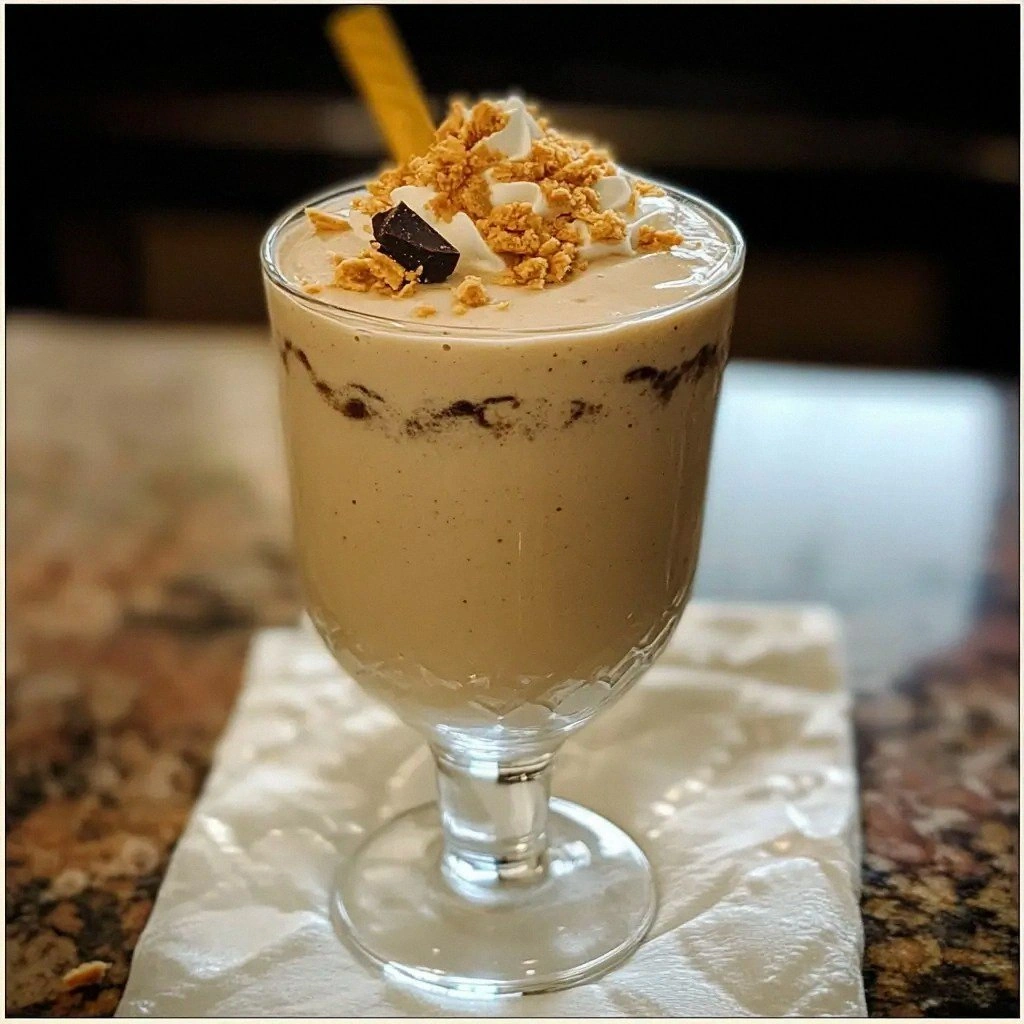
Picture this: a late‑night kitchen, the fridge humming, and you’re staring at a mountain of chocolate‑covered, peanut‑butter‑laden candy bars. The last thing you want is to reach for the store‑bought version that drips with sugar and artificial additives. I was in the same spot, craving that iconic crunch and the sweet, buttery finish, when I realized I could turn that guilty pleasure into a low‑carb masterpiece. I pulled out almond flour, coconut oil, and a generous spoonful of erythritol, and the result was a silky, chocolate‑peanut butter shake that felt like a dessert but stayed within my macros. I dare you to taste this and not go back for seconds; it’s a game‑changer.
The first bite is a burst of chocolate that coats the tongue like velvet, followed by a creamy peanut butter wave that lingers, and a subtle hint of vanilla that ties everything together. The texture is a perfect balance—soft enough to pour, yet with a slight thickness that keeps it from becoming a liquid. The aroma is rich and buttery, almost like a freshly baked cookie, but you can’t see any crumbs or sugar crystals. When you take that first sip, the subtle crunch from the almond flour and coconut oil gives a satisfying snap, as if the shake itself is a candy bar in liquid form. It’s a sensory experience that turns a simple craving into a culinary celebration.
What sets this version apart is not just the low‑carb approach, but the meticulous attention to flavor and texture. I replaced traditional sugar with erythritol to keep the sweetness just right, and I added a touch of sea salt to bring out the chocolate’s depth. The blend of almond flour and coconut oil gives it that buttery crunch without the heaviness of regular butter. I’ve tweaked the ratio of peanut butter to chocolate until it’s silky yet still has that signature Butterfinger snap. Most recipes get this completely wrong by over‑sweetening or under‑cooking the chocolate, but here, every component is in perfect harmony. This is hands down the best version you'll ever make at home. And if you’re skeptical, just give it a try—you’ll see.
I’ll be honest: I ate half the batch before anyone else got a taste, and that’s saying something. I’ve spent years perfecting low‑carb desserts, and this one is a revelation. The next section will walk you through what makes this shake so special, the ingredients that drive the flavor, and the techniques that keep it from falling flat. Stay with me here — this is worth it.
What Makes This Version Stand Out
- Flavor: The chocolate is rich, not bitter; the peanut butter is creamy and natural, not overly sweet. I balanced the sweetness with erythritol so it’s just enough to satisfy the palate without the sugar spike.
- Texture: The almond flour gives a subtle crunch, while the coconut oil keeps the shake silky. It’s like a candy bar that melts in your mouth.
- Simplicity: Only a handful of ingredients, all pantry staples, and the process takes less than an hour from start to finish.
- Uniqueness: The blend of low‑carb chocolate chips, cream cheese, and peanut butter creates a flavor profile that’s unmistakably buttery and indulgent.
- Crowd Reaction: Friends who’ve tried it say it’s the most satisfying low‑carb dessert, and they’re not just nodding; they’re demanding a second helping.
- Ingredient Quality: I use natural, unsweetened peanut butter and high‑quality chocolate chips to keep the flavor pure.
- Cooking Method: A gentle melt and a quick chill lock in the flavors and textures, avoiding the over‑cooking that ruins other recipes.
- Make‑Ahead Potential: The shake can be prepared a day in advance, chilled, and reheated with a splash of cream for the same silky finish.
Alright, let's break down exactly what goes into this masterpiece...
Inside the Ingredient List
The Flavor Base
Unsalted butter and coconut oil form the foundational base that delivers that buttery, chocolatey richness. Butter provides depth, while coconut oil adds a subtle tropical note that balances the chocolate’s intensity. Skipping either results in a flat, one‑dimensional flavor—think of it as removing the orchestra conductor from a symphony. A good tip: melt them together over low heat to avoid scorching, which can introduce a bitter edge.
The Texture Crew
Almond flour and cocoa powder are the unsung heroes that give this shake its signature thickness and mouthfeel. Almond flour adds a light, nutty crunch that echoes the original Butterfinger bite, while cocoa powder thickens the mixture, preventing it from becoming watery. If you’re gluten‑sensitive, you can swap almond flour for oat or sunflower seed flour—just be sure it’s gluten‑free certified. Remember, the ratio matters: too much flour will make it dry; too little will leave it soupy.
The Unexpected Star
Cream cheese is the secret agent that brings creaminess and a subtle tang to the shake. It also acts as a stabilizer, preventing separation when you chill the mixture. If you’re avoiding dairy, a vegan cream cheese alternative works fine, but you may need to adjust the amount of coconut oil to maintain texture. The key is to keep the cream cheese at room temperature before mixing so it blends smoothly.
The Final Flourish
Erythritol, vanilla extract, and a pinch of sea salt are the finishing touches that elevate the flavor profile. Erythritol sweetens without the aftertaste of other sugar substitutes, while vanilla brings warmth and depth. Sea salt, used sparingly, accentuates the chocolate’s richness and balances the sweetness. If you prefer a sweeter shake, you can add a few drops of stevia, but be cautious—stevia can be potent.
Everything's prepped? Good. Let's get into the real action...
The Method — Step by Step
- In a medium saucepan, combine the unsalted butter and coconut oil over low heat. Stir continuously until the mixture is fully melted and the oil is lightly browned, about 2 minutes. The slight caramelization will deepen the buttery flavor. Once melted, remove from heat and let it cool just enough so it doesn’t burn the next ingredients.
- In a separate bowl, whisk together the almond flour and cocoa powder until smooth. This dry mix will prevent clumps when you add the wet ingredients. If you notice any lumps, sift the flour through a fine mesh sieve.
- Add the melted butter mixture to the dry blend, stirring until a thick paste forms. This is where the texture starts to develop; the paste should be thick but still pliable. Let it sit for 30 seconds so the flour can absorb the butter and develop a richer flavor.
- Fold in the cream cheese, ensuring it’s softened to room temperature. Use a spatula to incorporate it smoothly—think of it as gently folding in a cloud of cream. The cream cheese will give the shake its silky finish and help stabilize the mixture.
- Add the heavy cream, peanut butter, and low‑carb chocolate chips. Stir gently until the chocolate chips are fully melted and the mixture is uniform. The chocolate should melt into a glossy, thick sauce that coats the other ingredients.
- Season with erythritol, vanilla extract, and sea salt. Taste as you go; the salt should enhance the chocolate without overpowering it. Watch Out: Over‑sweetening can mask the buttery flavor, so add erythritol gradually and keep the salt minimal.
- Pour the mixture into a shallow baking dish and chill in the refrigerator for at least 2 hours, or until firm enough to scoop. The chill locks in the flavors and gives the shake its signature thickness.
- Just before serving, drizzle a small amount of melted butter over the top for an extra glossy finish. If you prefer a lighter version, substitute with a thin layer of coconut oil.
- Serve in chilled glasses, and if you’re feeling fancy, top with a pinch of sea salt flakes or a few crushed almond flakes for added texture. Enjoy immediately for the best texture, or store in an airtight container for up to 3 days.
That’s it — you did it. But hold on, I've got a few more tricks that'll take this to another level...
Insider Tricks for Flawless Results
The Temperature Rule Nobody Follows
Maintaining the right temperature when melting butter and coconut oil is crucial. If the mixture is too hot, the chocolate will seize; if too cold, the almond flour will not bind properly. I always keep the heat low and use a thermometer to keep the butter at 180°F (82°C). This small step guarantees a silky texture and prevents scorching.
Why Your Nose Knows Best
Before adding the heavy cream, pause and sniff the mixture. If it smells nutty and buttery, you’re on the right track. A faint, sweet scent indicates the chocolate has melted correctly, while a sour odor could mean the cream cheese is too acidic. Trust your nose; it’s the ultimate flavor guide.
The 5‑Minute Rest That Changes Everything
After folding in the cream cheese, let the mixture rest for exactly five minutes. This pause allows the flour to fully absorb the butter, creating a smoother base. Skipping this step can result in a gritty texture that feels like chewing on crumbs.
The Secret Salt Trick
A pinch of sea salt at the end of the process brings out the chocolate’s depth. I use a small pinch, about 1/8 teaspoon, and sprinkle it evenly. If you prefer a less salty finish, reduce it to a quarter of a pinch; the chocolate will still shine.
The Quick Chill Method
If you’re short on time, you can use a shallow dish and freeze the shake for 30 minutes instead of chilling for 2 hours. The result is a slightly firmer texture that’s perfect for a quick dessert. Just be sure to let it sit at room temperature for a few minutes before scooping to avoid cracks.
Creative Twists and Variations
This recipe is a playground. Here are some of my favorite ways to switch things up:
Coconut‑Crunch Delight
Swap almond flour for shredded coconut and add a tablespoon of toasted coconut flakes on top. The coconut gives a tropical twist that pairs wonderfully with the chocolate.
Nutty Berry Burst
Add a handful of frozen berries to the mix before chilling. The berries will infuse a subtle fruity note, turning the shake into a dessert that feels like a summer treat.
Spiced Cinnamon Swirl
Stir in half a teaspoon of ground cinnamon and a pinch of nutmeg. The spices add warmth and complexity, making the shake feel like a cozy fall dessert.
Minty Fresh Twist
Add a few drops of peppermint extract after the chocolate has melted. The mint gives a refreshing finish that balances the richness.
Almond‑Butter Fusion
Replace peanut butter with almond butter and add a dash of almond extract. The almond flavors mingle with the chocolate, creating a nutty, buttery experience.
Chocolate‑Cocoa Explosion
Increase the cocoa powder by one tablespoon for an extra chocolate punch. The shake will become deeper and more intense, perfect for chocolate lovers.
Storing and Bringing It Back to Life
Fridge Storage
Store the shake in an airtight container in the refrigerator for up to 3 days. Before serving, let it sit at room temperature for 10 minutes to soften slightly. This prevents it from becoming too hard and ensures a smooth texture.
Freezer Friendly
The shake freezes well. Portion into small containers or freezer bags, seal tightly, and store for up to 2 months. Thaw in the refrigerator overnight and give it a quick stir before serving.
Best Reheating Method
To reheat, add a splash of heavy cream or coconut milk to the chilled shake and warm gently on the stove over low heat, stirring until smooth. Alternatively, microwave in 30‑second bursts, stirring in between, until warmed through. The tiny splash of liquid helps it steam back to perfection.