Picture this: it’s a rainy Tuesday night, the kind that makes you want to curl up with something sweet, but you’ve already raided the pantry for cookies and found only crumbs. I was staring at a bowl of overripe bananas that looked like they’d been through a war, and a half‑empty bag of chocolate chips that had been gathering dust for weeks. I thought, “What if I could turn this sad scene into the most decadent, melt‑in‑your‑mouth bar ever?” That thought turned into a kitchen experiment that nearly set off the smoke alarm, but the result? Pure, buttery bliss that made the whole house smell like a bakery on a sugar high. I dare you to taste this and not go back for seconds.
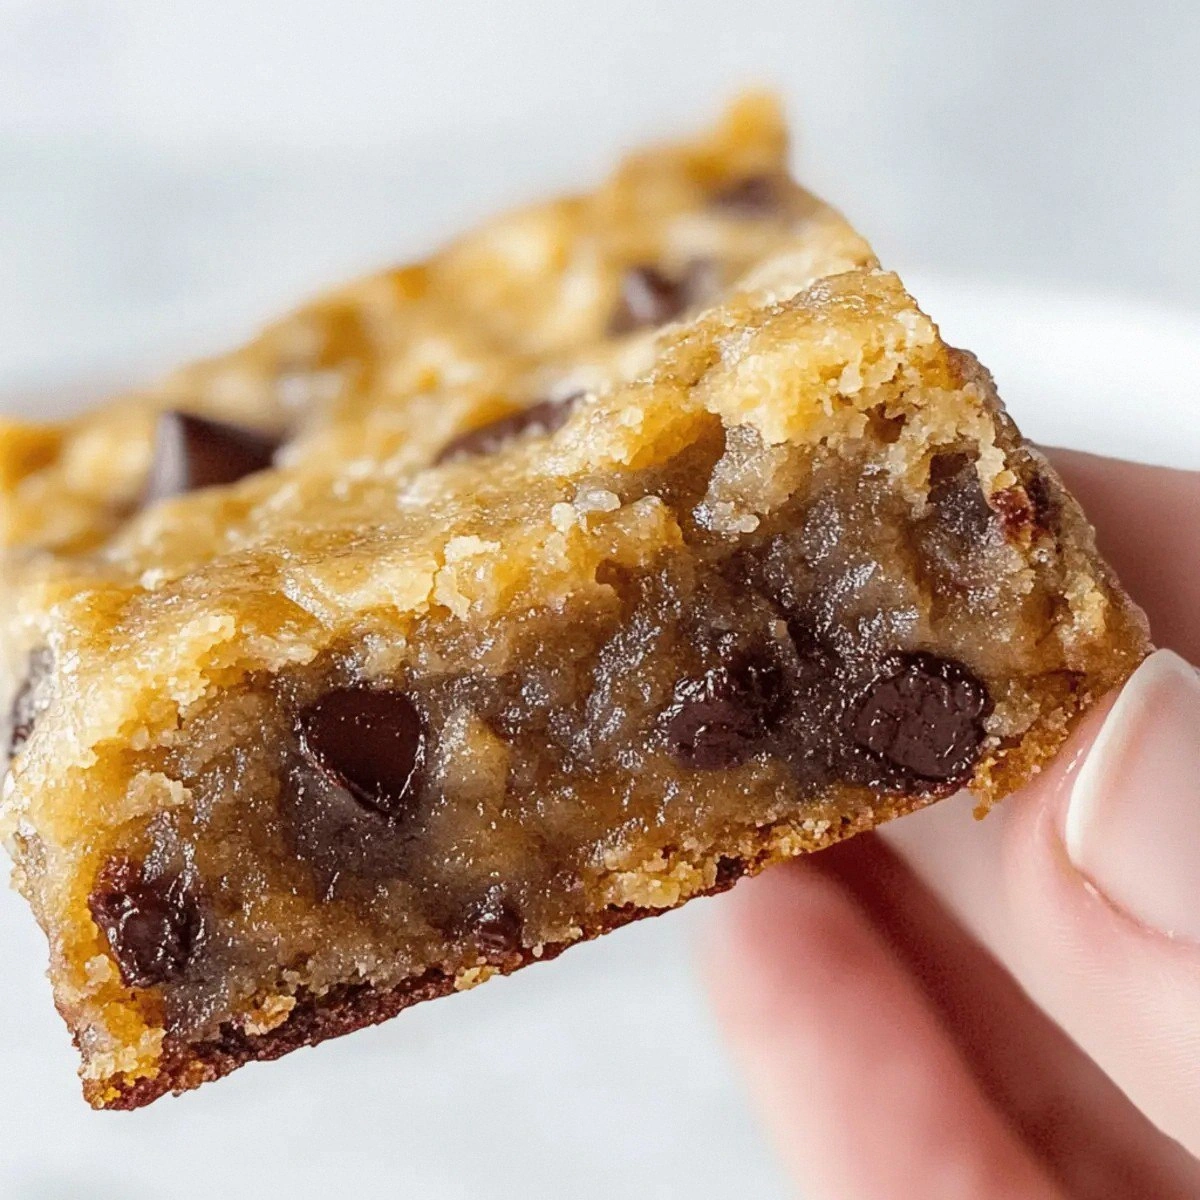
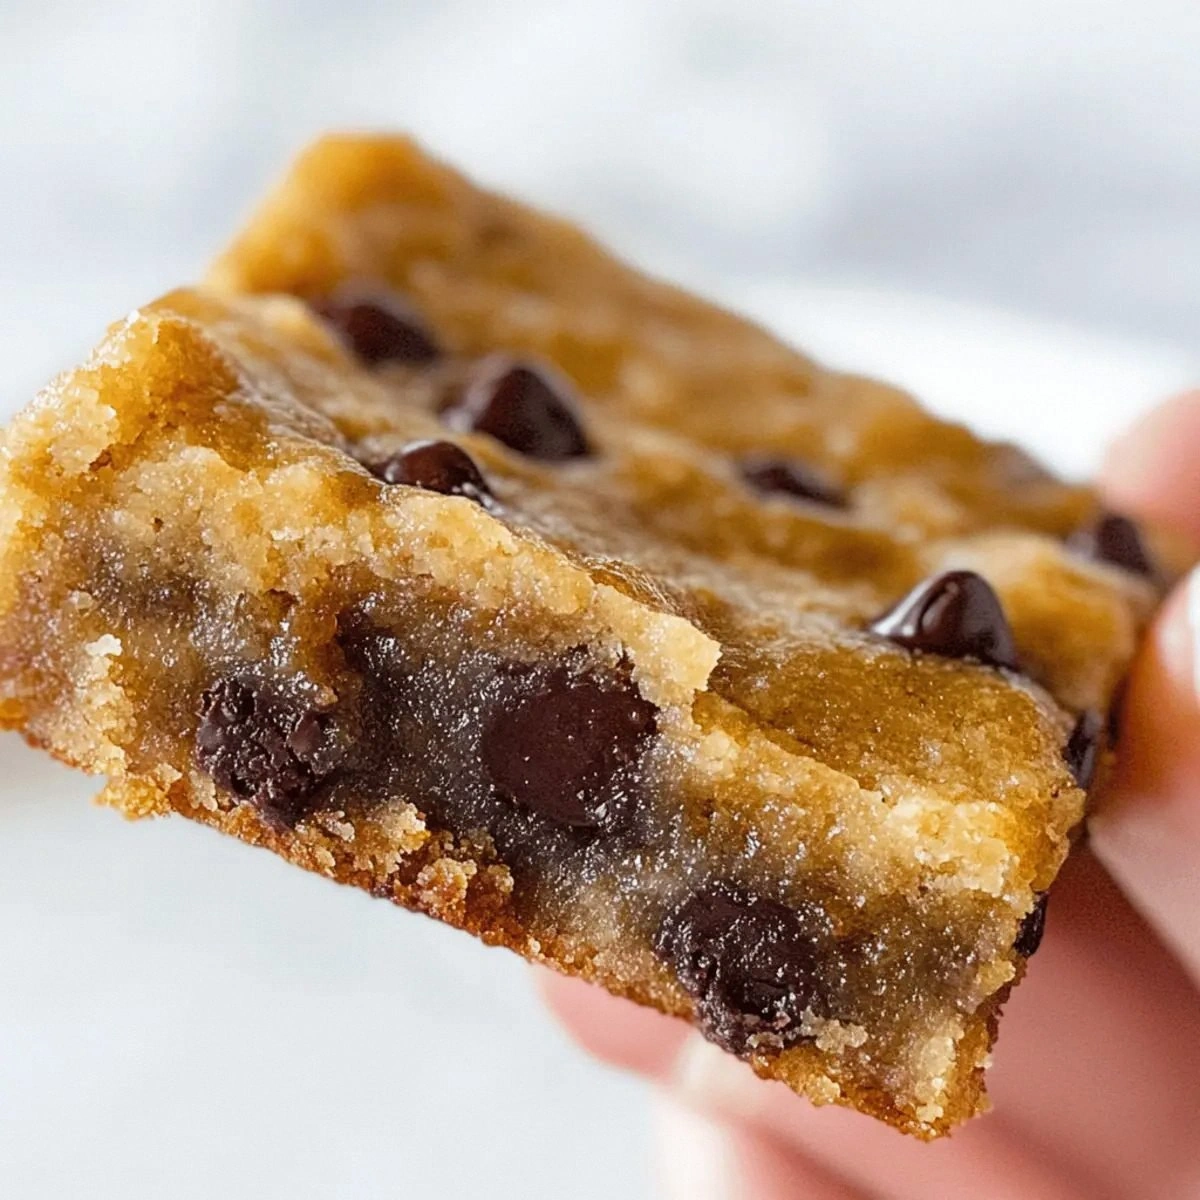
The moment I pulled the first batch out of the oven, the aroma hit me like a warm hug from an old friend—sweet banana notes mingling with toasted butter and chocolate that seemed to whisper, “You’ve just discovered the holy grail of comfort desserts.” The bars were glossy on top, with edges that pulled away from the pan as if they were shy about being touched, while the interior stayed moist, almost custardy, thanks to the perfect balance of banana moisture and butter richness. Most recipes get this completely wrong, either ending up dry as a desert or soggy like a swamp; this version hits the sweet spot like a perfectly tuned piano chord. I’ll be honest — I ate half the batch before anyone else got to try it, and the crumbs left behind were still good enough to make a second round.
What makes these bars truly stand out is a handful of secret moves that I’ll spill in this post. First, I fold the chocolate chips in at just the right moment so they stay glossy and don’t melt into a uniform brown sea. Second, I use a combination of melted butter and brown sugar that creates a caramel‑like base, giving each bite a depth you’d expect from a professional pastry chef. And third, the bananas are mashed just enough to keep texture but not so much that they turn the batter into a soup. The result is a bar that’s both chewy and crumbly, with chocolate pockets that burst like tiny fireworks when you bite into them. Okay, ready for the game‑changer? Let me walk you through every single step — by the end, you’ll wonder how you ever made it any other way.
What Makes This Version Stand Out
- Flavor Explosion: The caramelized butter and brown sugar create a rich, toasty backdrop that amplifies the natural sweetness of the bananas.
- Moisture Mastery: Overripe bananas bring in moisture without watering down the batter, keeping the bars soft and tender.
- Chocolate Distribution: Folding chocolate chips at the end ensures they stay distinct, offering pockets of melty goodness.
- Simplicity: Only nine ingredients, all pantry staples, mean you can whip this up without a special trip to the store.
- Universal Appeal: Kids love the sweet, banana‑chocolate combo, while adults appreciate the sophisticated buttery undertone.
- Make‑Ahead Magic: These bars keep their moisture for days, making them perfect for meal‑prep or a grab‑and‑go snack.
- Texture Harmony: A slight crisp on the top contrasts with a plush, cake‑like interior that’s almost custardy.
- Flexible Scaling: The recipe scales beautifully, so you can double for a party or halve for a quiet night.
Inside the Ingredient List
The Flavor Base
Unsalted butter, melted, is the golden thread that weaves everything together. It creates a glossy, caramel‑like crust once baked, and because it’s unsalted, you retain full control over the final salt level. If you skip the butter, you’ll lose that luxurious mouthfeel and the bars will feel flat. For the best result, choose a high‑quality European butter that has a higher butterfat content; it’ll melt smoothly and add a subtle nutty note. Pro tip: Let the butter cool just a tad before mixing with the sugar to avoid cooking the eggs.
The Sweet Symphony
Light brown sugar brings moisture and a hint of molasses, which deepens the flavor beyond plain white sugar. Its fine crystals dissolve quickly, ensuring a uniform batter without gritty pockets. Swapping it for dark brown sugar will intensify the molasses flavor, which can be delightful if you love a deeper, almost caramel taste. When measuring, pack the sugar gently to avoid over‑packing, which could make the bars overly sweet. Fun Fact: The brown color comes from the addition of molasses, a by‑product of sugar refining that was historically used to keep sugar from hardening.
The Texture Crew
All‑purpose flour provides the structural backbone, giving the bars enough body to hold together while still staying tender. Using cake flour would make them too delicate, while bread flour would turn them chewy. If you’re gluten‑free, a 1:1 blend of rice flour and tapioca starch works surprisingly well, though the texture will be slightly different. The fine salt is essential; it balances the sweetness and enhances the butter’s flavor, but a pinch too much can make the bars taste briny.
The Unexpected Star
Mashed overripe bananas are the secret moisture agents, turning this dessert into a moist, almost fudgy treat. Their natural pectin helps bind the batter, reducing the need for extra eggs or oil. If you use just‑ripe bananas, the bars will be drier and lack that deep banana flavor. Choose bananas that are speckled with brown spots and feel soft to the touch for maximum sweetness. The additional chocolate chips sprinkled on top create a crunchy crown that adds visual appeal and an extra burst of chocolatey goodness.
Everything's prepped? Good. Let's get into the real action...
The Method — Step by Step
-
Preheat your oven to 350°F (175°C) and line a 9×13‑inch baking pan with parchment paper, letting the paper hang over the edges for an easy lift later. While the oven warms, the kitchen will start to fill with the buttery scent that signals something delicious is about to happen. This is the moment of truth: if the oven isn’t hot enough, the bars won’t develop that coveted golden top. I like to place a small oven thermometer on the rack to ensure accuracy. Power transition: Okay, ready for the game‑changer?
Kitchen Hack: Lightly butter the parchment paper; it prevents sticking and gives the bars a subtle buttery edge. -
In a medium saucepan, melt the 1/2 cup of unsalted butter over medium heat until it’s just bubbling, then remove from heat and whisk in the 1 cup of light brown sugar until the mixture is smooth and glossy. You’ll hear a faint sizzle as the sugar meets the hot butter—listen for that sound; it means the sugar is dissolving properly. Let this caramel‑like mixture cool for about two minutes; this prevents the egg from scrambling when added. If you’re impatient, you can speed up cooling by spreading the mixture in a thin layer in a shallow bowl.
-
Beat in the large egg, 1 ½ tsp vanilla extract, and ½ tsp fine salt until the batter is light and slightly frothy, about 30 seconds. The batter should look glossy and a shade lighter, a sign that the egg has been fully incorporated. I always recommend using a whisk instead of a fork; it introduces a tiny amount of air that makes the final texture more tender. Watch Out: If the butter mixture is too hot, the egg will cook; always test with a fingertip—if it feels warm, give it a few more seconds to cool.
-
Sift the 1 cup of all‑purpose flour directly into the bowl and gently fold it in with a silicone spatula, stopping as soon as you no longer see dry flour. Over‑mixing here would develop gluten, making the bars dense instead of fluffy. The batter should be thick but still pourable; think of a thick pancake batter. If it feels too stiff, a splash of milk (about a tablespoon) can loosen it without compromising the banana flavor.
Kitchen Hack: Fold the bananas in last; they’re the most delicate component and can turn mushy if over‑handled. -
Stir in the 1 cup of mashed overripe bananas until just combined. The bananas should be evenly distributed, creating a marbled effect in the batter. This step adds the signature moist crumb that makes these bars so irresistible. Take a moment to sniff the batter; you should catch a sweet, tropical aroma that hints at the final flavor.
-
Gently fold in ¾ cup of chocolate chips, reserving the remaining ¼ cup for sprinkling on top before baking. The chips should stay whole, creating little chocolate islands throughout the bar. If you prefer extra gooeyness, you can add half of the reserved chips now and the rest on top.
-
Spread the batter evenly in the prepared pan, using an offset spatula to smooth the surface. Sprinkle the reserved chocolate chips over the top, pressing them lightly so they adhere. The top should look speckled, like a night sky dotted with chocolate stars. This next part? Pure magic. Let the batter rest for five minutes; this allows the flour to hydrate fully, resulting in a tender crumb.
-
Slide the pan into the pre‑heated oven and bake for 30‑35 minutes, or until the edges are golden brown and a toothpick inserted into the center comes out with just a few moist crumbs. The top will develop a thin, crackly crust that shatters like thin ice when you cut into it. Around the 20‑minute mark, rotate the pan 180° to ensure even browning. The kitchen will now be filled with a scent that could convince anyone that a bakery is next door.
-
Allow the bars to cool in the pan for 15 minutes, then use the overhanging parchment to lift them onto a wire rack. This cooling step lets the interior set, preventing them from falling apart when you cut them. Once completely cool, slice into squares or rectangles—my favorite size is about 2×2 inches, perfect for a bite‑size treat. And now the fun part: serve warm with a glass of cold milk, or let them sit at room temperature for that perfect chew.
That's it — you did it. But hold on, I've got a few more tricks that'll take this to another level...
Insider Tricks for Flawless Results
The Temperature Rule Nobody Follows
Always start with melted butter that’s just off the heat, not piping hot. If the butter is too hot, it can seize the sugar and create a gritty texture. Let it cool for a couple of minutes; you’ll hear a faint “pop” as the sugar settles, which is your cue to move on. I once tried to speed this up with a microwave and ended up with a caramel that tasted burnt. Trust the cooling period; it’s a small step that makes a massive difference.
Why Your Nose Knows Best
When the bars are baking, trust your sense of smell more than the timer. Around the 25‑minute mark, you’ll detect a sweet, buttery aroma that signals the crust is forming. If the scent turns nutty or slightly burnt, pull them out a minute early to avoid over‑browning. I’ve saved countless batches by listening to my nose, especially on ovens that run hot.
The 5‑Minute Rest That Changes Everything
After spreading the batter, let it sit for five minutes before popping it in the oven. This short rest lets the flour absorb the liquid, resulting in a tender crumb that’s not gummy. Skipping this step is a common mistake; the bars become dense and heavy. Think of it as a brief “marriage counseling” session for the ingredients—everyone gets to settle in.
Chocolate Chip Placement Strategy
Reserve a quarter cup of chips for the top and sprinkle them just before baking. This creates a crunchy, caramelized topping while the rest stay melty inside. If you fold all the chips in, you’ll lose that textural contrast that makes each bite exciting. I once tried a “all‑in” approach and missed the delightful crunch on top.
Cooling on a Wire Rack Is Non‑Negotiable
Transferring the bars to a wire rack prevents steam from making the bottom soggy. The air circulation helps the crust stay crisp, especially if you plan to store them later. If you leave them on the pan, the bottom will become a gummy mess, ruining the overall texture. This simple step is often overlooked, but it’s a game‑changer for texture preservation.
Creative Twists and Variations
This recipe is a playground. Here are some of my favorite ways to switch things up:
Nutty Banana Crunch
Stir in ½ cup of toasted chopped walnuts or pecans with the chocolate chips. The nuts add a buttery crunch that complements the soft banana interior. It’s perfect for those who love a bit of texture contrast. If you’re allergic, try sunflower seeds for a similar bite.
Double Chocolate Delight
Replace half of the chocolate chips with dark chocolate chunks and add a tablespoon of cocoa powder to the flour. The result is a richer, more intense chocolate flavor that still lets the banana shine. This version is ideal for serious chocolate lovers who want a dessert that feels indulgent.
Spiced Banana Bliss
Add ½ tsp of ground cinnamon and a pinch of ground nutmeg to the dry ingredients. The warm spices turn the bars into a cozy, autumn‑ready treat. Pair it with a drizzle of caramel sauce for an extra layer of decadence.
Fruit‑Burst Variation
Fold in ¼ cup of dried cranberries or chopped dried apricots along with the chocolate chips. The tartness of the dried fruit balances the sweet banana, creating a more complex flavor profile. It’s a great way to use up pantry leftovers.
Gluten‑Free Goodness
Swap the all‑purpose flour for a 1‑to‑1 gluten‑free blend, and add a tablespoon of xanthan gum to mimic the structure. The bars will be slightly more crumbly but still delicious. I’ve found that a blend of rice flour, potato starch, and tapioca flour works best.
Vegan Version
Replace the egg with a “flax egg” (1 tbsp ground flaxseed mixed with 3 tbsp water) and use coconut oil instead of butter. Use coconut sugar for the sweetener and dairy‑free chocolate chips. The texture changes a bit, becoming a tad denser, but the flavor remains spectacular.
Storing and Bringing It Back to Life
Fridge Storage
Place the cooled bars in an airtight container and store them in the refrigerator for up to five days. The moisture will stay locked in, and the bars will actually taste better after a night as the flavors meld. If you notice any condensation, pat the tops with a paper towel before sealing.
Freezer Friendly
Wrap individual bars in parchment paper, then place them in a zip‑top freezer bag. They’ll keep for up to three months. When you’re ready to enjoy one, let it thaw at room temperature for 20 minutes, then pop it in the microwave for 10‑15 seconds. The added splash of water (about a teaspoon) before reheating restores that fresh‑baked moisture.
Best Reheating Method
For a warm, gooey experience, preheat your oven to 300°F (150°C) and bake the bars for 5‑7 minutes, or until the chocolate chips on top are melty. This gentle heat revives the crisp edge while keeping the interior soft. Avoid microwaving for too long; a quick 10‑second zap can make them rubbery.