I still remember the night my kitchen turned into a science experiment. A handful of rhubarb stalks, a dash of sugar, and my over‑eager attempt at a “simple” cheesecake. The crust collapsed, the filling set like a hard rock, and the oven’s timer rang like a siren. I stared at the disaster, then laughed, because that laugh became the spark that birthed the Rhubarb Cheesecake you’re about to discover.
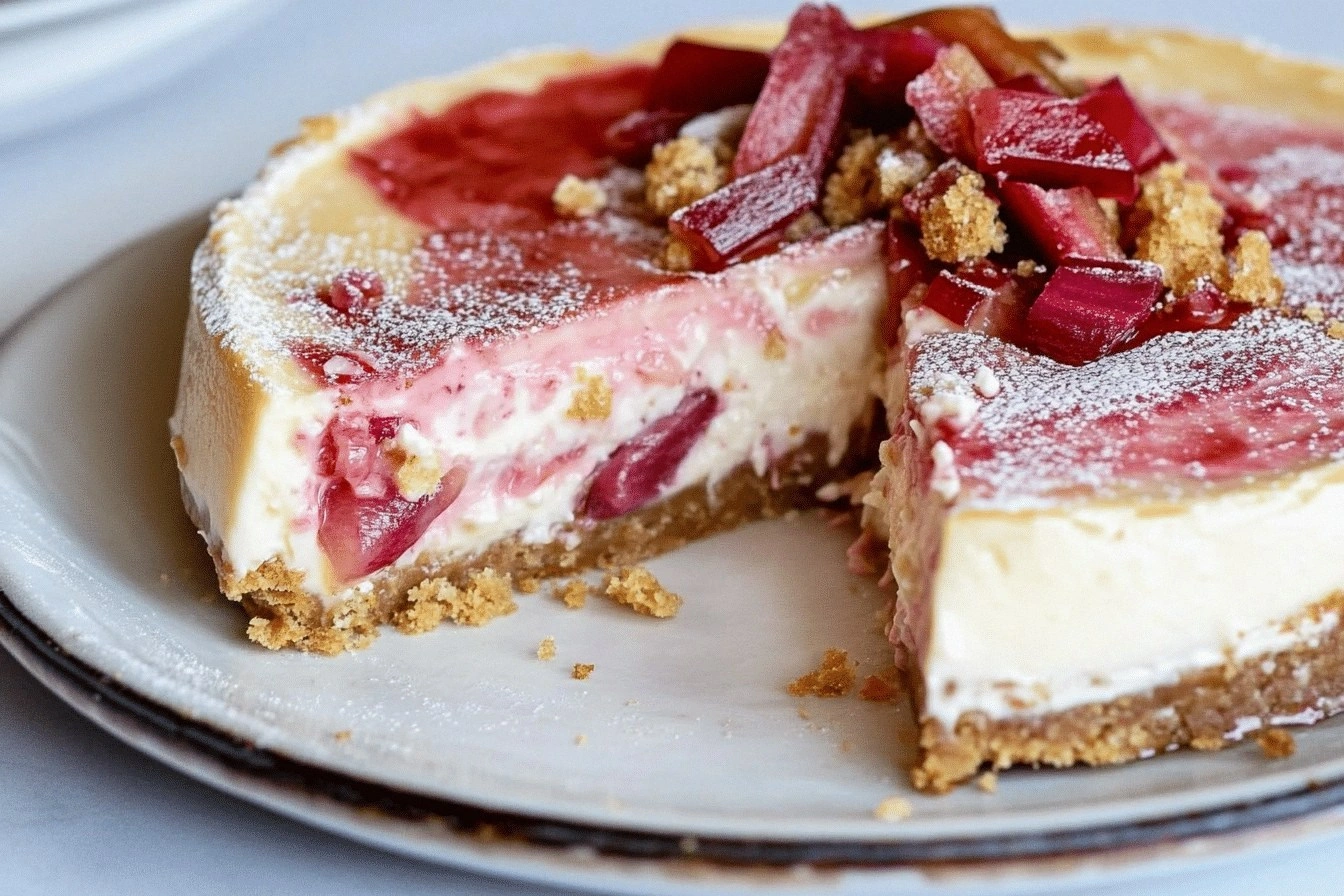
Picture this: a golden crust that crackles as you bite, a filling so creamy it melts on your tongue, and a tart ribbon of rhubarb that cuts through the richness like a sharp knife. The aroma that fills the kitchen is a sweet‑savory perfume—sweet vanilla, buttery crumbs, and the unmistakable zing of fresh rhubarb. The texture is a dance of smoothness and a subtle snap from the fruit, and the flavor is a harmonious balance of sweet and tart that lingers long after the last bite.
What sets this version apart is the meticulous attention to each element—crust, filling, fruit, and finishing touches. I’ve refined the process to eliminate common pitfalls, such as over‑baking or under‑cooking the rhubarb, and I’ve added a secret ingredient that elevates the cheesecake from good to unforgettable. The result is a dessert that feels like a luxurious treat, yet is surprisingly approachable for home cooks.
I dare you to taste this and not go back for seconds. I’ll be honest—once I had a plate of this on my kitchen counter and ate half before anyone else could try it. If you’ve ever struggled with a cheesecake that turns out too dry or too runny, you’re not alone, and I’ve got the fix. Let me walk you through every single step—by the end, you’ll wonder how you ever made it any other way.
What Makes This Version Stand Out
- Flavor: The combination of sweet cream cheese and tart rhubarb creates a layered taste profile that satisfies both sweet and savory cravings.
- Texture: A silky filling that holds its shape without being gummy, thanks to a balanced ratio of cream cheese to sour cream and a touch of flour.
- Crust: A buttery, slightly sweet graham cracker base that adds crunch and a subtle caramel note.
- Ease: Every step is designed to be straightforward—no complicated techniques or hard-to-find ingredients.
- Versatility: The recipe can be adapted for gluten‑free, vegan, or keto lifestyles with simple swaps.
- Make‑ahead: You can prepare the filling a day ahead, chill, and bake right before serving, making it perfect for parties.
- Presentation: The bright green rhubarb ribbons on a creamy white background look stunning on any plate.
- Result: A cheesecake that feels like a luxurious dessert, yet is surprisingly approachable for home cooks.
Alright, let’s break down exactly what goes into this masterpiece…
Inside the Ingredient List
The Flavor Base
Cream cheese is the heart of any cheesecake, and I use a full‑fat, room‑temperature variety to achieve a lush, velvety texture. The sugar balances the tanginess, but be careful not to over‑sweeten—too much sugar can mask the rhubarb’s bright acidity. If you’re craving a deeper flavor, consider adding a teaspoon of vanilla extract; it rounds out the richness without overpowering the fruit.
The Texture Crew
Sour cream adds moisture and a slight tang that complements the rhubarb, while a tablespoon of all‑purpose flour (or cornstarch for a gluten‑free version) helps stabilize the filling and prevents cracks. The eggs act as binders, but if you’re worried about over‑cooking, whisk them together with the sugar first to create a smoother batter. A pinch of salt brings all the flavors together, pulling out the sweetness of the cream cheese and the tartness of the rhubarb.
The Unexpected Star
Rhubarb isn’t just a garnish; it’s the star that gives this cheesecake its signature zing. Fresh rhubarb is best, but if you’re out of season, frozen rhubarb works—just thaw and drain thoroughly. When chopping, aim for bite‑size pieces so they cook evenly and release their juices. A tablespoon of lemon zest and a splash of lemon juice brighten the overall flavor, cutting through the richness and adding a subtle citrus note.
The Final Flourish
The crust is a simple yet essential component. Combine graham cracker crumbs with melted butter and a touch of sugar; press firmly into the pan to create a sturdy base. The buttery crumbs add a caramelized sweetness that balances the tart rhubarb. If you’re feeling adventurous, sprinkle a few pistachios or candied ginger on top before baking for an extra layer of texture and flavor.
Everything's prepped? Good. Let's get into the real action…
The Method — Step by Step
- Preheat your oven to 325°F (163°C). Line a 9‑inch springform pan with parchment paper, ensuring the paper extends up the sides. This step guarantees easy release and a clean finish. I swear this trick saves me from a sticky situation every time.
- In a medium bowl, combine the graham cracker crumbs, melted butter, and ¼ cup sugar. Mix until the crumbs are evenly coated and the mixture looks like wet sand. Press the mixture into the bottom of the prepared pan, using the back of a spoon or a flat glass to create an even layer. This forms the buttery, crunchy base that will cradle the filling.
- Allow the crust to chill in the fridge for 10 minutes while you prepare the filling. This helps the butter set, preventing the crust from becoming soggy during baking. The cool crust also gives a nice contrast to the warm filling.
- In a large mixing bowl, beat the softened cream cheese on medium speed until smooth and creamy, about 2 minutes. Add the sugar and vanilla extract, and continue beating until the mixture is pale and fluffy. This step is critical; a smooth base ensures a silky texture in the final cheesecake.
- Whisk in the eggs one at a time, fully incorporating each before adding the next. The eggs bind the filling, giving it structure without making it rubbery. If you’re concerned about over‑mixing, keep the beaters on low after each addition.
- Stir in the sour cream, flour, and a pinch of salt until just combined. The flour helps set the filling and prevents cracks. Don’t over‑mix; a few lumps are okay, as they will disappear during baking.
- Fold in the chopped rhubarb, lemon zest, and lemon juice gently. The rhubarb should be evenly distributed; this gives the cheesecake its signature bright green swirls. If you prefer a smoother look, pulse the rhubarb in a food processor until finely chopped.
- Pour the filling over the chilled crust, smoothing the top with a spatula. Tap the pan gently on the counter to release any air bubbles. This is the moment of truth—watch the batter settle into a uniform layer.
- Bake for 45–50 minutes, or until the edges are set and the center is just slightly jiggly. Remove from the oven and immediately place the pan on a wire rack. Let it cool to room temperature, then chill for at least 4 hours, preferably overnight. The chilling step allows the flavors to meld and the texture to firm up.
That's it—you did it. But hold on, I've got a few more tricks that'll take this to another level…
Insider Tricks for Flawless Results
The Temperature Rule Nobody Follows
Many bakers bake at 350°F, but 325°F gives a gentler heat that prevents the cheesecake from cracking. The slower bake allows the filling to set evenly, giving that silky mouthfeel. If you’re in a hurry, you can bump the temperature to 350°F, but be prepared for a slightly firmer texture.
Why Your Nose Knows Best
As the cheesecake bakes, keep an eye on the aroma. A sweet, buttery scent indicates the crust is golden, while a faint lemony tang signals the rhubarb is cooking through. Trust your nose—it’s a reliable indicator of doneness.
The 5‑Minute Rest That Changes Everything
After removing the cheesecake from the oven, let it rest on a wire rack for 5 minutes before transferring to a cooling rack. This brief pause allows the internal temperature to stabilize, reducing the risk of cracks and ensuring a smooth finish.
The “No‑Crack” Water Bath
Line a large baking dish with foil and fill it with hot water until it reaches halfway up the side of the springform pan. Baking the cheesecake in this water bath keeps the heat evenly distributed and prevents the edges from over‑cooking. If you don’t have a water bath, simply place the pan on a lower rack and keep an eye on the edges.
The “Chill‑Then‑Serve” Trick
Chilling the cheesecake for at least 4 hours, or overnight, not only firms the texture but also allows the rhubarb juices to meld with the cream cheese. The result is a richer, more cohesive flavor profile that tastes like a well‑balanced symphony.
Creative Twists and Variations
This recipe is a playground. Here are some of my favorite ways to switch things up:
Raspberry Rhubarb Fusion
Swap half the rhubarb for fresh raspberries to add a pop of color and a berry sweetness. The raspberries complement the tartness of the rhubarb and create a visually stunning swirl.
Almond‑Infused Crust
Add ½ cup finely ground almonds to the crust mixture for a nutty flavor and a slightly denser texture. The almonds also provide a subtle crunch that contrasts with the creamy filling.
Chocolate‑Rhubarb Delight
Fold in ¼ cup dark chocolate chips into the filling for a decadent twist. The chocolate’s bitterness pairs beautifully with the sweet‑tart profile of the rhubarb.
Citrus‑Zest Variation
Replace the lemon zest with orange zest and add a splash of orange juice. The citrusy brightness lifts the entire cheesecake, giving it a fresh, summery feel.
Gluten‑Free Option
Use a gluten‑free graham cracker mix or crushed gluten‑free crackers in the crust. The rest of the recipe remains unchanged, ensuring a perfect gluten‑free cheesecake.
Vegan Version
Swap the cream cheese for a vegan cream cheese alternative, use coconut milk instead of sour cream, and replace eggs with flaxseed meal mixed with water. The texture may be slightly denser, but the flavor remains rich.
Storing and Bringing It Back to Life
Fridge Storage
Store the cheesecake in an airtight container in the refrigerator for up to 5 days. Keep the springform pan in place to maintain its shape. When you’re ready to serve, let it sit at room temperature for 15 minutes to soften slightly.
Freezer Friendly
Wrap the cheesecake tightly in plastic wrap and then in foil before freezing. It will keep well for up to 2 months. Thaw overnight in the refrigerator before serving.
Best Reheating Method
To reheat, place a slice on a microwave‑safe plate and heat on medium for 15–20 seconds. For a more even heat, wrap the slice in a damp paper towel and microwave for 20 seconds. This trick steams the cheesecake back to perfection without drying it out.