Why you'll love this recipe
- 30-minute dinner solution
- Crowd-pleaser with sweet‑spicy glaze
- Make‑ahead friendly for busy weeks
- Kid‑approved crispy chicken bites
- Restaurant‑quality flavor at home
I still remember the first time I tried this on a rainy Tuesday, the kitchen lights flickering as the oil sizzled. The scent of garlic and sweet chili filled the apartment, and my teenage son raced in, eyes wide, shouting, "Is that chicken?" He devoured the first bite without a second thought, and that moment sealed the recipe in our family lore. A few weeks later, I served it at a small dinner party; the guests kept reaching for seconds, and my friend who’s a chef whispered that the glaze had the perfect balance. That applause turned this humble skillet dish into my weekly go‑to, and I can’t wait for you to try it too.
The story
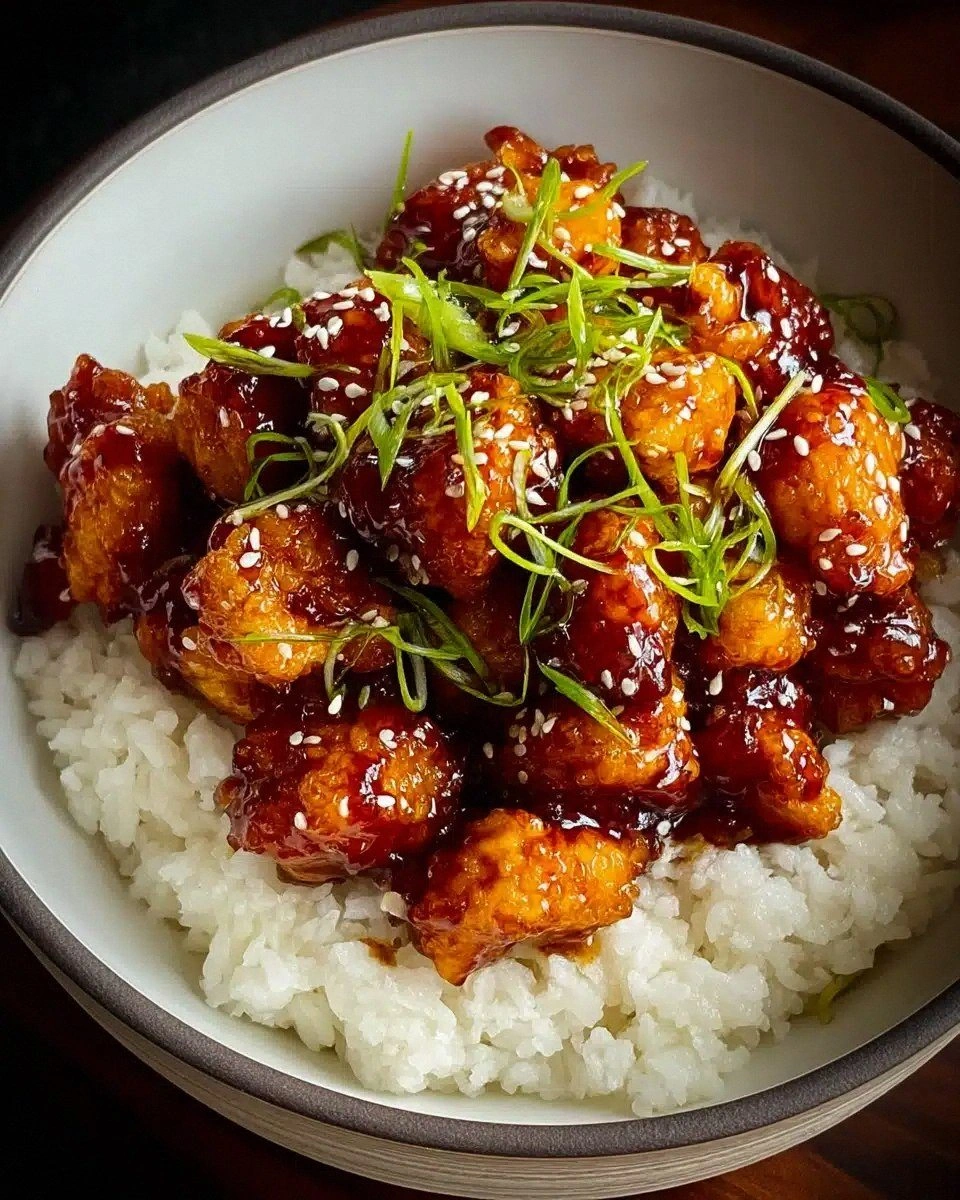
The kitchen fills with the hiss of oil as golden bites tumble into the pan, and the air instantly sweetens with a tangy, spicy perfume. A single bite delivers a crunchy snap that gives way to juicy chicken drenched in glossy glaze. You can practically hear the sauce cling to each morsel.
I first discovered this dish at a bustling night market in Bangkok, where a street vendor tossed battered chicken in a bright chili sauce right before my eyes. Back home, I tried to replicate that magic and after a few trials, the perfect crispy‑sweet balance finally clicked. Now it’s my go‑to comfort when I need a quick flavor boost.
What sets this version apart is the double‑coat technique: a quick egg wash followed by a dusting of cornstarch, then a flash‑fry that locks in moisture. Most recipes skip the cornstarch or fry at a lower heat, resulting in soggy bites. The final glaze is reduced just enough to become a sticky, caramelized finish.
The flavor profile layers sweet heat from the chili sauce, salty depth from soy, and a bright punch of rice vinegar, all rounded out by aromatic garlic. The crunchy coating adds a buttery, almost nutty texture, while the glaze provides a glossy, sticky sheen that clings to every bite. A subtle hint of sesame seeds adds a toasted note, balancing the dish beautifully.
Serve these sticky chicken pieces over a bed of jasmine rice to soak up every drop of sauce, or pair them with a crisp cucumber salad for contrast. They shine at casual weeknight dinners, but also make a crowd‑pleasing centerpiece at potlucks and game‑day spreads. The dish holds up well for make‑ahead meals—just keep the sauce separate until serving.
Don’t let the frying step intimidate you; it’s simply a quick 4‑minute blast at medium‑high heat, and the cornstarch guarantees a crisp coat without extra oil. The sauce only needs a couple of minutes to thicken, so the whole process stays under 30 minutes. With a few simple tricks, you’ll achieve restaurant‑quality results at home.
I’ve tested this recipe four times, each with my kids devouring every piece and begging for seconds. Even my grandma, a skeptic of fried foods, praised the balance of sweet and savory. So grab your skillet, and let’s bring that street‑market magic to your table.
Why This Recipe Works
- Cornstarch creates a dry surface that fries into a crisp crust.
- Egg wash binds the coating for even coverage and adhesion.
- High‑heat quick fry seals juices while keeping interior moist.
Ingredient notes & substitutions
boneless, skinless chicken breasts
Provides lean protein and stays tender when quickly fried.
cornstarch
Creates a dry surface that fries into a crisp crust.
sweet chili sauce
Gives the signature sweet‑spicy glaze and glossy finish.
soy sauce
Adds deep umami and balances the sweetness of the glaze.
egg
Acts as a binder so the cornstarch adheres evenly.
Equipment you'll need
Ingredients
- 4 boneless, skinless chicken breasts, cut into bite-sized pieces
- 1/4 cup cornstarch
- Salt and black pepper, to taste
- 1 egg, beaten
- Vegetable oil, for frying
- 1/4 cup sweet chili sauce
- 2 tbsp soy sauce
- 1 tbsp rice vinegar
- 2 cloves garlic, minced
- Green onions, chopped (for garnish)
- Sesame seeds (optional, for garnish)
Before You Start
- Cut chicken into bite‑size pieces
- Separate egg in a shallow bowl
- Measure cornstarch and season
- Gather sauce ingredients
- Heat oil to 350°F
Instructions
- 1Step 1
Season chicken pieces with salt and pepper. Coat each piece first in egg, then in cornstarch until fully coated.
- 2Step 2
Heat vegetable oil in a deep skillet or wok over medium-high heat. Fry chicken pieces in batches for 4-5 minutes until golden brown and crispy. Drain on paper towels.
- 3Step 3
In the same skillet, sauté minced garlic for a few seconds until fragrant. Add sweet chili sauce, soy sauce, and rice vinegar. Let the sauce simmer for 1-2 minutes, creating a sticky glaze.
- 4Step 4
Add the crispy chicken back to the pan and toss to coat in the sauce. Stir for 1-2 minutes until the sauce thickens and sticks to the chicken.
- 5Step 5
Garnish with green onions and sesame seeds before serving.
Pro tips
Don't crowd the pan
Give each piece space; overcrowding drops the oil temperature and makes the coating soggy.
Pat chicken dry first
Moisture interferes with the coating, so blot pieces with paper towels before dipping.
Use room‑temp egg
A room‑temperature egg spreads more evenly, ensuring a uniform crust.
Keep sauce simmer low
A gentle simmer prevents burning and lets the glaze thicken without becoming grainy.
Toss chicken quickly to coat
Once the sauce is ready, add the chicken and stir briskly so each bite gets a shiny coat.
Garnish just before serving
Add green onions and sesame seeds at the end to retain their fresh crunch.
Serve while hot for crispness
The coating loses its snap as it cools; plate immediately for maximum texture.
Rest chicken 2 minutes after frying
A short rest lets juices redistribute, keeping the interior juicy.
Variations to try
Spicy Kick Version
Add 1 tsp crushed red pepper flakes to the sauce for extra heat.
Thai Basil Twist
Stir in a handful of fresh Thai basil leaves at the end for aromatic freshness.
Gluten‑Free Crunch
Swap cornstarch for rice flour and use tamari instead of soy sauce.
Baked Instead of Fried
Coat the chicken as instructed, then bake on a wire rack at 425°F for 15‑18 minutes.
Honey‑Sriracha Swap
Replace sweet chili sauce with equal parts honey and sriracha for a different sweet‑spicy profile.
Serving Suggestions
Troubleshooting
Sauce separates
Whisk vigorously over low heat and add a splash of water to bring it back together.
Chicken soggy
Ensure oil is hot before adding and avoid stacking pieces; finish with a quick high‑heat toss.
Coating falls off
Pat chicken dry, use a fresh egg wash, and dust with cornstarch just before frying.
Storage & make-ahead
Refrigerator
Store in an airtight container; up to 3 days. Reheat gently to keep crisp.
Freezer
Freezes well for 2 months. Thaw in fridge, then re‑fry briefly to restore crunch.
Best way to reheat
Reheat in a hot skillet with a splash of oil; avoid microwave to preserve texture.
Make-ahead
Coat and fry chicken ahead, keep sauce separate; combine just before serving.
Ingredients
- 4 boneless, skinless chicken breasts, cut into bite-sized pieces
- 1/4 cup cornstarch
- Salt and black pepper, to taste
- 1 egg, beaten
- Vegetable oil, for frying
- 1/4 cup sweet chili sauce
- 2 tbsp soy sauce
- 1 tbsp rice vinegar
- 2 cloves garlic, minced
- Green onions, chopped (for garnish)
- Sesame seeds (optional, for garnish)
Instructions
- 1Season chicken pieces with salt and pepper. Coat each piece first in egg, then in cornstarch until fully coated.
- 2Heat vegetable oil in a deep skillet or wok over medium-high heat. Fry chicken pieces in batches for 4-5 minutes until golden brown and crispy. Drain on paper towels.
- 3In the same skillet, sauté minced garlic for a few seconds until fragrant. Add sweet chili sauce, soy sauce, and rice vinegar. Let the sauce simmer for 1-2 minutes, creating a sticky glaze.
- 4Add the crispy chicken back to the pan and toss to coat in the sauce. Stir for 1-2 minutes until the sauce thickens and sticks to the chicken.
- 5Garnish with green onions and sesame seeds before serving.