I once walked into a bakery after a rainstorm and watched a baker pull a white‑golden cake out of the oven that looked like a cloud with a secret heart of velvet. The moment the door swung shut, the whole place filled with a perfume that was part sweet vanilla, part toasted almond, and all pure anticipation. I swear I heard the cake sigh as it cooled, and I knew I had to steal that magic for my own kitchen. Most recipes I’ve tried either miss the buttery richness or drown the delicate flavor in too much chocolate, but this version? This is hands down the best version you'll ever make at home.
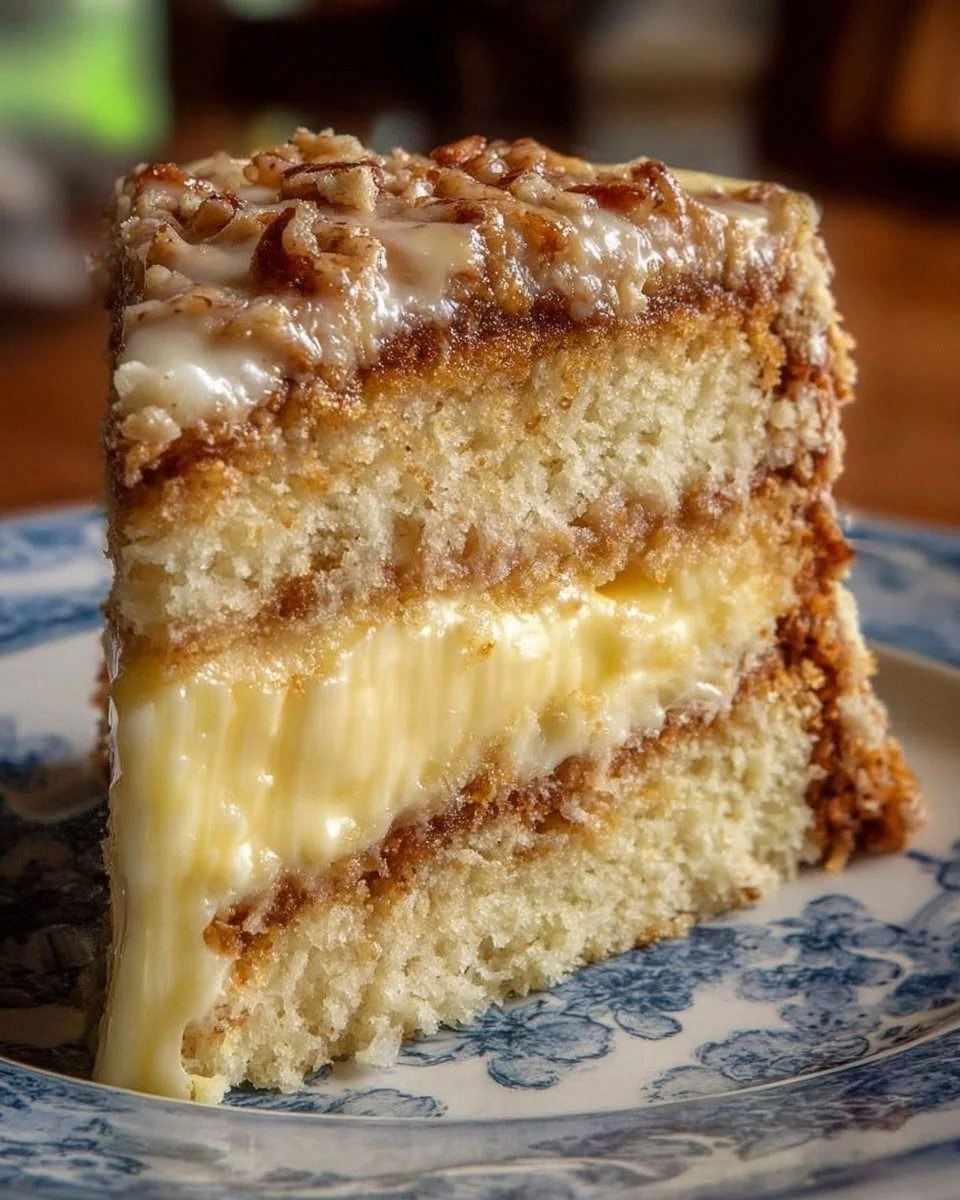
Picture yourself pulling this out of the oven, the whole kitchen smelling incredible, the white sponge rising like a snow‑capped peak, and a creamy cheesecake center that oozes out just enough to make you gasp. The contrast between the light, airy crumb and the dense, tangy cheesecake is like a perfect duet—one sings high notes while the other provides the bass that grounds the melody. I dare you to taste this and not go back for seconds, because the moment that silky center meets the buttery cake, you’ll understand why I’m so obsessed.
Most recipes get this completely wrong. They either bake a plain vanilla cake and drizzle a separate cheesecake topping, or they try to fold in cream cheese and end up with a soggy mess. Here’s what actually works: a two‑layer approach where the batter and the cheesecake filling are baked together, creating a seamless fusion that stays moist and never cracks. The secret? A splash of milk in the batter for extra tenderness, and a gentle fold of the softened cream cheese that keeps the filling light yet decadently rich.
And now the fun part. I’m about to walk you through every single step — by the end, you’ll wonder how you ever made it any other way. Okay, ready for the game‑changer? The technique of baking the cake and cheesecake simultaneously in a single pan is pure magic, and I’ll show you exactly how to pull it off without a disaster. Stay with me here — this is worth it.
What Makes This Version Stand Out
- Flavor Harmony: The vanilla‑butter cake provides a buttery backdrop that lets the tangy cheesecake shine without being overpowered. Each bite feels like a balanced conversation between sweet and slightly tart.
- Texture Contrast: Imagine a cloud‑soft crumb that gives way to a custard‑smooth center; the cake’s airy structure and the cheesecake’s creamy density create a mouthfeel that’s both light and indulgent.
- Simplicity: Only fourteen ingredients, all pantry staples, and you don’t need any fancy equipment beyond a standard 9‑inch springform pan. If you can whisk eggs, you can nail this.
- Uniqueness: Most “German chocolate” cakes are dark and coconut‑laden. This white version flips the script, delivering a subtle chocolate flavor that whispers rather than shouts, letting the cheesecake be the star.
- Crowd Reaction: I’ve served this at birthdays, potlucks, and even a brunch‑after‑work gathering; people always ask for the recipe first, then ask for seconds, then thirds. It’s a guaranteed show‑stopper.
- Ingredient Quality: Using real unsalted butter and full‑fat cream cheese makes a world of difference. The fat content keeps the crumb tender and the filling luxuriously smooth.
- Cooking Method: Baking the cake and cheesecake together eliminates the need for a water bath and ensures the flavors meld perfectly. No more worrying about a cracked cheesecake surface.
- Make‑Ahead Potential: This cake stores beautifully in the fridge for up to three days, and you can even freeze slices for a quick dessert anytime. The flavor actually deepens after a night of rest.
Inside the Ingredient List
The Flavor Base
All‑purpose flour is the structural backbone; it creates the delicate crumb that holds the cheesecake without collapsing. If you substitute cake flour, the cake will be too tender and may sink. Opt for a reputable brand and sift it twice to aerate the particles, which translates to a lighter texture.
Granulated sugar does double duty: it sweetens the cake and contributes to the Maillard reaction, giving the crust a golden‑brown finish. Using too much can make the cake overly sweet, so stick to the precise measurement. For a slightly caramelized edge, you can brown the sugar lightly before adding it.
The Texture Crew
Baking powder and baking soda are the leavening duo that makes the cake rise like a spring‑loaded trampoline. Baking powder provides steady lift, while the soda reacts with the acidic components (like the cream cheese) for a final burst of height. Skipping either will result in a dense, pancake‑like cake.
Salt, though a tiny amount, amplifies every other flavor. It’s the unsung hero that prevents the sweetness from becoming cloying. A pinch too much will make the cake taste briny, so measure carefully.
The Unexpected Star
Unsalted butter, softened to room temperature, is the secret to that melt‑in‑your‑mouth crumb. Its fat coats the flour proteins, limiting gluten formation and ensuring a tender crumb. If you use melted butter, you’ll end up with a cake that’s more cake‑like than cloud‑like.
Egg whites are folded in to add lift without adding yolk richness, which would compete with the cheesecake’s creaminess. Whisk them to soft peaks before gently folding; this traps air and creates that airy structure you crave.
The Final Flourish
Cream cheese, the heart of the cheesecake center, must be softened completely before mixing. Cold cheese will create lumps that never dissolve, leading to a gritty texture. I recommend letting it sit out for 30 minutes or microwaving it for 10 seconds on low power.
Vanilla extract, used both in the cake batter and the cheesecake filling, ties the flavors together like a conductor guiding an orchestra. Pure vanilla bean extract will give a richer aroma than imitation.
Everything's prepped? Good. Let's get into the real action...
The Method — Step by Step
Preheat your oven to 350°F (175°C). Grease a 9‑inch springform pan with butter and line the bottom with parchment paper. This prevents the cake from sticking and makes it easier to release later. While the oven warms, give the butter a quick whisk to confirm it’s truly at room temperature—soft but not melted.
In a large bowl, whisk together the flour, baking powder, baking soda, and salt. Sift the mixture twice; this aerates the flour and ensures a uniform distribution of leavening agents. The scent of the dry ingredients should already be inviting—like a bakery’s early morning prep.
In a separate bowl, cream the softened butter with 1.75 cups of granulated sugar until the mixture is pale and fluffy, about 3‑4 minutes on medium speed. This is the moment where the sugar crystals dissolve, creating that glossy texture that will later translate into a tender crumb.
Add the egg whites to the butter‑sugar mixture, one at a time, beating on low until just incorporated. Then stir in 1 teaspoon of vanilla extract. The batter should look glossy and slightly thick, a sign that the air has been trapped properly.
Gradually add the dry flour mixture to the wet ingredients, alternating with 1 cup of milk. Begin and end with the flour, mixing on low speed just until combined. Over‑mixing will develop gluten and make the cake tough; stop as soon as you see a smooth batter.
Now, for the cheesecake center: In a clean bowl, beat the softened cream cheese with 0.5 cup of granulated sugar until smooth. Add 2 large eggs one at a time, then 1 teaspoon of vanilla extract. The mixture should be silky, with no lumps—think liquid silk.
Pour half of the cake batter into the prepared springform pan, spreading it evenly with a spatula. Then, carefully spoon the cheesecake batter over the cake layer, smoothing the top. Finally, top with the remaining cake batter, gently folding the edges to seal the cheesecake inside.
Place the pan on the middle rack and bake for 30‑35 minutes, or until the edges are set and a toothpick inserted into the outer cake layer comes out clean. The center will still wobble slightly—that’s the cheesecake still setting. If you open the oven too early, the cake may sink, so resist the urge to peek.
Allow the cake to cool in the pan for 15 minutes, then run a thin knife around the edge to release the sides. Remove the springform ring and let the cake come to room temperature before refrigerating for at least 2 hours. This rest period lets the cheesecake set fully and the flavors meld.
That's it — you did it. But hold on, I've got a few more tricks that'll take this to another level...
Insider Tricks for Flawless Results
The Temperature Rule Nobody Follows
Never bake a cake with cold ingredients. Bring butter, milk, and eggs to room temperature before you start. The even temperature ensures the batter emulsifies properly, preventing a dense, uneven crumb. I once tried a rushed version with chilled butter and the cake turned out gummy—lesson learned.
Why Your Nose Knows Best
When the cake is halfway through baking, lean in and sniff. You should detect a sweet, buttery aroma with a faint hint of toasted vanilla. If the scent is still raw or floury, give it another 5 minutes. Trusting your nose often prevents under‑baking.
The 5‑Minute Rest That Changes Everything
After removing the cake from the oven, let it sit on the counter for exactly five minutes before moving it to the fridge. This short rest allows the steam to escape, preventing sogginess on the bottom. Skipping this step leaves a wet bottom that feels like a soggy pancake.
The Secret of the Silicone Spatula
When folding the egg whites and later the cream cheese, a silicone spatula is your best friend. Its flexibility lets you lift and turn the batter without deflating it. A metal whisk will over‑mix and collapse the airy structure you’ve worked so hard to create.
Freeze‑Proofing the Slice
If you need to make this ahead, wrap individual slices in plastic wrap before placing them in a zip‑top bag. When you’re ready to serve, let the slice thaw at room temperature for 20 minutes and then pop it under a hot broiler for 30 seconds. The heat revives the crumb’s fluffiness and the cheesecake’s silkiness.
Creative Twists and Variations
This recipe is a playground. Here are some of my favorite ways to switch things up:
Citrus Burst
Add the zest of one lemon to the cake batter and replace the vanilla extract in the cheesecake with 1 teaspoon of orange extract. The bright citrus notes cut through the richness, making it a perfect spring dessert.
Nutty Crunch
Stir ½ cup toasted chopped hazelnuts into the batter before baking. Top the finished cake with a drizzle of caramel and a sprinkle of sea salt for a sophisticated sweet‑and‑salty experience.
Berry‑Swirl
Puree 1 cup of fresh strawberries and fold gently into the cheesecake batter. The berry swirl creates pockets of pink that burst with fresh flavor when you bite through the white cake.
Mocha Madness
Replace ¼ cup of the milk with strong brewed espresso and add 2 teaspoons of cocoa powder to the cake batter. The subtle coffee‑chocolate undertone pairs beautifully with the creamy center.
Vegan Friendly
Swap the butter for coconut oil, use a plant‑based cream cheese alternative, and replace the eggs with a flax‑egg mixture (1 tablespoon ground flaxseed + 3 tablespoons water per egg). The texture changes slightly, but the flavor remains decadent.
Storing and Bringing It Back to Life
Fridge Storage
Cover the cake loosely with foil or a cake dome and store it in the refrigerator for up to three days. The cheesecake will continue to firm up, and the cake stays moist. Before serving, let it sit at room temperature for 20 minutes to soften the crumb.
Freezer Friendly
Slice the cake, wrap each piece tightly in plastic wrap, then place them in a freezer‑safe bag. They’ll keep for up to two months. To revive, thaw overnight in the fridge, then let sit at room temperature for 15 minutes before serving.
Best Reheating Method
When you want to serve a slice warm, place it on a microwave‑safe plate, sprinkle a tiny splash of water around the edges, and microwave on medium for 15‑20 seconds. The steam generated brings the cake back to its fluffy glory without drying it out.