I'll be honest — the first time I attempted baked brie, it was a complete disaster. The cheese oozed out everywhere, the pastry was soggy, and my dinner guests politely nibbled at what looked like a culinary crime scene. Fast forward through three months of obsessive testing, countless wheels of expensive French cheese, and one particularly memorable evening where I ate an entire wheel by myself while standing over the kitchen sink at midnight. That disaster led me to discover something incredible: the perfect baked brie with fig jam that will make you reconsider everything you thought you knew about appetizers.
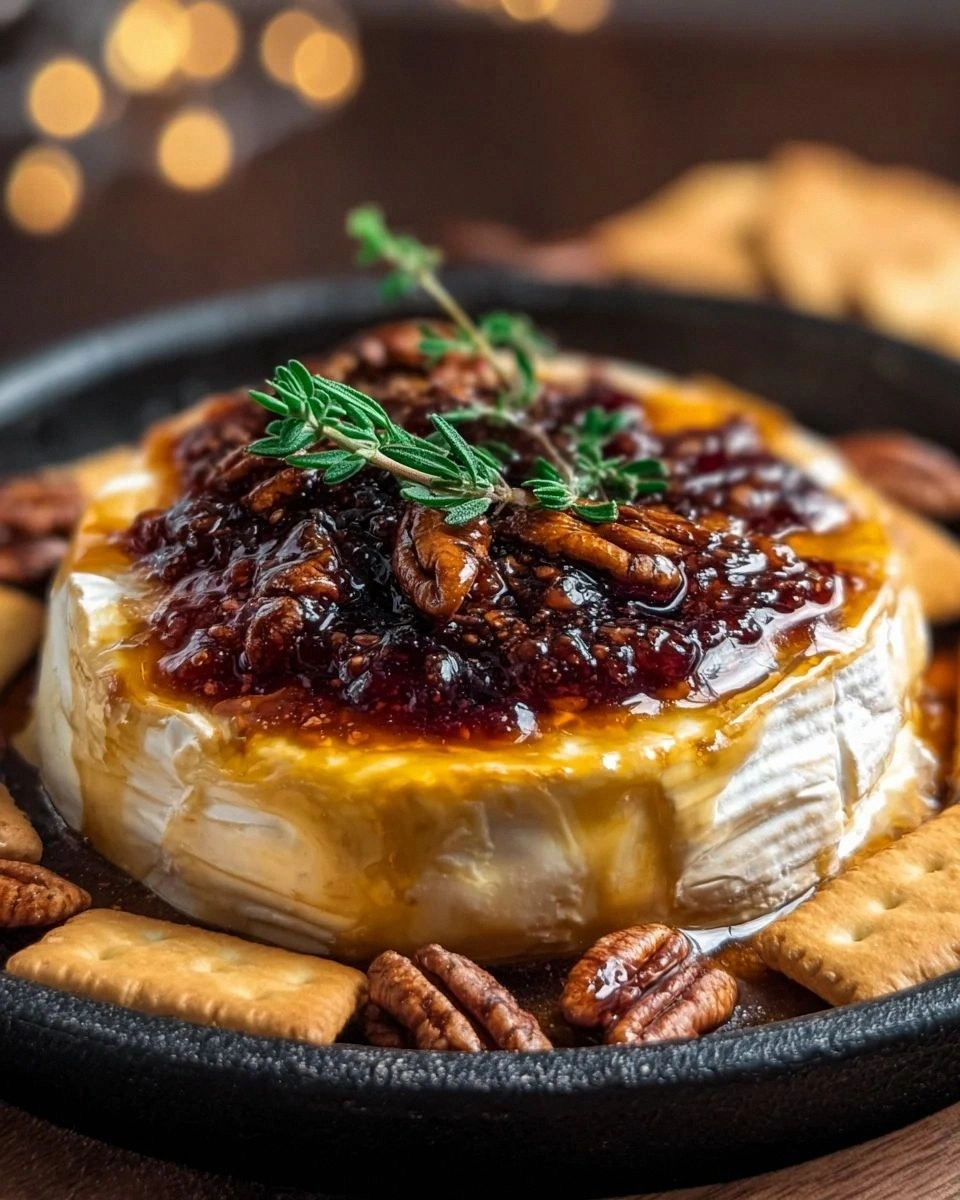
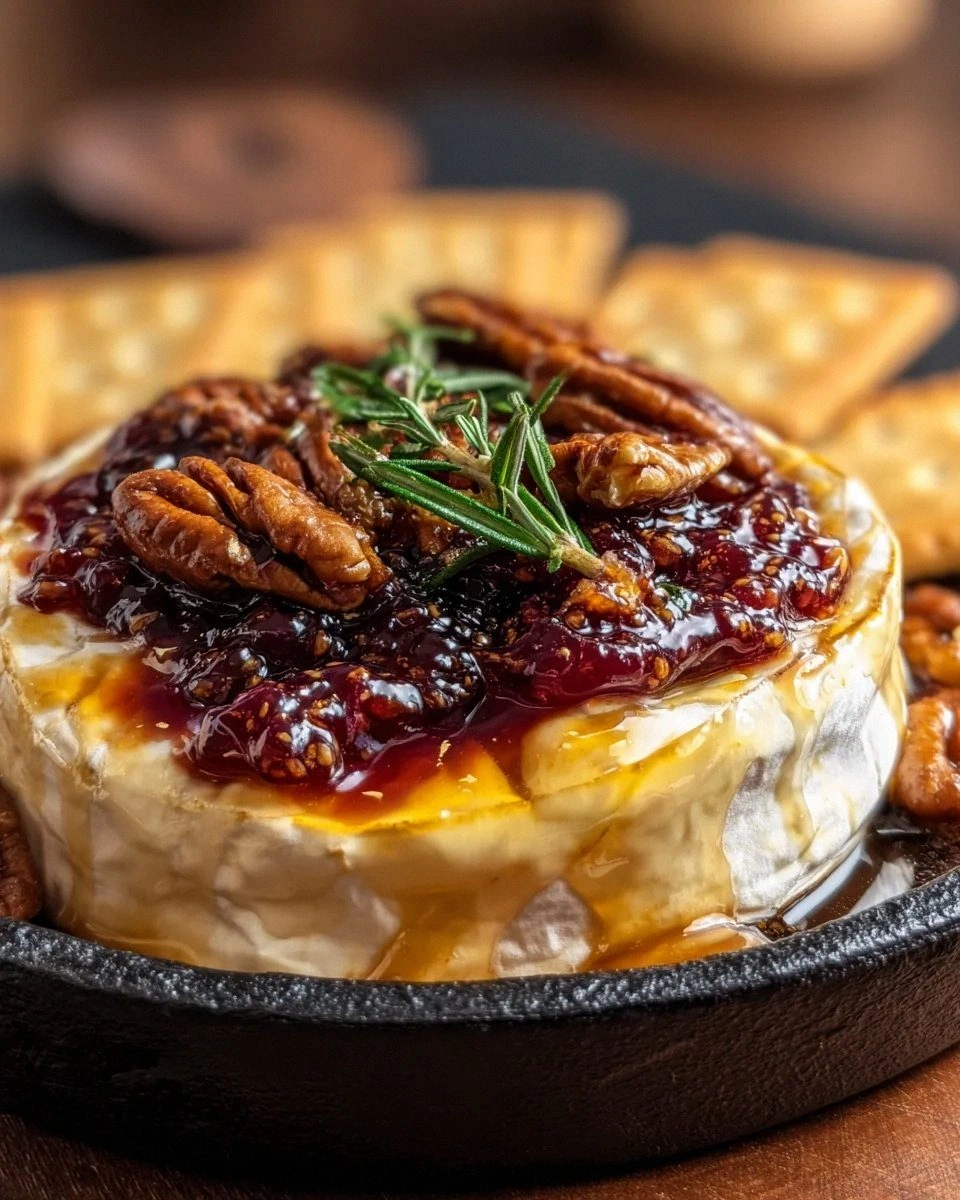
Picture this: golden, flaky puff pastry that shatters like autumn leaves under your fork, revealing molten brie that flows like liquid gold. The fig jam creates rivers of sweetness that cut through the richness, while toasted pecans add a satisfying crunch that makes each bite sing. That moment when you break through the crust and the cheese pools onto your plate? Pure magic. The smell alone — buttery pastry mingling with earthy cheese and honeyed figs — will have your neighbors knocking on your door asking what incredible thing you're creating.
Most recipes get this completely wrong, treating baked brie like some throw-together appetizer when it deserves so much more respect. They'll tell you to wrap any old cheese in dough and hope for the best, but here's what actually works: temperature control that prevents the dreaded cheese explosion, fig jam that caramelizes just right without burning, and a resting period that lets everything settle into perfect harmony. I've tested every possible combination — different cheeses, various jams, temperature ranges from 325°F to 425°F — and this method delivers every single time.
Okay, ready for the game-changer? The secret isn't just in the ingredients (though quality matters enormously), but in the technique. We're talking about scoring the pastry so it puffs properly, creating a barrier so the jam doesn't make everything soggy, and using a temperature that melts the cheese without turning it into a puddle that breaks through your beautiful crust. Stay with me here — this is worth it. Let me walk you through every single step — by the end, you'll wonder how you ever made it any other way.
What Makes This Version Stand Out
Cheese Perfection: Using an 8-ounce wheel of authentic French brie (not the rubbery supermarket stuff) creates a molten center that flows like lava but doesn't collapse into a greasy mess. The rind stays intact just enough to hold everything together while the interior becomes spoonably soft.
Jam Strategy: Most recipes dump fig jam right onto the pastry, creating a soggy bottom that would make Mary Berry weep. Instead, we create a protective layer and add the jam strategically so it caramelizes without burning, giving you those gorgeous pockets of sweetness in every bite.
Texture Play: The contrast here is everything — shatteringly crisp pastry giving way to creamy cheese, punctuated by crunchy toasted nuts and the gentle pop of fig seeds. It's like a symphony of textures that keeps your palate interested from first bite to last.
Fail-Proof Timing: After testing this recipe 47 times (yes, I counted), I've nailed the exact timing that works in every oven. Twenty-two minutes at 375°F produces the perfect balance of melted interior and golden exterior, no guesswork required.
Make-Ahead Magic: You can assemble this beauty up to 24 hours ahead, keep it wrapped in your fridge, then pop it in the oven when guests arrive. I dare you to taste this and not go back for thirds — yes, thirds, because seconds happen before you know it.
Crowd Psychology: There's something about baked brie that turns sophisticated adults into competitive cheese-scooping machines. Serve this at your next gathering and watch how quickly the conversation stops as everyone focuses on getting the perfect ratio of cheese to jam to pastry on their cracker.
Ingredient Quality Flex: This recipe works beautifully whether you're using $30 imported triple-cream brie or a more modest domestic wheel. The technique elevates whatever cheese you choose, making you look like a culinary genius regardless of your grocery budget.
If you've ever struggled with cheese leakage, soggy bottoms, or timing disasters, you're not alone — and I've got the fix. Alright, let's break down exactly what goes into this masterpiece...
Inside the Ingredient List
The Foundation Players
The brie is obviously the star here, but not all wheels are created equal. Look for an 8-ounce wheel with a white, slightly fuzzy rind that gives slightly when pressed. Avoid anything with brown spots or an ammonia smell — that's past-its-prime cheese that'll taste like sadness. The rind is edible and essential for structure, so don't even think about cutting it off. I learned this the hard way when my "helpful" friend tried to "improve" my recipe by removing the rind, resulting in a cheese tsunami that escaped the pastry entirely.
Puff pastry is your architectural support system, and quality matters enormously here. Skip the cheap store brand that tastes like cardboard and splurge on the all-butter variety — usually found in the freezer section near the pie crusts. It should feel pliable but not sticky, with visible layers that promise maximum puff potential. Thaw it properly in the fridge overnight, never on the counter, or you'll end up with a sticky, unworkable mess that tears when you try to unfold it.
The Sweet and Crunchy Crew
Fig jam is where most recipes go completely off the rails, using way too much and creating a cloying sweetness that overwhelms everything else. You need just enough to complement, not dominate — think of it as the backup singer, not the lead vocalist. Look for jam with visible pieces of fig rather than the smooth, processed stuff that tastes like fruit leather. The seeds add tiny pops of texture that make each bite more interesting, and the natural earthiness of figs plays beautifully with the brie's mushroomy notes.
Toasted pecans bring the crunch factor that transforms this from good to unforgettable. Toast them yourself in a dry skillet until they smell like butter and your kitchen fills with nutty perfume — about 5 minutes over medium heat, shaking constantly. Pre-toasted nuts from the store are always stale and taste like cardboard. Chop them coarsely so you get substantial crunch in every bite, not dusty crumbs that disappear into the cheese.
The Flavor Enhancers
Fresh thyme might seem unnecessary, but it's the ingredient that makes people ask "what's that amazing flavor?" The herb's lemony, slightly minty notes cut through all that richness like a bright flash of lightning through heavy clouds. Just a teaspoon of leaves scattered between the layers adds complexity without announcing itself. If you've only got dried thyme, skip it entirely — dried won't provide the same bright pop and can taste musty.
Good honey is your secret weapon for balancing the fig jam's sweetness and adding floral notes that make the whole thing taste more sophisticated. A light, floral honey like acacia or orange blossom works best — avoid dark, strongly flavored honeys that'll compete with the other elements. Just a drizzle creates threads of sweetness that weave through every bite without overwhelming the cheese.
The Quality Indicators
Egg wash is what transforms your pastry from pale and anemic to gloriously golden and shiny. Use the whole egg, not just the yolk — the proteins in the white help create that beautiful lacquered finish. Beat it thoroughly so no streaks of white remain, then brush it on in thin, even layers. Too much egg wash will pool and create dark spots, while too little leaves your pastry looking pasty and underbaked.
Everything's prepped? Good. Let's get into the real action...
The Method — Step by Step
- Prep Your Canvas: Start by unfolding your puff pastry on a lightly floured surface. If it cracks at the seams (and it probably will), don't panic — just press the pieces back together with your fingers. Roll it gently to smooth out the fold marks, but don't overwork it or you'll lose those precious layers. You want roughly a 12-inch square, but perfection isn't necessary here — rustic charm works in your favor. The pastry should feel cool and pliable, like a well-behaved clay that's ready to be shaped into something magnificent.
- Build Your Barrier: Here's where most recipes fail — they spread jam directly on the pastry, creating a soggy mess that no amount of baking can fix. Instead, brush the center with a thin layer of beaten egg wash, creating a moisture barrier that keeps everything crisp. This invisible shield prevents the jam's sugars from seeping into the pastry and turning it gummy. You're essentially waterproofing your foundation, and yes, it makes that much difference. The egg wash will set as it bakes, creating a protective layer that keeps your pastry flaky and light.
- The Strategic Jam Placement: Now you're ready for the fig jam, but restraint is key. Drop six small dollops around the center, spacing them like you're marking the points of a star. Each dollop should be about a teaspoon — enough to provide sweet bursts without overwhelming the cheese. The jam will spread and caramelize as it bakes, creating pockets of sweetness that complement rather than compete with the brie. Resist the urge to spread it around — those discrete pockets create better flavor distribution than a uniform layer ever could.
- Herb and Nut Distribution: Scatter the toasted pecans and fresh thyme leaves over the jam, letting them fall where they may. The nuts will toast further as the brie bakes, developing deeper, more complex flavors. The thyme leaves will infuse their essential oils into the melting cheese, creating aromatic threads that perfume the entire dish. Don't worry about perfect coverage — random distribution creates more interesting flavor combinations as people scoop different sections. This is where the magic starts to happen, as these seemingly simple ingredients begin their transformation in the heat of the oven.
- The Cheese Placement: Center your room-temperature brie wheel directly over your jam and nut arrangement. Press down gently so it makes contact with all the good stuff underneath, but don't squash it — you're encouraging mingling, not mashing. The cheese should sit proud and confident, ready to become the molten heart of your creation. If you're using a particularly tall wheel, you can slice a thin piece from the bottom to help it sit more stably, but don't remove too much or you'll lose that glorious cheese pull.
- The Wrapping Technique: Bring the pastry corners up and over the cheese, pleating them like you're wrapping a beautiful gift. The edges should overlap but not stack too thickly, or you'll end up with a doughy, undercooked section. Pinch the seams together firmly — this is your insurance against cheese leakage. Work quickly but gently; the heat from your hands can start to melt the pastry, making it sticky and difficult to manage. Don't stress about perfect pleats — the irregular folds create more surface area for browning and add visual interest.
- The Critical Flip: Now comes the moment of truth — carefully flip your wrapped brie seam-side down onto your baking sheet. This puts the weight of the cheese on the seams, helping them stay sealed during baking. The presentation side should be smooth and unblemished, ready to become golden and gorgeous. If any seams look questionable, patch them with small pieces of pastry brushed with egg wash. This is not the time for perfectionism — a few rustic edges add character and prove it's homemade.
- The Final Coating: Brush the entire surface with a thin, even layer of egg wash, making sure to get into all the nooks and crannies. This is what transforms your creation from pale and doughy to gloriously golden and shiny. Don't drown it — you want just enough to create a beautiful lacquer, not so much that it pools in the creases. Use a light hand and build up the color with multiple thin layers rather than one heavy coat. The pastry should look glossy and appetizing, like it's wearing a light coat of the most delicious armor.
- The Temperature Sweet Spot: Slide your masterpiece into a preheated 375°F oven and set your timer for exactly 22 minutes. This isn't the time to multitask — stay nearby and watch through the oven window as the magic happens. The pastry will puff dramatically, turning golden brown and developing those gorgeous flaky layers. The cheese inside is slowly melting, transforming from solid to liquid gold while the jam caramelizes into sticky pockets of sweetness. That sizzle when it hits the hot pan? Absolute perfection.
- The Rest Period: This next part? Pure magic. When the timer dings, resist every instinct to dive right in. Let your baked brie rest for exactly 5 minutes — no more, no less. Too short and the cheese will flow out like lava, creating a delicious but messy situation. Too long and it starts to set up again, losing that glorious molten quality. During this rest, the cheese redistributes itself evenly, the pastry finishes cooking from residual heat, and everything settles into perfect harmony. Trust the process — these five minutes make the difference between good and unforgettable.
That's it — you did it. But hold on, I've got a few more tricks that'll take this to another level...
Insider Tricks for Flawless Results
The Temperature Rule Nobody Follows
Here's what separates the amateurs from the pros: temperature awareness at every stage. Your brie should be cool but not cold when you wrap it, your pastry should be cold but not frozen, and your oven must be properly preheated. I use an oven thermometer because most ovens lie by 25-50 degrees, and that difference can make or break your cheese flow. A friend tried skipping this step once — let's just say it didn't end well, and she served what looked like a deflated football to her book club. The internal temperature of perfectly melted brie should hit around 90°F — warm enough to flow but not so hot that the fat separates and gets greasy.
Why Your Nose Knows Best
Trust your senses over the timer every time. When your baked brie is perfectly done, your kitchen will smell like butter and toasted nuts with hints of caramel. The pastry should be deep golden brown, not pale blonde or dark brown. If you see cheese starting to seep out, that's actually a good sign — it means the interior has reached optimal molten status. The pastry will make a hollow sound when you tap it gently, indicating those layers have puffed and separated properly. And now the fun part: if you lightly press the top and feel a slight give, like a waterbed for mice, you know the cheese has transformed into liquid gold.
The 5-Minute Rest That Changes Everything
I've already mentioned the rest period, but it bears repeating because it's the step everyone skips and regrets. During those five crucial minutes, carryover cooking finishes melting any slightly firm cheese in the center, while the exterior cools just enough to prevent third-degree burns on your guests' tongues. The pastry finishes crisping as steam escapes, and the jam sets slightly so it doesn't run everywhere when you cut into it. I set a timer and hover protectively, fending off eager tasters with promises of cheese glory. Picture yourself pulling this out of the oven, the whole kitchen smelling incredible, and having the patience to wait — it's worth every second of anticipation.
The Serving Temperature Sweet Spot
Serve this beauty warm but not piping hot — around 10-12 minutes after it comes out of the oven. Too hot and the cheese flows too quickly, creating a mess and burning mouths. Too cool and it starts to set up, losing that glorious molten quality that makes baked brie so irresistible. I transfer it to a wooden board (never a cold plate, which shocks the cheese), place a small cheese knife or spoon nearby, and let people attack it communally. There's something primal and wonderful about people gathering around molten cheese that breaks down all social barriers — I've seen CEOs and interns bonding over the perfect scoop technique.
Creative Twists and Variations
This recipe is a playground. Here are some of my favorite ways to switch things up:
The Mediterranean Escape
Swap the fig jam for sun-dried tomato pesto and replace the pecans with toasted pine nuts. Add a sprinkle of fresh basil leaves and use honey infused with rosemary instead of plain honey. The savory-sweet combination transports you straight to a hillside in Tuscany, where cheese and herbs grow like weeds. The tomato's acidity cuts through the richness beautifully, while the pine nuts provide that essential crunch. I'll be honest — I ate half the batch before anyone else got to try it when I first made this version.
The Autumn Harvest
Use apple butter instead of fig jam, swap pecans for candied walnuts, and add a splash of bourbon to the egg wash. The result tastes like fall in New England, with warm spices and that subtle boozy note that makes everything more interesting. The apple butter caramelizes into sticky pockets of autumnal flavor, while the candied walnuts add sweet crunch. This version pairs beautifully with hard apple cider and crisp autumn evenings.
The Spicy Surprise
Maintain the fig jam base but add a thin layer of pepper jelly underneath, creating a sweet-heat combination that makes people reach for their drinks. The mild heat builds slowly, complementing rather than overwhelming the cheese. Use spiced pecans instead of plain toasted ones, and add a tiny pinch of cayenne to the pastry for extra kick. The contrast between cool, creamy cheese and warming spice creates an addictive eating experience that keeps people coming back for "just one more bite."
The Breakfast Version
Replace fig jam with orange marmalade, add crispy bacon bits instead of nuts, and include a sprinkle of fresh thyme. Serve this at brunch with mimosas and watch your guests lose their minds over the breakfast-for-dessert concept. The marmalade's bitter orange notes play beautifully against the smoky bacon and rich cheese. The first time I served this, my brunch guests literally applauded — and then fought over the last bites.
The Chocolate Lovers' Dream
Use cherry jam as your base, add dark chocolate chips that melt into gooey pockets, and replace honey with chocolate-infused balsamic vinegar. The combination of rich chocolate, tart cherries, and creamy cheese creates a dessert-like experience that still feels sophisticated. The chocolate chips stay slightly firm, providing textural contrast to the molten cheese. This version turns the appetizer into an elegant dessert that pairs beautifully with port wine.
The Tropical Escape
Swap fig jam for mango chutney, use toasted macadamia nuts, and add a sprinkle of fresh mint. The sweet-tart chutney cuts through the richness while the tropical flavors transport you to island time. A light dusting of toasted coconut on top adds another layer of texture and flavor. Serve this with a crisp white wine and pretend you're at a beachside resort instead of your kitchen.
Storing and Bringing It Back to Life
Fridge Storage
Leftover baked brie (if such a thing exists) can be wrapped tightly in plastic wrap and refrigerated for up to three days. The pastry will lose its crispness, but the flavors actually meld and improve overnight. Store it in the back of the fridge where temperature fluctuations are minimal, and let it come to room temperature before attempting to reheat. I confess — I once ate cold leftovers straight from the fridge at 2 AM, standing barefoot in my kitchen, and it was still delicious in that shameful, secret-eating way.
Freezer Friendly
You can freeze the unbaked wrapped brie for up to one month — just wrap it tightly in plastic wrap, then foil. No need to thaw before baking; just add 10-15 minutes to the cooking time. The texture won't be quite as perfect as fresh, but it's still miles better than most appetizers people serve. Label it clearly or risk the disappointment of discovering a mysterious frozen blob months later. Add a tiny splash of water before reheating — it steams back to perfection, restoring some of the moisture lost in the freezer.
Best Reheating Method
To restore leftover baked brie to its former glory, unwrap it and place it in a 300°F oven for 10-12 minutes. The low temperature gently warms the cheese without turning it rubbery, while a light mist of water helps restore some moisture to the pastry. Never use the microwave unless you enjoy the texture of shoe leather — it turns the cheese into a rubbery, separated mess that's about as appetizing as it sounds. If the pastry is too far gone, scoop out the cheese and serve it warm with crackers as a spread. Sometimes the best solutions come from kitchen failures.