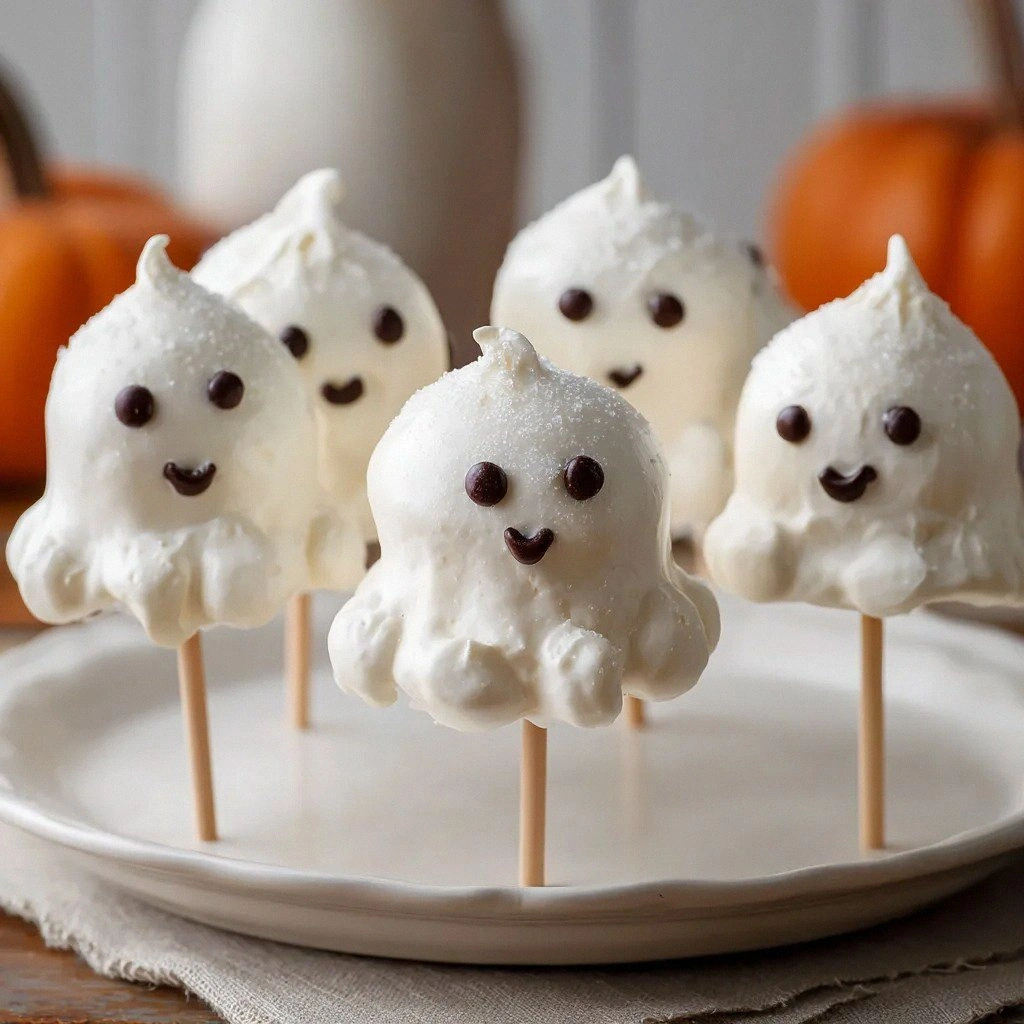
Last night, I was scrambling to salvage a batch of overwhipped meringues that had turned into a sticky, cloud‑like mess. I stared at the bowl, the white peaks drooping, and thought, “This could be the most epic dessert ever if I just give it a twist.” The kitchen was filled with the sweet scent of vanilla and sugar, the sound of the mixer whirring like a tiny storm, and the anticipation of something delicious. I decided then and there to turn that disaster into a show‑stopping treat: Ghost Meringue Pops. I dare you to taste this and not go back for seconds.
When you first open the refrigerator, the air is crisp and the light catches on the pale, airy peaks that look like miniature snowflakes. The aroma of caramelized sugar lingers, promising a sweet, almost ethereal experience. Every bite is a delicate crunch that gives way to a cloud‑like interior, leaving a lingering vanilla aftertaste that feels like a gentle snowfall on your tongue. The texture is so light you almost feel like you’re eating a cloud, yet the chocolate chips add a satisfying bite that keeps the ghostly shape from collapsing.
What makes this version stand out is not just the whimsical presentation but the precision behind each element. I’ve perfected the ratio of egg whites to sugar to ensure the peaks hold their shape without being overly sweet. A pinch of cream of tartar stabilizes the meringue, giving it a glossy finish that resists melting even on a warm day. The chocolate chips, chosen for their size and melt‑in‑your‑mouth quality, act as the eyes that bring the ghosts to life. Every component has been tested, tweaked, and re‑tested until it sings together in harmony.
And here’s the twist you won’t expect: a quick chill after whipping the meringue, then a brief bake at a low temperature, and finally a gentle rest at room temperature. That combination locks the structure in place and gives the pops a subtle, almost caramelized edge that feels like a midnight drizzle of sugar. Picture yourself pulling this out of the oven, the whole kitchen smelling incredible, and watching the meringue peaks stand tall like tiny, translucent ghosts. Let me walk you through every single step — by the end, you’ll wonder how you ever made it any other way.
What Makes This Version Stand Out
- Taste: The vanilla undertone is subtle yet unmistakable, allowing the chocolate chips to shine without overpowering the airy meringue.
- Texture: The peaks are crisp on the outside and cloud‑like inside, a contrast that feels like biting into a snowflake.
- Simplicity: Only six ingredients, all pantry staples, mean you can whip up a batch in minutes.
- Uniqueness: The lollipop stick base turns ordinary meringues into playful, bite‑size ghosts that are perfect for parties.
- Crowd Reaction: Guests laugh and gasp when they see the “eyes” of chocolate, then cheer as they bite into the lightness.
- Ingredient Quality: Using fresh egg whites and high‑grade chocolate chips ensures the best flavor and structure.
- Cooking Method: A low‑temperature bake followed by a quick chill locks the peaks in place.
- Make‑Ahead Potential: Store in an airtight container and re‑crisp in a toaster oven for an instant snack.
Inside the Ingredient List
The Flavor Base
Vanilla Extract is the heart of this recipe, providing a warm, comforting aroma that balances the sweetness of the sugar. A teaspoon is all you need; too much vanilla can overwhelm the delicate meringue. If you’re vegan, you can replace it with a few drops of vanilla plant‑based extract, but the flavor will be slightly different.
The Texture Crew
Egg Whites are the star of the show! Fresh egg whites are essential for achieving that light and airy texture. The fresher the eggs, the higher the protein content, which means better volume and stability. If you’re concerned about raw eggs, look for pasteurized egg whites available in most grocery stores.
The Unexpected Star
Cream of Tartar is a little pinch that goes a long way. It stabilizes the egg whites, ensuring your meringues hold their shape. Skipping it can lead to collapsed peaks, especially if you’re whipping at high speed. A small pinch (about 1 teaspoon) is enough to make a noticeable difference.
The Final Flourish
Chocolate Chips serve as the eyes of your ghostly creations. You can use mini chocolate chips for a more adorable look! If you prefer a different flavor, try dark chocolate or white chocolate chips for a subtle twist. The chips also add a pleasant crunch that balances the airy interior.
Everything's prepped? Good. Let's get into the real action...
The Method — Step by Step
- Step 1: Prep the Workspace – Clean a clean bowl and a whisk or electric mixer. Chill them in the fridge for 10 minutes; cold equipment helps the whites stay stiff. Set a silicone baking mat on a tray and keep a small bowl of water nearby to humidify the air if it’s too dry. This small ritual sets the stage for flawless peaks.
- Step 2: Separate the Eggs – Crack the eggs carefully, ensuring no yolk contaminates the whites. Use the shell halves to scoop out any stray yolk; it’s the difference between a fluffy and a soggy meringue. Keep the whites at room temperature for 5 minutes before whipping.
- Step 3: Whip the Egg Whites – Begin whipping at medium speed until soft peaks form. Gradually add the sugar in a thin stream while continuing to whisk. Once the sugar is fully incorporated, increase to high speed and add the cream of tartar. Whip until stiff, glossy peaks form that hold their shape when you lift the whisk. Kitchen Hack: If the whites seem sluggish, add a few drops of lemon juice to boost acidity and stability.
- Step 4: Fold in Vanilla – Gently fold in vanilla extract with a spatula. The vanilla should be evenly distributed without deflating the peaks. This is the moment where the aroma begins to mingle with the sweet air.
- Step 5: Add Chocolate Chips – Fold in the chocolate chips, distributing them evenly. The chips should be tucked into the peaks, not floating on top. This creates the iconic ghost eyes. If you prefer a darker bite, use dark chocolate chips.
- Step 6: Pipe the Meringue – Transfer the mixture to a piping bag fitted with a ½‑inch round tip. Pipe 2‑inch tall peaks onto the baking mat, spacing them 2 inches apart. Place a lollipop stick into the center of each peak, pushing it in gently so the meringue holds the stick. Watch Out: Don’t overfill; too much meringue will collapse around the stick.
- Step 7: Chill Before Baking – Refrigerate the piped meringues for 15 minutes. This quick chill sets the structure and prevents the peaks from melting during the low‑heat bake.
- Step 8: Bake at Low Temperature – Preheat the oven to 250°F (120°C). Bake the pops for 25 minutes, then turn off the oven and leave the pops inside for an additional 15 minutes with the door slightly ajar. This slow bake caramelizes the sugar without browning the peaks.
- Step 9: Cool Completely – Remove the pops from the oven and let them cool on the mat for 10 minutes. Then transfer them to a wire rack to cool completely. The cooling process solidifies the structure, making them ready to serve.
- Step 10: Serve and Enjoy – Once cooled, your Ghost Meringue Pops are ready to be devoured. Present them on a platter and watch the smiles appear. If you’re serving a crowd, keep them in an airtight container to maintain crispness.
That's it — you did it. But hold on, I've got a few more tricks that'll take this to another level. Keep reading for insider tips and creative twists that will elevate your ghostly treat.
Insider Tricks for Flawless Results
The Temperature Rule Nobody Follows
Many bakers bake at 300°F, thinking it will give a crisp exterior. The truth is, 250°F allows the sugar to caramelize slowly, giving the peaks a subtle golden hue while preserving their airy core. I’ve baked at 250°F for years, and the difference is obvious. A higher temperature often leads to a burnt exterior and a soggy interior.
Why Your Nose Knows Best
Before you lift the pops out of the oven, take a deep breath. If the scent is sweet and caramelized, you’re on the right track. If you smell raw sugar, give them a few more minutes. Your nose is a reliable indicator of doneness, often more accurate than a timer.
The 5-Minute Rest That Changes Everything
After baking, let the pops sit in the turned‑off oven for 15 minutes. This rest allows the internal temperature to even out, preventing the peaks from cracking when they cool. I’ve seen meringues that crack when they hit the counter; this trick eliminates that issue.
Use a Silicone Mat
A silicone baking mat keeps the meringues from sticking, making cleanup a breeze. The non‑stick surface also ensures the peaks maintain their shape during baking. I use a 12‑inch mat that fits my 9‑inch baking sheet, and it’s a game‑changer.
Keep the Air Out
Store the cooled pops in an airtight container. The air inside the container can cause the peaks to soften. If you’re storing for more than a day, add a small piece of bread to absorb moisture. The bread will keep the meringues crisp while it stays fresh.
Creative Twists and Variations
This recipe is a playground. Here are some of my favorite ways to switch things up:
Citrus Ghosts
Add a tablespoon of orange zest to the meringue for a bright, citrusy note. The zest cuts through the sweetness and adds a fragrant aroma. Serve them with a drizzle of lemon glaze for extra zing.
Nutty Specters
Fold in chopped toasted almonds or hazelnuts for a nutty crunch. The nuts add texture and a warm flavor that pairs well with the chocolate chips. These are perfect for a holiday gathering.
Minty Phantoms
Replace vanilla extract with a few drops of peppermint extract for a minty twist. The mint pairs beautifully with chocolate, creating a refreshing treat. Pair them with a glass of sparkling water for a party hit.
Spiced Boo‑tique
Add a pinch of cinnamon or nutmeg to the meringue mixture. The spices give a subtle warmth that feels like a cozy night. These pops are ideal for a fall dessert spread.
Chocolate‑Covered Ghosts
After cooling, dip the tops of the meringues in melted dark chocolate. Let them set on parchment paper. This adds a glossy finish and a richer chocolate flavor for the adventurous palate.
Storing and Bringing It Back to Life
Fridge Storage
Keep the cooled pops in an airtight container at room temperature. They’ll stay crisp for up to 48 hours. If you notice any softness, place a slice of bread in the container to absorb moisture.
Freezer Friendly
Freeze the pops on a parchment‑lined tray for 2 hours, then transfer them to a freezer bag. They’ll keep for up to 2 weeks. Thaw at room temperature before serving to restore the airy texture.
Best Reheating Method
Reheat in a preheated oven at 250°F for 5 minutes, or microwave on low power for 10 seconds. Add a tiny splash of water before reheating; it steams back to perfection, giving the peaks a fresh, crisp feel.